Simple Spider-Man Cookies
Not too long ago I took the kiddos to see The Amazing Spider-Man. Once upon a time I would have told you that I am NOT an action movie kind of girl. But that was before I discovered that these super hero character guys are SO DARN GOOD LOOKING!
Tobey Maguire didn’t quite do it for me, but Andrew Garfield? Well let me just say, I fell in love right along with Gwen Stacy.
Maybe it’s because I have I thing for nerds {especially brown-eyed ones}, but whatever it is, I had to come home and make cookies. The best part is my kiddos liked them as much I liked the new Peter Parker.
These cookies are easy enough for a beginner to make. All you need is:
- Red piping and flood icing {To make things even simpler, skip the red piping icing and outline with black}
- Black piping icing
- White 20-second icing
- Black food color marker {optional}
The cookie itself is simply a simple egg shape. If you don’t already have an egg cutter, you can find one HERE.
I should mention that there are about a million and one ways to approach this cookie design. This is my current preferred method. If you have a better idea then by all means, go for it! You’ll quickly learn that when it comes to cookie decorating, there’s more than one way to skin a rabbit.
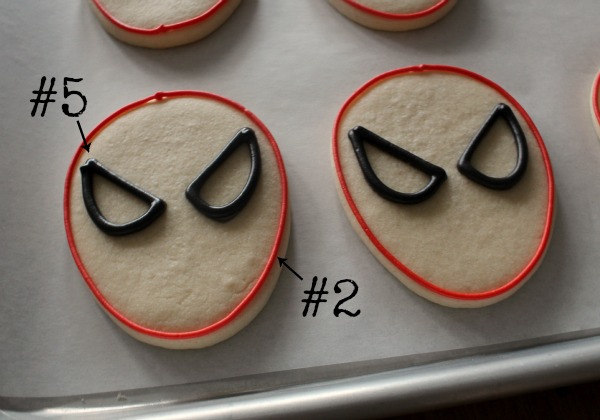
Begin by outlining the face and eyes. I used a #2 for the face, and a #5 for the eyes to create sure a heavy black line between the red and white icing.
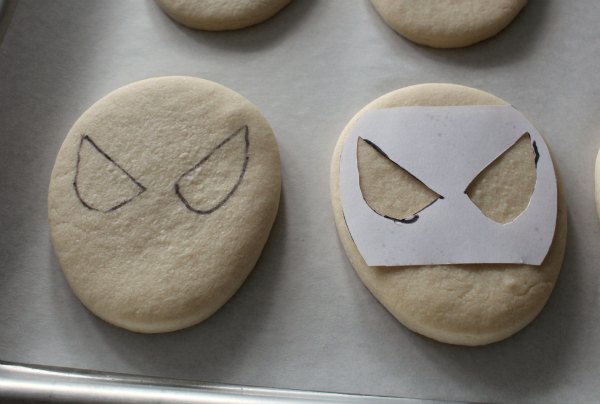
If you’re not comfortable free-handing the eyes try this little trick. Find Spider-man image online {make sure it’s about the size of the cookie} and use the image to make a stencil. I simply put a piece of paper against my laptop screen and trace rather than wasting printer ink. Once you’ve made a stencil, it’s as simple as tracing the eyes onto the cookie with a food-safe marker.
Whatever route you choose, strap on your Spidey sense because the next steps have to be done rather quickly. Once the cookie is outlined, flood the face with red icing.
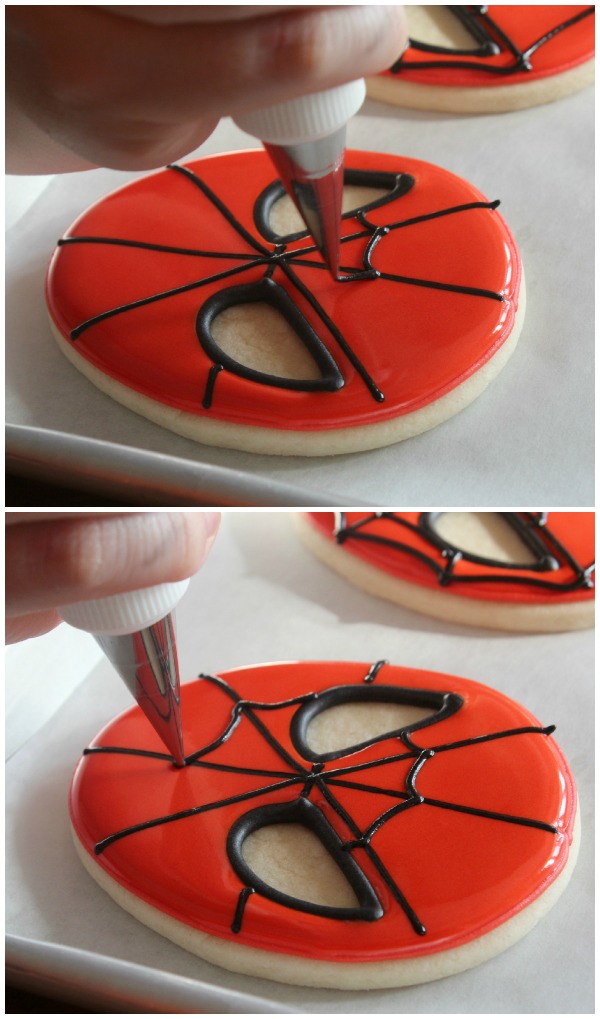
After the cookie is flooded immediately use black piping icing to create the web design. I like to break the cookie into sections by first dividing it into halves, then quarters, and finally eighths.
Once divided, finish up the web. The lines kind of remind me of childhood drawings of the ocean.
Go around the cookie, then do it a second time. Remember to move quickly.
See the curve? This really gives Spidey an authentic look.
After piping the web, let the cookie dry for a couple of hours.
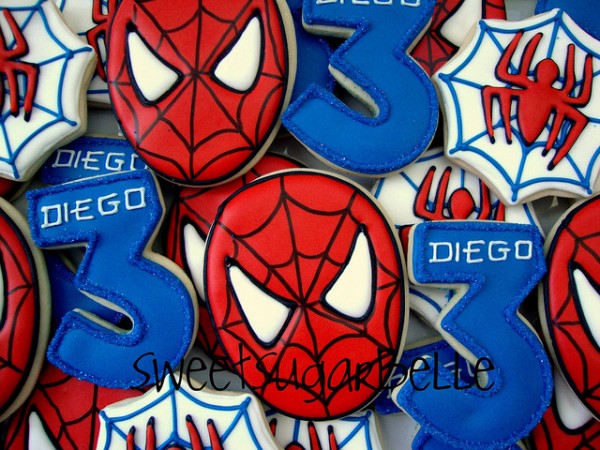
Finally, fill the eyes. If you’re worried about bleeding, let the cookie dry completely before moving on to this step and use an oscillating fan for drying.
If you really want to make things simple, you can skip the piping and draw the web on with a black food color marker after the red icing has dried.
I’ve done it this way many times and the final product is still a crowd pleaser.
If your kid has requested Spiderman cookies this year, consider yourself lucky. After all, there is nothing simpler than red and black icing and a few simple lines.
- For information on Spider-man fonts click HERE.
- For help with outlining and flooding, click HERE.
- For a Valentine’s Day version of Spidey click HERE.
- If you don’t like icky tasting red icing try Tulip Red, which you can read about HERE.
So girls {and boys}, enough about cookies. What I want to know is whether it’s Andrew or Tobey you’d like to swing by the next time you’re perched perilously on a random ledge in New York City. That’s What We Said has crowned Andrew king, but I still have to ask. So, tell me, tell me, tell me!
Hope everyone has a great weekend. Happy Baking!







Pingback: Valentine's Day Spiderman Cookies
Can you believe I’ve never made spider-man cookies?!! You make everything looks so easy and very professional.
I just found bunch of comments from you on the blog again in the blogger comment section not sure why it is not going to to disqus. I’ll just post my answer here, hope you don’t mind. Red beets and horseradish are a great flavor combination. You don’t taste much of the horseradish in my pickled beets, only if you ate horseradish on its own.
PS.: you double inspired me this week! I made your 3D Cookie Cupcake and I also used your chocolate chip cut out recipe. Thanks again. Both turned out great.
They look very cool! Oh, and I’m with you on this one – Andrew 🙂
Spiderman NEVER looked better! Cookies and Andrew! 😉
My boys would LOVE these and looks like something I could do! I made your Spiderman Heart Cookies a couple of years ago for Valentines day and they kids thought they were awesome!
these are great. and I agree, Toby was “cute” but I like the new Spidey much better! Thanks for popping by my 50th b’day cookies….and that tracing on the laptop screen is my way of doing lettering and everything. I have a pad of Vellum, and never print a thing, trace and into the KK!
These are so perfect!! I can see so many spiderman fans wanting this for their birthday!! 😀
these are awesome, I haven’t seen the new Spiderman, but i did enjoy Tobey in the first ones. However, I do find Andrew kind of sexy!
Awesome cookies! I have to go with Andrew over Tobey – it’s the hair for me, I think 🙂
I have to ask, I love the effect that royal icing has on cookies… but I hate the taste of royal icing when I make it. I’ve had cookies from a bakery that have the same effect that taste wonderful, but I hate the taste of home made icing (and I have tried many recipes.) Does anyone have any tips or the same problem?
I suggest flavoring it heavily. I think that’s the #1 mistake home bakers make when making royal icing…they neglect to flavor it, so it basically tastes like sweetened egg whites. Not always the best flavor. My suggestion is to use a combination of almond, butter, and vanilla extracts. Thats what I use and most people say it tastes like marshmallow a they’re eatin it with a spoon. If you still aren’t happy with the flavor, I recommend using corn syrup glaze. There are several great recipes online and it tastes WONDERFUL!
Thank you so much! That is probably my mistake, your combination sounds great! The cookies are adorable. I can’t wait to see the new Spiderman movie!
I love these! Just found out this summer that one of my little grand-nephews adores Spiderman. He’d love to have these 🙂
Every time I have extras I make some for the boys. You’d think I’d brought home a pony. They LOVE THEM!!!
WOW!!
I think that my son would love these cookies.
I’ll try to bake them… Love your blog, it’s so cute!
Xoxo from Spain
Raquel http://www.pequealamoda.com
Since I have one girly girl at home who is 8, I don’t get requests to go to the movie spider man – but sounds like it would be a nice visual for mom!! The cookies are fun, that is for sure – your red color just pops. As always, your posts make my life sweet.
Heavens, these are amazing! You’re the best cookie decorator ever! Just saying…
These look great! So simple but very, very effective. The red looks great. I add a little vanilla or different flavourings to my reds, more so that I usually would because it can taste a little bitter. I have 3 girly girls but they all love spider man so these would go down a storm!
Thanks so much for sharing. I’m with you on the action movies, the main attraction are the actors. I’m more of a Sly Stallone fan, maybe some day I’ll make “Expendables” cookies.
Your cookies rock!!
Too cool! My son just came home from school today and told me he wants Spiderman and Captain America cookies for his birthday. Thanks for this! 🙂
What size tip did you use for the web? These look awesome, and I am making something similar for a friend’s son’s birthday party. Any advice is appreciated, thank you!! I LOVE your website, you are truly talented.
I was wondering the same. My guess would be a 1 or 2. Making these for a birthday party, so far they look pretty good! 🙂
I’d like to make these as favors to my son’s birthday- do you think they would freeze well?
Andrew because Tobey is just not cute. Lol! This tutorial is awesome! Your pics are amazing!
Your blog is fantastic and so inspiring. Googling Spiderman cookies is what led me here and I made them the other day. Your instructions and photos were really helpful and I was pleased with the result (although not a patch on yours!). I look forward to trying out some more iced cookies.
Thanks for the tutorial. I tried it wet on wet but I think my black was too thin so it didn’t work so well. The template for the eyes is genius. Thank God for black edible markers because that’s what I’ll be using for the web.
What number applicator is used for the web piping?? also, wouldn’t it run into the red ‘flooding’ icing if not completely dry?
I use a #1.5-#2 for that size work. I don’t have bleeding issues. I think it’s because I use a fan and live in an extremely dry climate.
Where did you get the web cookie cutter from? Or what is it called
These are adorable! Do you have any tips for coloring the black icing? Which brand of food coloring do you use?
Pingback: Good Vs. Evil | Delish
Pingback: Fundraiser | Sugar and Spice: A Cookie Blog
Thank you so much for the tutorial. I was having the hardest time doing the web, and your instructions made it very simple to follow. I was adding too many lines, which makes it too busy, and your lines are spaced out perfectly. Thank you again,
Rachel (RDC)
How long can these be made ahead of time? My son’s bday is on Thursday but I’d like to make them this weekend.
What brand of edible marker do u use? And are they cookies able to be touched or bagged with the edible pen or does it smear? I just love your blog! You have the prettiest cookies! I wish mine turned out this perfect! Thank u for sharing all your tips, tricks, recipes, Etc with us!
Pingback: Galletas de Spiderman Paso a Paso - Pintando una mamá | Pintando una mamá
These are awesome!
I’m going to make them for my daughter’s birthday next month!
I just wanted to say thank you! I made these for nephew’s birthday and they were a huge hit! Your instructions were impeccable! Many thanks!
Could you please tell me what red and black food colourings you used as they actually look the colour they should be? I can’t seem to get my icings to look RED and BLACK they just look a deep pink and charcoal. Also where did you get your pastry cutter from? Loved your Spiderman biscuits I’ve just made an decorated some for my Grandson – though obviously they don’t look the right colours. But thanks for all your tips.
Did you use a piping bag?
thank you for the picture tutorial. I have the confidence to try and decorate this cookies.
Well, with the NEW Spider-Man movie out (Spider-Man: Homecoming), I was looking for inspiration for cookie gift favours. Lo and behold (and OF COURSE), you came to my rescue with this post (I know it’s an old one)! Since you make it look so easy-peasy (and I have your Shape Shifter set to use the egg shape cutter!), I’m making them for my soon-to-be-13-year-old son’s birthday (regardless that he says he’s too old for them). I, also, was for Andrew but I have now moved onto to Tom (Holland). I know he’s a young’un but he’s a cutie and I like him as a person outside of the industry. If you haven’t seen the new one, you should!
gah! these are exactly what i needed for inspiration for favors for my son’s 4th birthday party! i have such a hard time making the icing look red though. it always turns out orange or salmon colored, even with adding a touch of brown. I’ve tried americolor super red, tulip red, all the reds… it is my everest! thanks for the easy and fun tutorial!