Simple Tangled Cookies {Pascal}
A couple of years before I decided to brave the Internet I was one of those home baker gals. Basically, I baked and decorated a gazillion cookies each and every week. The majority of those cookies were for birthday parties, which almost always meant character cookies. Back then, I spent a lot of time trying to make cookies that EXACTLY matched the theme I was given. Talk about stressful!
I don’t know if it’s because I actually have time to sleep now, but these days I live by a new, smarter rule. Somewhere along the way I learned that cookies didn’t have to perfectly match the party set to be beautiful. Now, I am passing that wisdom onto you. Over the next few months I will be sharing several ideas for simplifying popular party cookies. I am super excited about it, and I hope you are too.
At the risk of being repetitious, I’m still on the subject of Tangled, but these were so simple it wouldn’t be fair to keep them to myself.
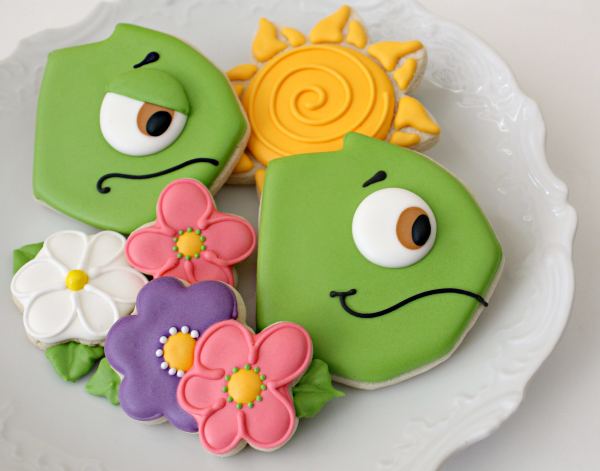 When I made Tangled cookies for my little one’s birthday, I skipped almost all the characters with the exception of Pascal, who looked pretty manageable. He ended up being so easy that the tutorial I made for him was all of two photos long.
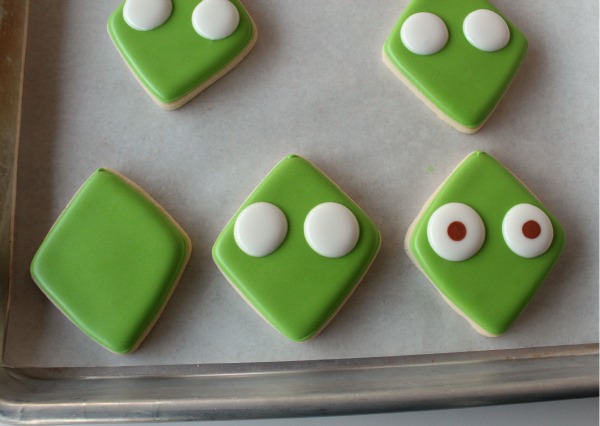 I used a simple square cutter squished to a diamond, outlined, filled, then added eyes and a few details…easy breezy.
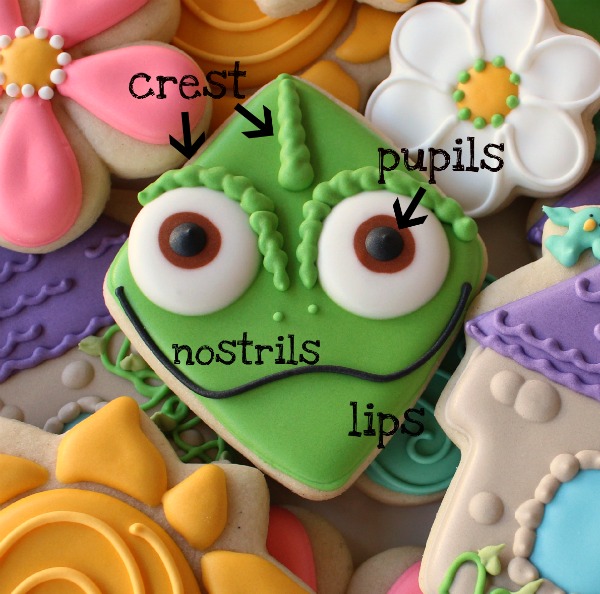 Then, a few weeks after my daughter’s party, I ran across these adorable Pascal party blowers on Disney Family.com and instantly saw cookies. The best part is that this idea is even cuter and easier than the first!
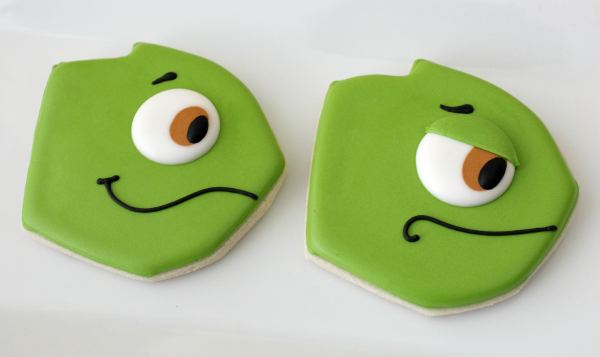
It all started with a barn cutter, which you can get here. With a tiny bit of trimming it worked perfectly for what I had in mind.
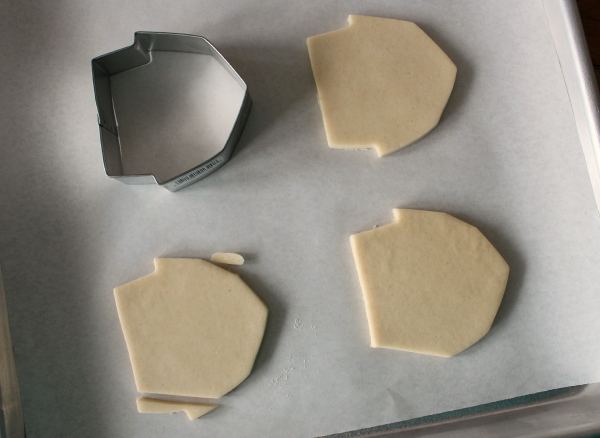 If you’d like to make these cookies you will need:
- green piping and flood icing
- a small amount of brown and white 20-second icing
- black flood and piping icing
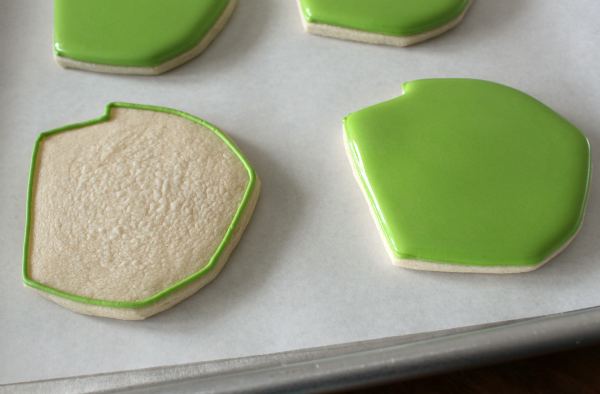
Begin by outlining and filling the cookie, then wait until they are completely dry.
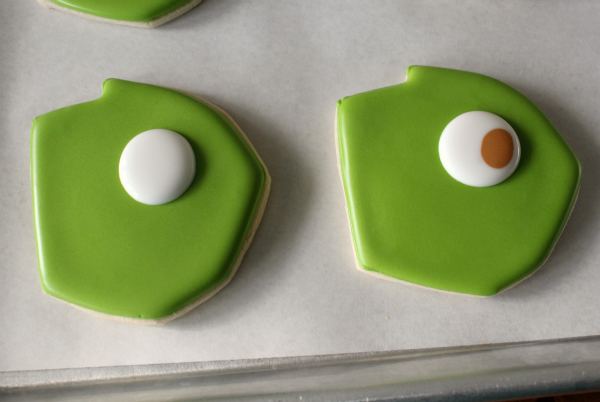
 When the base is dry, use white 20-second icing to add eyes, then quickly us brown icing and add an iris to the wet white icing. {FYI, this is called the wet-on-wet technique}
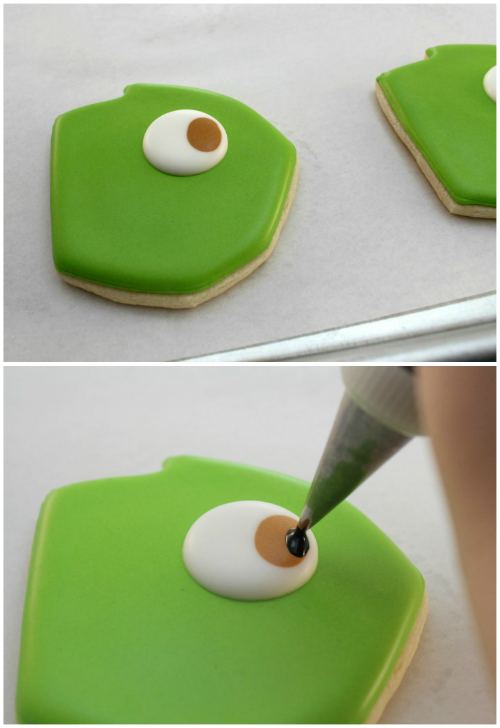
 At this point, wait until the eyes are completely dry {down time is great for doing other party prep} then use the black 20-second icing to make pupils.
 Finally, use a #1.5 tip to add a mouth and eyebrows {use the party blowers for reference}. If you’re going for the unamused look, eyelids are a great touch.
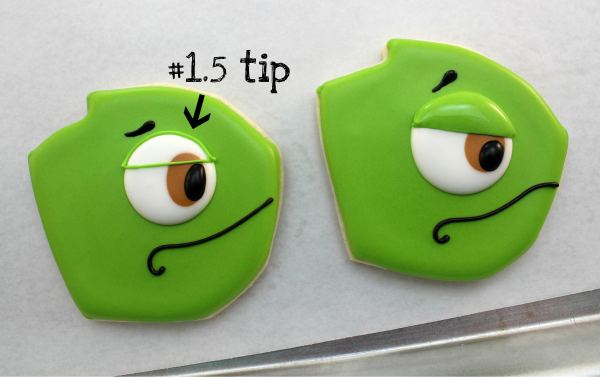 Tada! Cute, quick, easy, and a perfect match! I hope I’ve saved you some cookie decorating stress.
 Repeat after me. Cookies don’t have to be stressful to be amazing. This is our new mantra. No matter what the theme, you CAN make cute cookies.
I have several cookie ideas ready to go, but I’m also up for suggestions. If you have a theme that’s got you stumped, let me know, I’ll see what I can come up with.
Have a wonderful weekend everyone!


So cute! I love his “unamused look” =)
I love this! You are amazing at characters! I’m completely lost with new Disney’s characters… I have to ask my nieces and be a cool Auntie COOKIE…
genius as always.
This makes me want to have another tangled party!!
you are so creative
I can’t wait to see what you come up with next! I’m anxious to try out all of your Tangled cookies! I even have a barn cutter:) Thanks so much, Callye!
OMG! you really have a lot of imagination using cutters… So perfect!
Thank you very much for sharing this wisdom and the imagination. I am not able to use the glaze, I am a terrible mess, but love their work.
I love the mantra. I’ve been practicing Yoga for 20 years and even today I hard work controlling my nerves and my stress.
Huge greetings and happy weekend
This is marvelous!!!! I love your idea about not staying up three nights in a row crying because I am stressing over 20 Little Mermaid cookies! Thank you for your brilliance!!! Only YOU would make Pascal with a barn cutter! He is amazing:)
so cute, I love how easy you make it all look.
Oh my goodness, these are so cute!!
I always tell people that either I don’t do characters or will do a “version” of a character….so this series will be especially interesting to me!
Thank, Callye!
Seriously, you AMAZE me. I can’t ever figure out how you’re so talented (do you drink special water??). 🙂
Also, I live in a really rural area that won’t stock any of these cookie decorating supplies. Is there an online source you use for supplies that you’ve been really impressed with? I’d appreciate any suggestions you might have. Keep up the great work!
Oh….Callye…I have “princess and the frog” in two weeks…..so “hop” to it!!!!
Love it! I’m excited to see more simple party cookies 🙂
Hi Calleye, these cookies are so cute! You make it look so easy. Thank you so much for your generous sharing. I want to make some cookies for teacher appreciation week. My daughter is in 6th grade and she has 4 teachers which I’d like to make different themes for. The subjects are Math, Science, P.E. and Language Arts/Social Studies. Any ideas?
These are adorable. I’ve not seen Tangled yet, as my boys deem it a “girl’s movie”. I don’t know when they are going to recognize the fact that I’M A GIRL!
Great post! Thank you for reminding us to breath every once in a while 🙂
Love these cookies they are super cute and I LOVED tangled
Your vision continues to amaze! Are there special glasses I can purchase to see all the options in one simple cutter???? I just don’t have the ability to see outside the box. Thanks for “lifting the lid.”
Another wonderful tutorial! I always have trouble getting my flood icing to blend seamlessly with the outline icing. It seems you can always see the outline, but your flood usually hides it completely. How do you do it???
The characters that really have me stumped right now are Teenage Mutant Ninja Turtles and the guy from the Captain Morgan liquor bottle. Looks like Captain Hook kinda. Any ideas would be a great help!
I want to know that, too, how in the world to get your flood icing to hide your outline!
The trick is to make it thick enough that it will “pouf” but not overflow, then use an offset spatula to pull it to the VERY edge =)
While I still do stress over Every. Single. Order., I only have to visit your site for inspiration and help….you calm my nerves! I have Toy Story coming up (agh) and lots of graduation / moving up ceremonies. Also, I”m always stumped when I have to do a birthday collection for a guy (say, early to mid thirties….esp. if he’s not into sports! what to do with a simple round or square cookie that can be whipped up quickly!!?!!
As always, thanks Callye for sharing your Genius with those of us who are challenged, but trying! xo
Every year I end up making ‘Lightning McQeen’ cookies. I have 2 nephews and a son that is OBSESSED 🙂 These are the ones I made last year:
http://rochelsblog.blogspot.com/2011_04_01_archive.html
and I just made some more, though I didn’t take pictures…oops. Anyway, they turn out cute, but take FOR.E.VER. Any ideas to make them easier?
(btw…I just made some Strawberry Shortcakes cookies patterned very much after the ones you made, and they turned out so amazingly cute. Thanks for the inspiration. I hope to post pictures of them today…we’ll see if my kiddos let me 🙂 )
ack…wrong link
it’s here
http://rochelsblog.blogspot.com/2011/04/this-and-that.html
And here are the strawberry shortcake ones 🙂
http://rochelsblog.blogspot.com/2012/04/4132012-strawberry-shortcake-cookies.html
Oh, can’t wait for the upcoming tips since this post is flooded (no pun intended) with tips already. Fantastic post and fantastic Tangled cookies. I’m 30 and watched Tangled with my 3 kiddos, all girlies, and loved it too. My kids are changing me into a girly girl, heh!
I agree with your mantra though, they don’t have to be perfect character matches. I love how you’ve picked out the face and added in flowers which completely is the theme. You’ve given me a few ideas from reading this post already.
LOL, my kind of pun!!!
You are so amazing. I don’t know how you do it! And you make it so simple for all of us – thank you!
Thank you! PS…LOVE your autism cookies!
Very much looking forward to the next few months here. Making character cookies easier is something I certainly could use a few tutorials on. I tend to get stuck in the details and you are showing us that we needn’t do so in order to produce a great and fun cookie!
Oh, Paula, me too…I’m learning though. Slowly, but learning!
Is there any chance you will be doing The Little Mermaid? Maybe…. Haha. Love the Tangled theme!!
I made need prayers for Ariel, we are arch enemies, LOL!
Seriously?? You are like the most talented person I’ve ever seen! Gorgeous! anne
Thank you!!!
Cute! I love seeing your creativity with cookie cutters!
Amazing as usual! I am fairly new to the cookie decorating world, and while I don’t think I will ever get to your level, it is so great to read your tips and ideas. My daughter is having a Jessie from Toy Story party next month. I want to make some cookies to go along with the theme, but I am no artist, so I can’t do characters. The only thing I could think of was her red hat and cow print or something. Any ideas for that?? 🙂 Thanks for being such an inspiration!
My co-worker wants me to make cookies for her granddaughter’s birthday in early May – and the theme is Olivia the Pig. Cute, but MERCY! I don’t do faces!!! Any ideas on how to simplify Olivia? I can come up with accompanying cookies, just not sure about the character. Your “Tangled” cookies are darling and I love how simple they are.
Ohhh! I CAN do Olivia! I will try to get her in!
Thank you! I would appreciate any help you can offer!!
You are a cookie genius! I am so excited about your new series of simplifying character cookies! Please do Cars & Toy Story! Those two party themes give me cookie fits!
I totally understand! I will start thinking now!
I’m all for no stress… problem is I want to do EVERYthing! If I could just keep focused on maybe doing 2 or 3 designs? I don’t really have a theme coming up – except for a Route 66 (sort of 50’s) party for my husband’s 66th bday (we missed celebrating the 65th), and I just need to get the “Route” shield cookie cutter, probably, unless you have another idea for using that barn! Of course I don’t have one of those cutters, either. However I DO have a HAND cookie cutter that came in a grab bag of cutters from the thrift store. First of all, what theme is a HAND in, anyway? And, second… are there any other uses for a HAND? c@
Do you sell your cookies? I’m definitely not going to attempt this on my own, but your cookies are ADORABLE!!!
Your cookies are so beautiful!!!! Keep up the good work. Rose
ADORABLE! Callye you are so awesome at seeing new shapes in regular old cookie cutters! I kind of think of you as a sculptor looking a block of raw marble and seeing forms inside that need to be sculpted. 🙂 Really, you’re an artist!
Pingback: Decorated Princess Cookies | Princess Cookies - The Baked Equation - Homemade Cookies
When you make the 20 second icing what is the recipe for that? I see your RI recipe, but what do you add to your RI so that it is 20 second icing?
Pingback: How to Make Simple Strawberry Shortcake Cookies
is the recipe for the piping and flood icing you use somewhere on here? dying to know!
I am so excited to see this option for the pascal cookies and I already have that cutter which makes it even better. What is your opinion on the big candy eyes instead of piping them? I guess it would just be more expressive if pipped.