Yoda Cookies
“Do, or do not, there is no try.” Even if you aren’t a Star Wars nerd, there’s a lot of wisdom in those words.
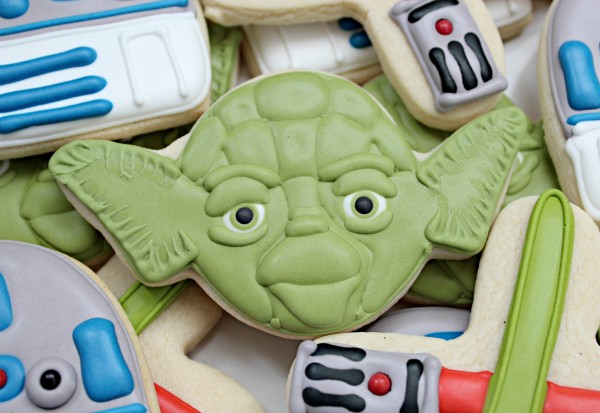 I’ve always loved Star Wars, but it wasn’t until I watched Episode III that I really began to love Yoda. I guess I like the idea of guys that speak softly but carry a big stick {or lightsaber in this case}. I’ve seen the Revenge of the Sith a gazillion times, and I still get a little teary during the fight scene with Emperor Palpatine. Anywho, before I REALLY show my nerd, let’s get to cookies. Your little Padawans will love you for it!
Although Williams-Sonoma sells a Yoda cookie cutter, I prefer to use a simple spider cutter like the one in this kit.
 With a little stretching, it quickly becomes the perfect Yoda face.
To make Yoda cookies you will need:
- Yoda green piping, flood, and 20-second icing {I made mine with a mixture of leaf green, warm brown, egg yellow, and ivory, but you can use avocado Americolor gel to keep it simple}
- white 20-second icing
- a small amount of black 20-second
If you need help with 20-second icing, you can read about it HERE and HERE.
Begin by outlining the cookie as shown below.
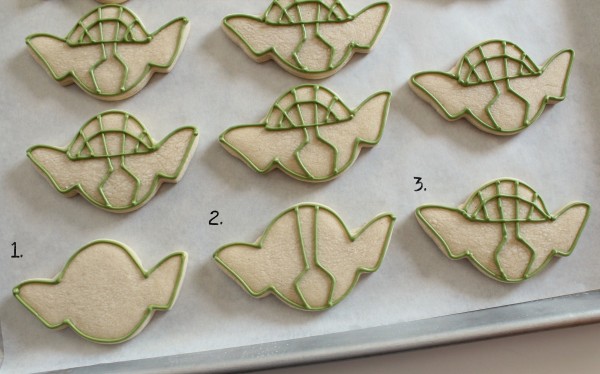 If you have trouble with icing craters, skip steps two and three and use 20-second icing for the forehead detail. If you need to, use an edible marker to sketch out guidelines to follow until you’re comfortable with the design.
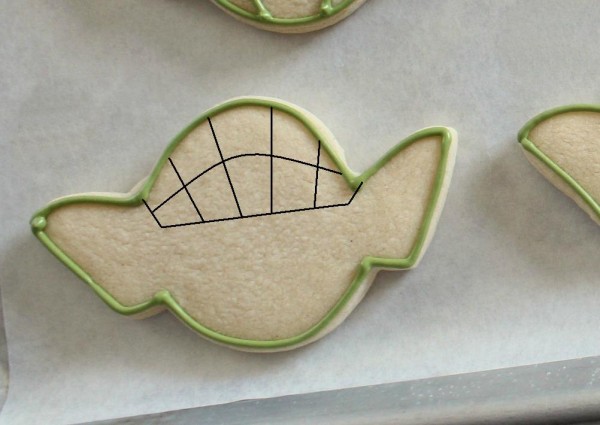 After outlining, fill in the spaces with icing with 20-second icing. To prevent craters, start close to the surface of the cookie and flood from the bottom up. Use a toothpick to make sure there aren’t any air pockets in the spaces.
 It’s important to flood the cookie in alternating sections to get the dimensional look of Yoda’s forehead. The drying time between sections is the perfect time to add Yoda’s eyes.
To create eyes I used white 20-second icing to make an eyeball, then, after a minute or two I added a drop of Yoda green 20-second icing.
 After the forehead has had a bit of time to dry, fill in the remaining spaces including the lower portion of the face.
Notice in the picture below that Yoda’s eyes are cratering? This happened because I made the mistake of using thinner flood icing for the pupil, rather than 20-second icing. Luckily, it’s easily fixable later, I just wanted to throw that out there so you don’t make the same mistake.
 Let the cookie dry for an hour or two and then flood the rest of the face. At this point, let the cookie dry overnight.
 The next day is when the fun begins. Making Yoda is all in the details. Begin by using the black 20-second icing to add pupils. Just to be safe, use a number one or two tip for this. You don’t want to get carried away with the black.
 Next, use 20-second Yoda green icing to add the details shown below. I think a #2 tip works best. Again, let the cookie dry for a bit before moving on.
 To finish up, add the upper lip, wait 20 or so minutes, then add the final details. I used the brush embroidery technique for the ear detail.
 Give the cookie a bit more drying time, and you’re finished!
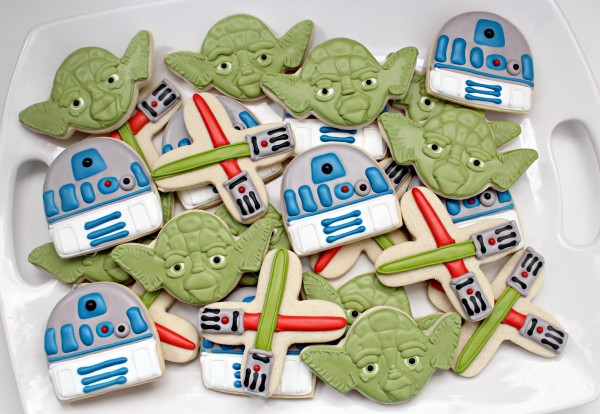
If you love Star Wars as much as I do, be sure to check out how I made 15 Star Wars characters using holiday cutters and light saber cupcake toppers.
I promise you can make this cookie. It’s a bit tedious to add all of the layers, but the limited color palette makes up for it, I think.
I hope everyone has a great Monday. May the force be with you!


Wow, amaaaazing cookies!!! I love them 😀 Such a great Yoda.
You amaze me woman! Love this!!
And to think years ago when I made yoda I had to make my own cookie cutter for it! If only I’d known about the spider cutter! 🙂
You never cease to amaze me! Those eyes are more perfect than words. It’s like looking into Yoda’s soul through those eyes. I nearly fell over when you said you like the idea of guys that speak softly but carry a big stick. 🙂
Pingback: Master Yoda Cookies « Monster Mash
You’re a geek like me yay! The original Star Wars is my fav movie of all time. I think I’ve watched too many times to count now. It’s my go to when I feel like crap. Your Yoda cookies are awesome!
WOW!! I love Yoda and yours is off the chart amazing!! He looks so good that I am waiting for him to talk to me:) LOVE IT!!!!
The detail on this one is so wonderful. Your color is perfect!
Brilliant tutorial. Just brilliant.
This is SUPERB~!! You are seriously so talented!
I love your talent and my hubby love these cookies. HE too is a MEGA nerd and loves Star Wars. I don’t think I have seen one in its entirety. So while I let him ooh and aww at your cookies … I think I will re-frame from telling him that you too are a Mega nerd fan because then … he may start liking you more than me.
LMAO.
thank you soooooooooo much for this! I’ve made Yodas and had to call them Yoda’s cousins. They were pretty close….but they drove me crazy. Now I need to make them again this week, and I was dreading it!!!! Perfect timing!!!!! thank you!!!!
LOVE! I bought the outrageously expensive set from Williams Sonoma and if I had seen your post firsts, I could have saved 20 bucks! Oh well, I’d do a lot of silly things for Star Wars! Amazing work as always 🙂
As always, my mind is completely blown. Jon David and I recently went and saw the movie that was rereleased in 3D and he LOVED it!!
I love the dimension on these cookies…your icing texture is perfect!
Tell Jon David when I went Darth Maul was sitting behind me. It was really creepy!
brilliant! I have not dared to attempt a Yoda cookie, maybe now I will, thanks!! oxoxo
:O)
Brilliant, absolutely brilliant!!
Wonderful cookies, the eyes are perfection
How amazing! You did Yoda justice…I love it. I’m going to show to my hubby, I know he’ll be impressed.
These are fabulous as is your step by step tutorial. The eyes are amazing, add so much personality!
Wow! Just wow!
I love these!! They’re so fun, and the perfect use for that spider cutter!
Thanks for the tutorial. It can get tricky when everything’s the same color! You’re right though, there’s more time to tinker when you’re only dealing with a couple of colors (also, like paint, mistakes are less obvious on a “single note” palette).
You never fail to impress me!!! I love how you use random cookie cutters for different cookies… with a little tweak here and there they’re perfect… fab work, yet again! Sam x
so cute, I have hardly any cookie skills, so i will just have to pretend this is something I could do. They are adorable.
they look fantastic! I’m always chuffed coming in to see what you’ve created – it’s always pretty darn cool and very impressive.
Mine were nowhere near as detailed as yours, but I’ll share the link anyway
http://seemyfootprints.blogspot.com.au/2011/11/cooked-yoda-and-raw-evil-one.html
because my guys loved them 🙂
These are perfectly decorated and so cute!
Please, a tutorial on your other Star Wars cookies! I have been asked to donate some for a bake sale this weekend and I’ve got the Death Star, C3PO, and light sabers down already. Your Yoda is awesome! I’d love a tutorial on R2D2.
I’m doing R-2 in a few weeks =)
Wow, awesome! I am a Star Wars nerd, and that is actually one of my favorite quotes. : )
SO so amazing!
I am soooo going to try and make these cookies, I know so many Star Wars fans that would love these cookies!
Thank you so much for linking up to Tasty Thursdays last week. Hope to see you again this week!!Nichi The Mandatory MoochNichi The Mandatory Mooch recetnly posted..
2 years, and many bags of royal icing ago, I made the Star Wars cookies out of the Williams Sonoma cutters for a display (I work there…I know, it is an awesome job). But I was floored I needed 11…that’s ELEVEN colors of icing for those 4 cookies….I would like to revisit those cutters, 2 years is a lot of practice!
That’s so cool!!! No kidding, BEST JOB EVER! So, I gotta ask since I have you here…what do you think of the people who hang around and taste way too much and only buy one gadget? I may or may not have been guilty of this back in my younger, being broke days, lol! I was scared the ladies were going to implement a “you try you buy” policy for me 🙂
It is always so much fun to see what you’ve come up with next and Yoda cookies was not something I expected…so cool! Love the way you came up with his face by using the different cookie cutter shapes-so creative:)
These are awesome! My husband is a huge Star Wars fan so I made some Star Wars cookies for him a few months ago, with the Williams Sonoma cookie cutters, but since I’m new to cookie making (about 9 months in) I used homemade marshmallow fondant instead of royal icing (imprinting the image into the fondant) and they came OK, but not great. I will have to give them another try. This tutorial is great – I will definitely use it to help me next time. Thanks!!!! May the force be with you 🙂
Pingback: Mingle Monday Highlights {March 19} | Add a Pinch
Wow. Thanks for sharing!
I love all your cookies! It’s amazing how much depth and detail you got on Yoda’s face, on a cookie! You are such an inspiration. Thank you for sharing everything that you do!
super job! So impressed!
SO awesome! I’ve made lots of Yoda’s but never quite “nailed” it…of course you did…because as usual…you ROCK!
Pingback: Spock LLAP Cookies - Bakingdom
Incredible!
Pingback: Simple R2-D2 Cookies
My husband (whos eyes glaze over anytime I speak “cake” or “cookie”) thinks your Yoda cookie is “Awesome!” Maybe I’ll get that kind of compliment on my cookies or cakes soon =) For the record- they are awesome! My son is begging me to make them. Love your blog- I’m always checking for the “great next thing” you come up with!
Pingback: Silvias Blogbuch
Hey!! Thanks sooo much for sharing this is awesomee!! I was just wondering… Where did u get that set of cookie cutters? Thanks!!!
Pingback: Star Wars «
Wow! I was just googling Star Wars cookies because I’m making some this weekend – I am so glad I came across this. I remember seeing all of the other Star Wars cookies you posted in May, but this tutorial is just amazing. I am in awe….not sure how you came up with the brilliant idea to make yoda like this!!
Pingback: kleinstyle » Star Wars : eine galaktische Geburtstagsparty
I used. Your brush embroidery technique last night to make gills on Creature from the Black Lagoon for some classic movie mpnsylter cookies. Thank you for such a great tutorial blot. I love learning from your posts. Also my nephew would go crazy for these Yoda cookies
Good job!! Well explained. I try it ;D
Pingback: 50+ Ways to say, "Happy Valentine's Day" with Cookies
Do you use piping or 20 second icing for the outline? Which part do you use the flood icing for?
The 20 seconds icing is for filling the forhead , lower part of the face and to add the final details, the piping icing is to outline the hole cookie (step #1). And the flooding, I think she used in the large part of the ears and cheeks.
omg so cute! It will go so well with this cake! http://bakentake.co.za/product/yoda-cake/
Pingback: 40 Delicious Ways to Celebrate Star Wars Day - Totally The Bomb.com
amazing! Really nice work!
Love this! Would you mind if I featured this post for a Star Wars post I’m working on?
Not al all, thanks for asking!
Thanks so much! See you on the internet!
Pingback: Yoda Cookies | Pork Chop Tuesday
Pingback: How To Make A Yoda Cake | HappyForever168
Dear Sugarbelle,
Thank you so much for sharing your beautiful cookies and step by step tutorials! I’ve been working on Star Wars cookies to surprise by brother, and I couldn’t have done it with out you!
p.s. I love all your “stories” to go along with the posts!
=)
Pingback: 25 Incredible Star Wars Inspired Recipes Rural Mom