Creative Hibiscus Cookies
So… I bet you’re wondering why I have tropical flowers on the brain, right? I mean, it’s supposed to be winter, and I guess it might be in some places but here, it’s not.
That’s not the reason I am making hibiscus cookies, though. These cookies have little to do with the weather, and a lot to do with cookie cutters.
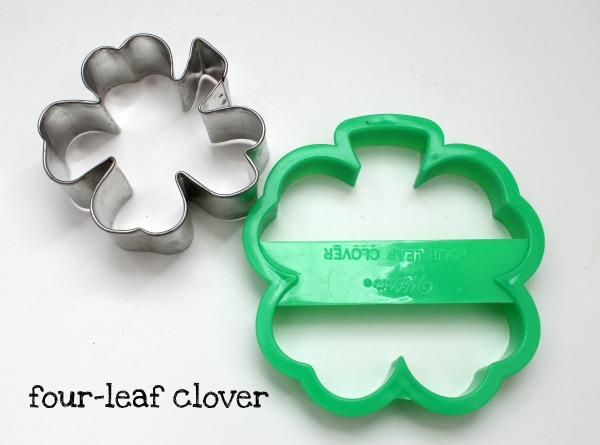
 Believe it or not, these are my two all-time favorite hibiscus cutters. Of course, I didn’t figure it out easily. Once upon a time, I might have paid $21 dollars for a very large, outrageously hard to figure out, copper hibiscus cutter.
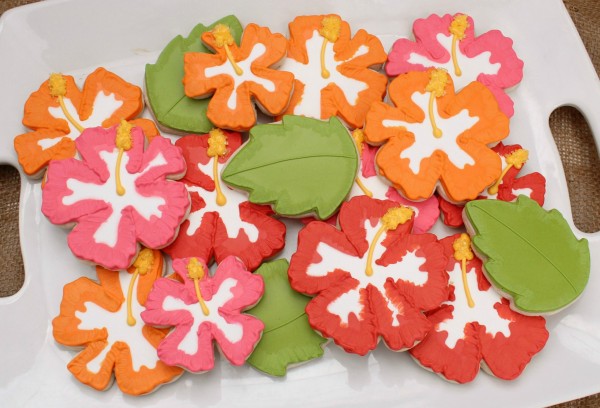
 That was many many moons ago, of course, but since I have my St. Patrick’s Day cutters out, I thought I better tell you about it before I forget. You can thank me for saving you twenty-one dollars later. In the meantime, this is how I turned a four leaf clover into hibiscus cookies.
To make these cookies you will need:
- outline and flood icing in your choice of color for the flowers
- white 20-second icing
- thin-ish yellow piping icing
- coarse yellow sugar
Begin by outlining the clover with a #3 tip. It’s okay if you’re messy. It actually adds to the look of the hibiscus. Once the cookie is outlined, use white twenty-second icing to create the center of the hibiscus as pictured below. Let the white set for about 2-3 minutes, then flood the rest of the cookie. At this point, let the cookie dry completely. To prevent bleeding, use one of my favorite tools, an oscillating fan.
 After the cookie is dry, it will look like this! Now we’re ready to add petals.
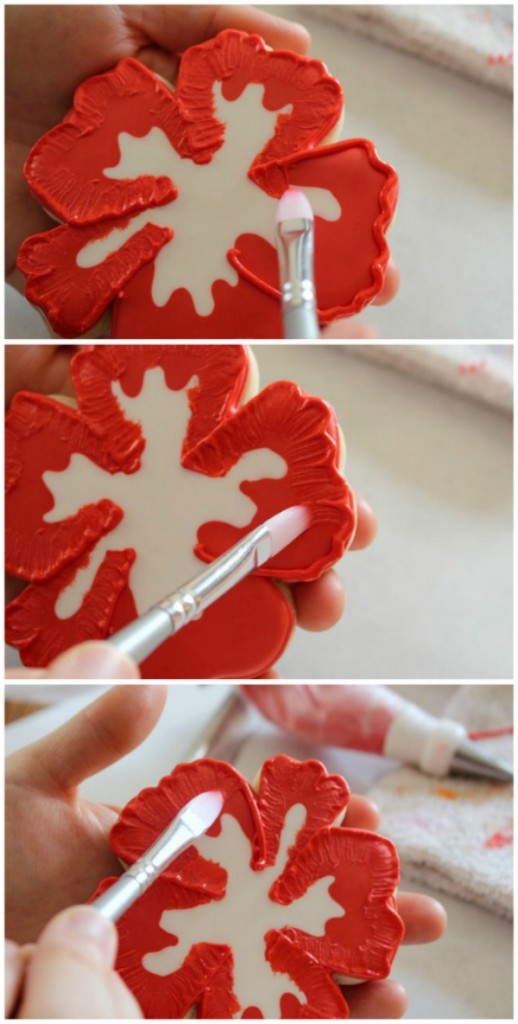
 Remember a few weeks ago when my cookie crush, Ali-Bee, came over to teach us the brush embroidery technique? Well, I have been practicing, and now I am kind of obsessed. Begin by piping around the smallest petal {the clover stem}.
 Then, use a brush to create the look of a petal. If you need a little help remembering how to do this, click HERE to view the post. It will also lead you to Ali’s video tutorial if you prefer to watch her in action.
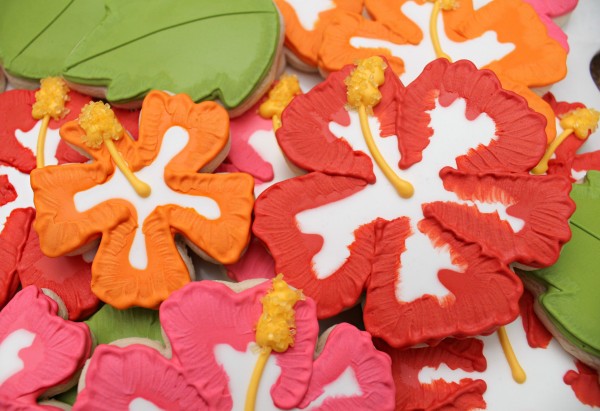
 Once the petal detail is added, use yellow icing to add the pistil {well at least most of it} to the cookie. Let dry.
For the next step you can use any type of yellow sprinkle, but I thought coarse yellow sugar would look nice.
 Use the yellow icing to pipe a stigma {why I know this, I don’t know} then carefully sprinkle with coarse sugar.
 I mixed mine with simple green leaves to give the platter a little pop of color, then I shared them with a very special lady who recently made my day.
For the cutters I used, click HERE or you can often find the plastic Wilton one on EBAY.
For another hibiscus cookie idea, check out Glory’s version, at Glorious Treats. If you don’t like the clover idea, I’ve also found that this sand dollar cutter from Little Fox Factory works well too. As a matter of fact, they have LOTS of cutters you NEED.
 Well, friends, I guess that’s enough enabling for a Monday. I am excited for a new week. I hope everyone has a great day.
Happy Monday!


I just love these cookies! Can you tell me what St. Patty’s day cookie cutters you used here and have in your collection? Thanks!
Hi, Jackie, there is a photo above of the two cutters I used, and links toward the end of the post. YOu may have to look to EBAY for the green plastic one, though.
I love how you turn ordinary cutters into fancy cookies…..I laughed when you said that you didn’t know why you knew what a stigma was because it reminded me of the Reproduction song from Grease 2. That’s the only reason why I know what a pistil and stigma are, lol.
I love these flowers!!
Love the colours…have a nice week
How timely! My daughter is having a luau party for her birthday and I wanted to make Hibiscus cookies but wasn’t certain how to do it. I was resigned to doing surfboards and palm trees, but once again you’ve saved the day and will have me looking like a rock star.
Girl, I needed this post last year when I made Hibiscus cookies as part of the Teacher Appreciation luau! I hand-cut all those suckers, and it was a PITA! I do have the smaller, tin 4-leaf clover, so I’ll keep it in mind for next time, and now I’m off to scour eBay. I ♥LOVE♥ the brush embroidery add-on to these cookies, too. 😀
THANK YOU so much! I have to make luau cookies this week and was racking my brainto figure out what cutter to use. Thanks for your creativity!
You are such a cookie genius – you never cease to amaze me with your creativity!
These are absolutely beautiful!
Once again – awesome! Hope your week is wonderful, it was nice of you to start mine off with pretty flowers!!
you seriously need to make a book with all the things you can make with simple cookie cutters, I won’t even charge you for the book idea:)
Love these, as usual! Still in search of leaf cutters like you use. Can’t find them anywhere!
Emilie, the cutter I used here is a vintage cutter like this one with the stem cut off 🙂 http://www.etsy.com/listing/92179054/vintage-leaf-shaped-cookie-cutter?ref=cat_gallery_6
Thanks so much, Callye. Whenever I see your beautiful leaf cookies, I search the usual sites and the only ones I find are the traditional oak leaves, etc. This will be a start!
Love this! Baking cookies is on my agenda today, and with the St. Patty’s day cutters out, I’ll make a few more and give these a try. Seriously love your blog; your tutorials are well done, amazing, and inspiring. Thanks for sharing your tips and creativity!!
Okay, you are the “cleverist” person I know!
So Puuurty! I’m saving this idea for our Luau this summer!
Callye these are beautiful!! Love the texture the brush added.
These are gorgeous. Leave it to you to discover a hibiscus hidden in a shamrock 🙂
Yay! I love this tutorial! You’re the best, Callye!!!! 🙂
Wow – beautiful! Your clever use of cookie cutters is amazing 🙂
These cookies make me want to go to a tropical island…with a dozen of your cookies:)
I would like to make a cookie that looks like a Mah Jongg tile. Have you done one?
I am enjoying all of your decorating tips, since I am so new at this. Thanks
Amazingly beautiful, as always. I am in love with the texture in the petals!
I read this amazing rieevw of the Gucci fall 08 collection earlier, and the description of those boots was something about how “when the models walked there was something totally rock and roll about the way the leather strips smacked against the shoe body. it was like their own personal music.” i thought that was totally delicious. and true.
Gorgeous!! Callye these are jut perfect! And who knew a four leaf clover had such a fantastic hidden talent?!? Love them!
My daughter wanted an Hawaiian themed birthday party last year so I did some hibiscus cookies for that. I looked around for a cookie cutter but when they were all out of my price range I improvised too. I just used a round cutter and then freehanded the shape of the flower. I am not good at drawing and I think they turned out really well. I filled in the main color all over the shape and then puddled the white in the middle of the main color and used a toothpick to draw it out into the main color. Everyone really liked them. Thank you for the great idea to use the shamrock though!
Leave it to you to take a hibiscus and make it into something STUNNING!!! I love these!!
These are just too pretty for words!
WOW! WOW! This is such an amazing tutorial Callye! And it actually looks maybe possibly do-able! I definitely want to give this a try. My next door neighbor’s daughter is getting married and the bridal shower is a beach theme. I think I might have to try to make some of these to give to her! THANKS for sharing your amazing talent and creativity!
you. are. a. genius. these are so perfect!
I bought that crazy expensive copper cookie cutter! Wish I’d seen this first. You’re always one step ahead!
You are such a creative genius! I am so impressed with how you can see so many possibilities with one cookie cutter! These are stunning cookies. I decorated my first batch of cookies this weekend. Soomme came out pretty cute. Others were just practicing over and over and over and were just good to eat! My next batch is ready for session two. My hopes are to be ready to put out a plate of beauties at our family Easter gathering. My daughter took to it quite naturally, but I had to try over and over again. That’s okay. I won’t give up!! Thanks for all your wonderful posts, tutorials, links, and videos. ~karen
amazing how you get the different dimensions and textures…they look so real.
these made my day!!! I cant wait to try them.
Love
Follow back! 🙂 http://www.themiseducationofmaddiesmom.blogspot.com
It’s Hibiscus weather today in Colorado, but for tomorrow could you make some Snowflakes!! Beautiful cookies!! Love you too!
So so great! Hibiscus is my favorite flower to make, glad to have a new design!! Now if I could only find a four leaf clover cutter! They are all sold out here!
These cookies look like the REAL DEAL and from a shamrock no less!?! My amazement never lessens, no matter how many cookies you make/decorate. In fact, the reverse is true; the more I see, the more amazed I am! 🙂 XO!
I LOVE, LOVE, LOVE that you did brush embroidery with these! Its the PERFECT technique for hibiscus! And the colors are so fun and happy!!!
LOVE these!
Amaze-balls!
That is all I can say.
Seriously.
Thanks! I tried the link but its not working, any idea why?
Also, where did you get the brushes from and what kind are they? Thanks!
they are regular brushes from the craft store. This one is a #10 Filbert comb brush. She actually made a whole tutorial on brush embroidery. I linked to it from the post =)
Pinning right now. And they go beautiful with the Boarding Passes Invitations to Hawaii that I just designed for my shop. Really beautiful job! Milenna
Pinned it!! http://pinterest.com/pin/178807047675458424/
Gorgeous!
These are so gorgeous! Thank you for saving me $21. I’ll spend it on a different cookie cutter that I’ll discover was a waste of money because I wasn’t creative enough :).
These are beautiful! Love the colors and details!
Stunning! I would have never thought to use a 4-leaf clover cutter to make a Hibiscus flower cookie. Thank you for the inspiration:)
Pingback: Ebay, A Great Cookie Cutter Resource
You are such a sweetie! Thank you for the pin. Yes, I think our guys are the BEST! I am besesld and there is not a day that goes by that I don’t thank God for his blessings. Hugs
Those are very lovely hibiscus flowers! And I love the color. 🙂
Extremely beautiful. What a great idea on the cookie cutter. I’m always low on different cookie cutters. I need to find more ideas to use the ones I have. Thanks for sharing.
Pingback: Pretty Bluebonnet Cookies
I am just starting cookie decorating and your site has been so helpful. I was wondering how you achieved such beautiful colors. Are they special colors or did you mix colors to arrive at the final result?
Pingback: Decorated Hibiscus Cookies
Great job~
Pingback: How to Make a Fun Hibiscus Cookie-Video - The Bearfoot Baker
Thanks for sharing Callye, I love the way you blog, it’s so friendly and make me feel all its possible!