Burlap Bunnies and an Easter Blog Hop
Or basket weave…or rattan. Whatever floats your boat. Regardless, get ready for a hand ache, because these can definitely give you one.
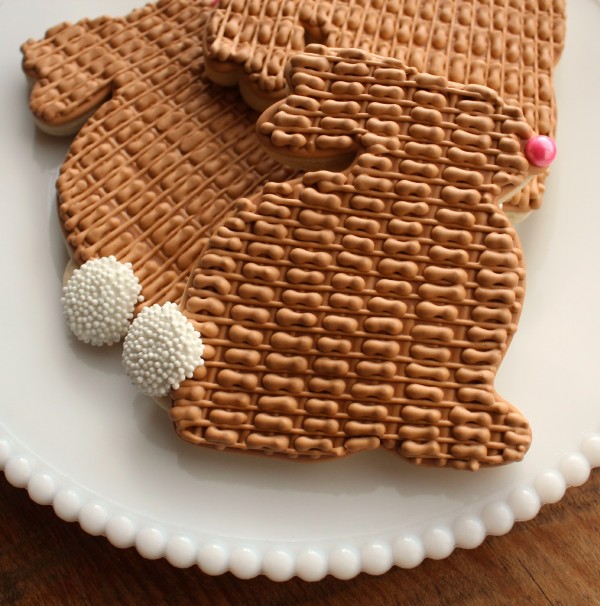 I’ve been kind hung up on making burlap cookies since I met up with my cookie friend Susan who’s obsession with burlap sparked my own . When I stumbled upon this adorable bunny bunting on Pinterest, I knew it would have to become a cookie.
Word to the wise {learned from experience, as always} It’s probably not a good idea to sign up for a platter of these. This is better used as an accent cookie, like I did in my Christmas collection…unless you’re into carpal tunnel syndrome and wrist braces.
To make these cookies you will need:
- light brown-ish piping icing {on the thin side}
- darker brown flood icing
- white piping icing
- #3, #1.5, #2 icing tips
- pink candy pearls
- white non-pareils
I thought I would offer a little tip on the icing color, just to make things a bit easier. For burlap brown I used warm brown, ivory, and a touch of egg yellow, chocolate brown, and black. But rather than adding a drop of black icing color to my mixture and risk over coloring, it’s safer to add a squirt of black icing to the color. It really tones down the brown color, but it isn’t so intense that you accidentally end up with black icing.
 To begin, use light brown icing to outline the cookie with a #3 tip. Don’t skip the tail like I did, do the whole thing. Be sure to add a little dot on the nose so you can attach a a pink pearl.
I normally use a #2 tip for outlining, but since there is a lot happening INSIDE the flood area, I gave this cookie a little higher barrier to prevent overflow.
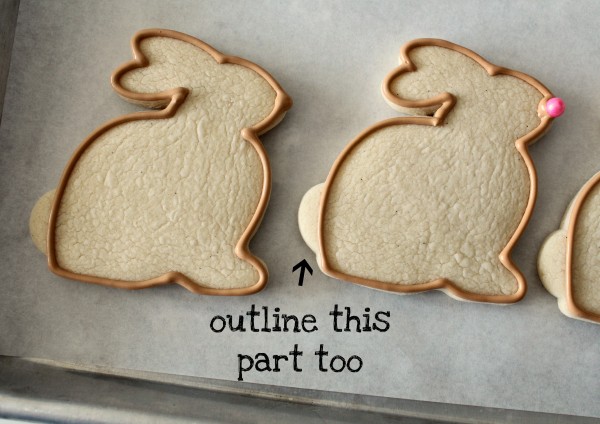 Give the outline a few minutes to dry then flood the inside with darker brown icing. Don’t use a whole lot. Keep in shallow so it doesn’t overflow when you flood in the lines. When the cookie is flooded, use a #1.5 tip to immediately pipe on horizontal lines. Wait twenty minutes or so and then pipe vertical lines.
 Let the cookie set for another 20-30 minutes, then come back and add the basket weave design using a #2 tip. Let the cookie dry completely.
 When the base has dried, use white piping icing to add a little tail and sprinkle with non-pareils. Be sure to use thicker icing than I did so it doesn’t run off the side. Let dry.
 Every once in a while, people accuse me of over explaining things, but because I am such a detail-oriented person, it’s my nature. On that note, I wanted to go through this one more time. Outline, flood, add horizontal stripes. Wait twenty minutes, then add vertical stripes.
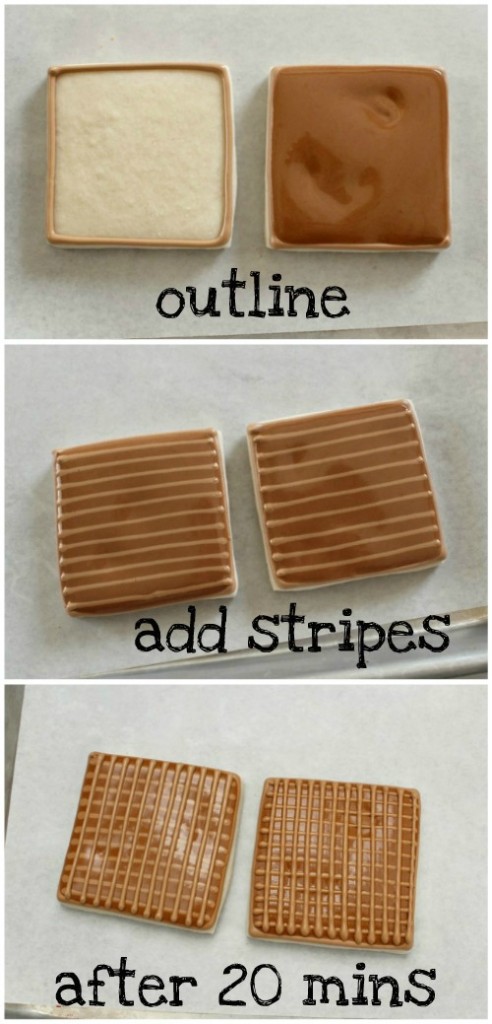 Let the cookie set for a few minutes, then add the basket weave pattern. While we’re here I wanted to point out one more thing. Notice how different cross piping {I totally made up that word} can create different looks.
 The first one looks kind of like burlap, and the other more rattan-ish. There I go making up words again.
For another cool basketweave tutorial, you should also check out THIS ONE from Sweet Ambs.
 All that plus a major case of arthritis, and five hours later, you have a bucket o’ burlappy basketweave bunnies.
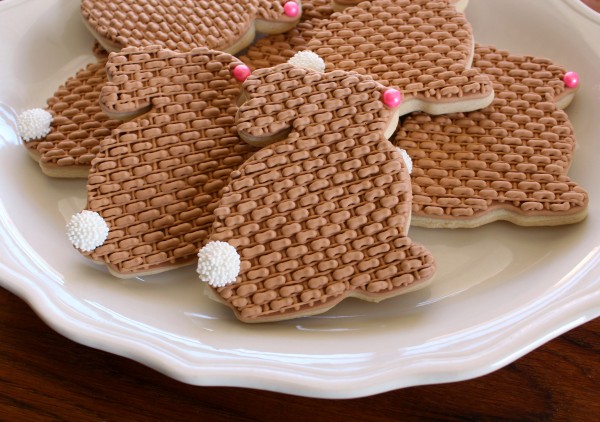 Icing consistency is the KEY to success when creating burlap/basket weave/rattan cookies. To thick, and you will get points. Too thin, and you’ll have a runny mess. Go for the consistency of warm pudding and take it just a SMIDGE thinner.
It’s totally appropriate that we’re talking bunnies today because I am participating in a blog hop today. I’m beyond fashionably late, and I apologize, but I am FINALLY HERE!
 On the roster are several fun treats from some of my favorite blogging buds. You should check them out!
- Pretty Birthday/Easter Party Printables via Living Locurto
- Chocolate Dipped Easter Peeps via Love from the Oven
- Easter Bunny Cake via The Celebration Shoppe
- Easter Snack Cones via Bird’s Party Blog
I hope everyone is having a wonderful week!


AMAZING! You have more talent in your pinkie finger than I do in all 20 of my fingers and toes! BEAUTIFUL work and a great tutorial…thank you!
I have been following your blog for sometime now and just wanted to tell you how much I enjoy each post! I have forwarded your blog on to so many people. I wish I had the time to do this…someday I will, but for now, I enjoy seeing how you make your cookies. You are one talented lady! I have to say…my favorite are the Fancy Nancy cookies. Only bc I have 2 girls that at one time were obsessed. I would love to see what you can come up with for American Girls… 😉
These bunnies are sooo cute.. who knew you could do burlap and wicker?? I love it!!
WHo would have thought that burlap would ever look so gorgeous!?
I love Burlap… and COOKIES… and Bunnies… and YOUR COOKIES… and your Burlap Bunny COOKIES!!! xo
My hand hurts just from looking at all that extreme piping you’ve done! However, your burlap basketweave bunnies are brilliantly beautiful. Bravo!
So clever and cute, as always!
I like the fact that you explain it so I can understand… sometimes it takes me awhile to catch on. Great job as always thanks for taking the time to share with us we really appreciate it.
i can’t even explain how cute these are. i really need to get better piping skills because i want to do this. you rock!
This looks so authentic. Surely took some intense work. Way to go!!
What a lovely effect!
These are adorable!! Fun hopping with you today!
So fun! Love the way thos elittle bunnies look!
AMAZING!
Pretty clever. Straight lines I can now do!! Outlining around curves still needs a bit more practice!!
Lovin’ the burlap bunnies!! Your Easter designs are always my favs… I wait all year to see them 🙂
Hey…you must have read my mind! I was just wondering how you’ve been!!!
Another super tutorial, thanks Calleye!!
Neat-o!
You so read my mind. Just today I was studing your Christmas collection and trying to figure this out. Cannot wait to make some baskets for the kiddos Easter at Church.
These are so pretty!
Love the basket-weave! Perfect for creative but understated bunnies.
Awesome! Thanks so much for the detailed tutorial. I appreciate every word (and picture) you provide, especially the impeccable results! Also, thanks for the hand cramp warning. Thank goodness for accent cookies!
Hi, I love your work and I’d like you to live in Brazil so that you could teach me how to do those wonderful cookies.
Thanks!
Hi, I love your work. I have started decorating my own cookies not long ago. Do you do the outline by hand or you use the cookie cutter. Yours look so perfect.
Gaby
OH. MY. GOODNESS! My wrist aches just looking at the bunny cookies. Genius! Your work is so consistent and beautiful. Too pretty to eat ~ I bet you hear that all the time!
OMG, these are beautiful, like everything else you create! Thanks for all the great tutorials.
LOVE the texture on these!! Basketweave is one of the coolest things evah.
These are so adorable. They reminded me of Nutter Butters as soon as I saw them! Once again, you’ve made another amazing set of cookies!!
Awesome! You make it look almost easy – thanks for the tutorial!
Seriously Callye, How do you come up with this stuff? Your bunnies look incredible! They really do look like rattan and wicker. Thanks so much for another great tutorial! I need all the details I can get:)
I can’t even imagine the patience it takes to make these! Outstanding
You are amazing! So talented! Love your work!
what a labour of love these must have been, but so effective! You are so dedicated. Thank you so much for sharing such a clear step by step. You are an unending font of inspiration and ideas!
How clever! I love the accent of the little tail 🙂
Ahhh… a lightbulb went on. Saw a close-up of these on instagram yesterday and for the life of me couldn’t figure out what everyone was talking about 🙂
Amazing work, though I can totally see how it would cause hand cramps.
Thank you! I have been hoping you would give us a tutorial on this since I saw your Christmas cookie.
Oh…these are precious! We are thrilled that you found inspiration in our sweet banner! I am soooo not good at baking, and have such respect for those who are! These are incredible!!! Stop by and link up to our Uncommonly Yours party !! Bonnie 🙂
You are amazing, Callye! I have no words… 🙂
Awww they are so cute!! Thanks for sharing!
Amazing and super cute!
Wow! Your burlap bunny cookies are positively incredible! Such exquisite detail, and an excellent tutorial too! Off to check out some of your favs in blogland.
Jenn/Rook No. 17
These are adorable! I love the look of the burlap (or basket weave) but I have yet to try it. Thanks for the easy tutorial.
When I saw this post title in my feed I was sooo excited. I bought 10 yards of burlap to make some great bunnies I saw at a boutique (for $50 each) thinking maybe you sewed too and had some amazing tips, hints etc…..Ha! I have to say, your burlap technique is amazing, but I have got to get sewing!
Wow, these are amazing! I just cannot believe how detailed they are, good work.
Que preciosidad, pero sobre todo que pulso y que paciencia. Saludos
Hello again!
I have a doubt. What is the recipe of royal icing that you used at the bunny cookies and what is the cookies recipe… I want to do the same.
Thank you.
Carol Ivanov
Both are under the recipes tab at the top 🙂
I have already used the basic sugar cookies…but my cookies aren´t as white as yours…I sent you an e-mail with my other doubts…
Thank you!
Wow, these are so unique…thanks for sharing. I’ll have to try this!!
seriously Callye those are the CUTEST bunnies EVER 🙂 XXXOOO!!!!
Oh my goodness, I can’t imagine how long these took to burlap-ize! I love burlap…these are gorgeous!
Incredible. You are amazing.Thank you for sharing.
Andreja
http://www.stancerfamily.blogspot.com
Thanks for the how to on the burlap technique. I’m going to try it soon. Your work is great!
Oh Callye! Now burlap bunnies! I’m seriously in love!!!
All you, baby! All you!
You just keep on “over explaining”! I love it and love the fact you are wiling to share your passion with this wannabe 🙂 On a side note, I love making up words. My favorite comes from way back when I was raising my children… “beautious” — a beautiful and glorious thing!
I think the best tutorials have as many pictures as possible!! That’s what I always appreciate about yours! It’s amazing to me at you can remember to photograph all the steps! Thanks for always sharing new techniques and tips. Can’t wait for easter basket time!
Callye, these are just stunning. I absolutely adore the texture–it’s perfection! And the pink note and white tail? The cutest. I am completely in love with this design!
Thank you for this, Callye….I’ve been dying for a burlap tutorial ever since I saw your Christmas cookies!
Pingback: Beautiful Decorated Burlap Easter Bunnies Cookie Recipe – Best Friends For Frosting
Pingback: Picks for a Bunny-tastic Holiday! | Daily Bits
Wow those are gorgeous
Pingback: Easy Delft Blue Eggs
I love the tail of the bunnies!!
I love your bunny cutter and have been looking but cannot find one with just this shape!!! I would love to know where you got it from. Thanks in advance. @Lorraine’s cookies
I got your link from “Sweet Surprise”. I love your work and idea thanks for all the tips can’t wait to try them.
Wow
Amazing! So happy to have you writing and taking pics, your tutorial is very well done.
I am another cookie artist..love to you!
Thank You so much for this, I have an idea to make VooDoo dolls with this technique you saved me so much time trying to figure it out myself. I find your site so inspirational thank you thank you!
Pingback: We're the Perfect Blend! (Valentine Cookies)
Pingback: 100 Easter Recipes, Crafts, Decorations and More - A Helicopter Mom
Beyond in love with your site…! Although shocked to see you say people accuse you of over explaining things… Without detail explanations, it can be so hard to understand some of these more difficult designs! Thank you so much for sharing your knowledge and experience, you are a wealth of information to me…x
Pingback: Burlap Heart Cookies - The Bearfoot Baker
Pingback: Easy Decorated Burlap Cookies