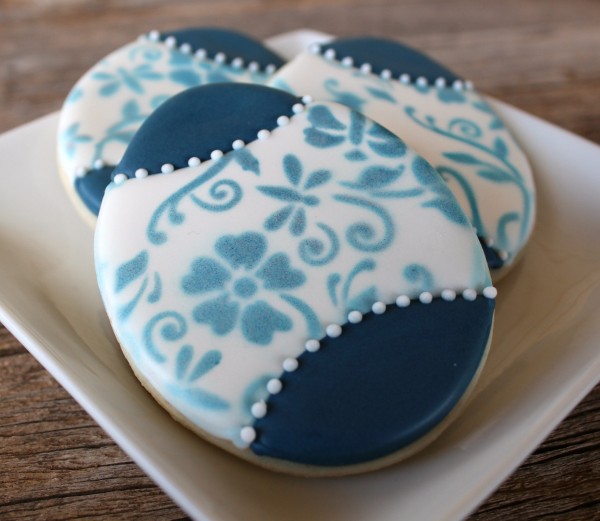
Simple Delft Blue Easter Egg Cookies
I have always wanted to make Delft blue Easter eggs, but somehow, every year I’ve run out of time. This year, I have the time, but somewhere along the way I decided that tons of intricate piping was not my thing {might’ve been the burlap bunnies}. Anyway, I decided that the world might be a better place if I came up with a lazy human way to make Delft eggs. I’m passing it on to you, so you can be lazy too, and I won’t feel as bad about myself.
 To make these cookies you will need:
- Patterned stencil
- White piping and flood icing
- Navy blue piping and flood icing
- Blue and black Wilton Color Mist
I made navy blue icing by mixing royal blue and black Americolor gel.
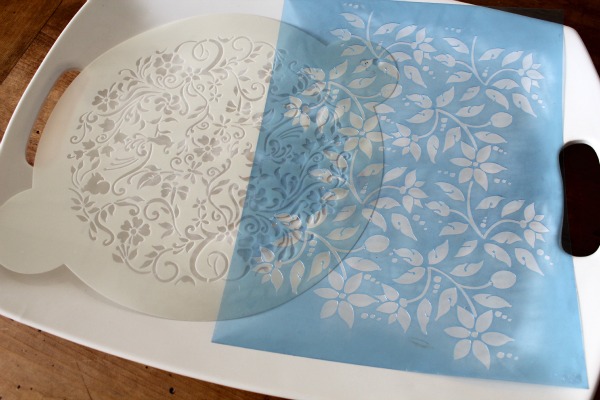
 Before we get going I want to spend a second talking about stencils. Technically any stencil will work {I got the blue one from Home Depot of all places} but if you’re more comfortable using food grade stencils, Designer Stencils has an amazing array of cake and cookie stencils for you to choose from.
 You’ll notice that the stencil I am using is actually a cake top stencil. When I purchase culinary stencils, I usually choose a cake top over a cookie stencil. It’s a bit pricier, but I find that it’s a lot more versatile. If you’re using it as an icing stencil and need to match the shape of the cookie, Designer Stencils also sells square and round cutouts that allow you to mask off sections of the stencil to make it the size you need. I ordered both the three and four inch sizes in both shapes, but in the case of cookies like THESE, I traced the shape of my cutter onto stencil paper and cut it out with an Exacto knife. More on that later…for now, back to the task at hand.
Before I decorating, use a cookie cutter to mark off the area of the cookie you plan to leave solid. In the tradition of making things difficult I made mine curved but you can do straight if you’d like
 Begin by outlining and flooding the cookies. Make sure your flood icing is liquid enough that it creates a flat surface for you to work on. Let them dry completely before moving on to the next step.
 When the cookie is dry, it’s time to add the pattern. If you have an airbrush, you can definitely use that, but since mine is currently out of commission, I used spray color. Wilton doesn’t make Navy Color Mist, so I added a thin layer of black over the blue layer to make Navy. See the difference?
 To make airbrushing a little easier, cut a four by four notch out of a piece of foam board and place the cookie inside to create an even surface so the stencil will lay flat on the cookie.
If you’re using an airbrush you can apply a heavier layer of color, but go easy with the color spray or it will bleed.
 Carefully remove the stencil, then outline and fill the rest of the cookie with Navy blue icing and let dry.
 When the blue icing is dry, add a dotted border along the color seams to give the egg a finished look.
 Easy. So you can spend more time doing, oh, you know…lazy things.
A few tips to help you out:
- Follow the instructions if using Wilton Color Mist. If you over spray, the color may bleed.
- to make the cake stencil lay evenly over the cookie, cut a small notch out of a piece of poster board. I’ve been bugging Bernie to make me a wood version of this little invention for a few years and he hasn’t. My friend Tracy suggested this as an alternative and it works.
- Airbrushes are great for this when you don’t drop and break them, ahem. If you don’t have one, you need one. I got mine from Karen’s Cookies and I love him, or rather I loved him…before I killed him.
- When investing in a patterned stencil, consider purchasing a cake top rather than a cookie stencil. They’re much more versatile and can be adapted to many shapes.
- Designer Stencils has great customer service. If you call or email them they are very helpful and will try to get you exactly the product you need.
I hope you have a great, lazy week!


So beautiful! I love these.
Simply breathtaking!
I would hardly call this a *lazy way* of decorating Delft Blue Eggs. The steps involved certainly are worth the end result though. Very good tips about using stencils, etc.. These are so pretty Callye.
Very elegant! Love the blue! Sorry about your Airbrush 🙁 I NEED to practice stenciling!!
These are just simply stunning I love them!
Gorgeous! As always!
Thanks for sharing!
These are absolutely gorgeous! I have always loved the Delft look…..the blue is spot on! Love the little white dots to finish the look, too! Genius!
Okay, FIRST — I am LOVING your title graphics!! So cute that they are ready for Easter!!
Second — These cookies are BEAUTIFUL!!
Third — GENIUS idea to use the foam board outside of the cookie to hold the stencil. GENIUS.
Fourth — COMBINING the blue and black spray to make navy? AGAIN GENIUS.
Fifth — I am IN LOVE with these cookies. They are so perfect and pretty and I just want to stare at them all day.
When I read this I was amazed and laughing out loud! Amazed at how you simplified the delft egg for us and laughing about you “killing” your airbrush gun! You are always informative and entertaining:) Love ya girl!!!
Love it! Beautiful and EASY exactly how I like it
So so pretty. Thank you for the tutorial!
Spectacular!
What an awesome idea!! Love it!
So cute!
These are gorgeous!! I never ever would have guessed that it was airbrush. I love all of your ideas!!
Oh Callye… these are gorgeous!!! Thanks for the tutorial… can’t wait to get my hands on some stencils:)
STELLAR!!
Dear Sugarbelle,
I am so happy that I found your blog. You are such an amazing artist!!
So pretty, and what a great tutorial. I am doing some hands with a henna pattern for a “Bollywood” party. This will work great for that. Thanks for the inspiration.
I could never figure out how create a “clean” stencil design because of the way it lays on the cookie! Foam board, cut out….ahhh! You kill me with your genius ideas. Another amazing tip Callye (and Tracy! ) 🙂
What a great use for the sprays! I can’t wait to give it a try. Thank you for the nice tutorial – your work is always superb!
These eggs are lovely. I especially love your “finishing” dots and the deep navy blue. Thanks so much for the tutorial on stenciling!
Thank you so much for your ideas !!!!! eres genial !!! Besos
Absolutely gorgeous! I have never tried airbrushing or the mist but this is certainly an incentive. Such a great look!
You are an artist!Amazing work!
Great cookies!!
Wow Callye, doing all that was your version of being lazy? Girl, I have got to teach you what it REALLY means to be lazy. I’m thinking pajama day, cup of hot cocoa, sitting in front of the ever-growing email box, doing nothing. LAZY. Your cookies are GORGEOUS. While I’ve figured out ways around a lot of stuff being a glaze gal, stencils just don’t work for me AT ALL. However, using a spray mist would work. I haven’t tried those yet. Would you believe that I went out a little over a year ago and bought a whole bunch of stencils thinking ooh these are so cool. Little did I know that glaze was like, ooh yaa right, you’re so dreamin. Color Mist seems the way to go. Thanks for your fun tutorials and your inspirational and gorgeous cookies!
SIMPLY BEAUTIFUL! I’m lovin’ this technique! Now to hunt down my stencils…I know they’re somewhere around here!
Beautiful, beautiful, beautifil.
oh I love it, so want an air brush but cannot justify it yet, but I can buy a can of spray colour!
Wow! these are so elegant! Love!
Your cookies are always beautiful!
Gorgeous! Thanks for sharing your lazy way of creating Delft eggs cookies 🙂 I love how the look!
Those are gorgeous! I would have never thought to layer the black over the blue. You so smart 😉
BEAUTIFUL! These are so pretty. I have so many stencils and I’ve never used any of them before. I will have to try some this week.
Love these! might have to try this for Easter!
Did you use just food coloring to do the first step of the stencling, or is it a thin RI?
Realmente impresionantes. Un saludo
Gorgeous! The stenciled eggs are just beautiful. Lisa @thebearfootbaker convinced me to get an airbrush and I LOVE it…I prefer it over royal icing stencils.
These cookies are absolutely beautiful! Thanks for posting such a descriptive how-to. I can’t wait to try this technique!
Simply beautiful! I don’t care if it’s the lazy man’s way or not, they’re gorgeous!! 🙂
Oohhh, how I love them! Even live near Delft in the Netherlands 🙂 Thank you for the nice post.
These are lovely!
simply gorgeous!!
These are so pretty!
Callye-These are stunning! I love your detailed instructions on how to make these.
Those are simply lovely. What a gorgeous cookie.
These are beautiful!
Pingback: Blue Easter Egg Cookies | SheSaved
These are jawdroppingly beautiful and so sophisticated Callye! Love the combination of techniques and the colors!!! You just never run out of incredible ideas!!!! Thanks for sharing your cookie art with all of us!
You make me want to do nothing … BUT make cookies!
Pingback: Galletas de Pascua elegantes | Fiestafacil Blog
Callye,
Thanks so much for your recipes and tutorials! They have been so helpful. I mentioned your blog in my last post! Have a great weekend.
SweetAdventureGirl
Pingback: Spray Painted Cookies [plus Product Review] « Sweet Anne Handcrafted Designs
You are the master, these are amazing, and so easy! I really don’t get the big deal with using food grade stencils, either, as long as you are not heating them, plastic is plastic, and if you wash them before, well, there you go! It sure opens up the possibilities, to shop all over, but Designer Stencils has many, and is dangerous for the credit card, lol!
Thanks for this idea session!
The cookies are amazing! I know this is an older post, but does the Wilton product dry enough to bag the cookies? Or, can it bleed?
Pingback: Vintage Floral Easter Bunny Cookies {Free Printable}
Pingback: Decorating Cookies with Stencils
Pingback: Easter and Spring Cookies and Treats | Easter & Spring Ideas
I am new to your blog and so glad I’ve found it. You’re so talented.
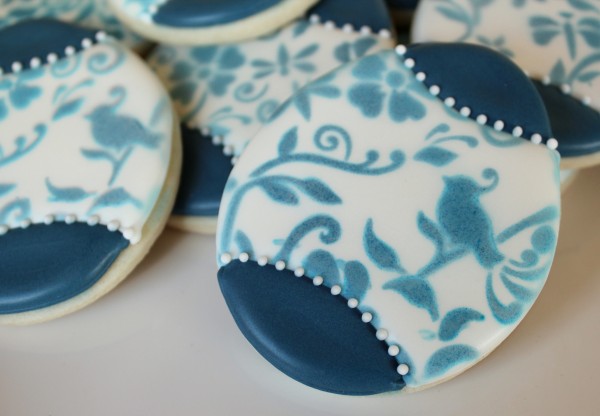
I really love this particular delft design that has the bird incorporated into it.
I was wondering if this particular stencil is an older design and has been discontinued as I have combed many of the stencils companies, including Designer Stencils you mentioned, and have not been able to find one like it.
This cookie is so incredibly beautiful. Thanks for sharing your tutorial.
Pingback: Simple Elegance | Sugar and Spice: A Cookie Blog
I’m so glad you show and teach us your techniques. You are amazing.Unlike so many other cookies I’ve found, They won’t show you how to do them. Thank you so much.