The Push-pin Trick {WFMW}
I know a lot of you got just as excited as I did about Wilton’s new line of licensed cutters. Many of you’ve already purchased them, and have them in hand. If you haven’t they’re more than likely on the way. The big question is, now that you’ve got them, how do you go from blank cutter to a perfect Hello Kitty?
This ol’ gal is not quite as simple as she looks. If you don’t get her eyes and nose just right she ends up looking more like cross-eyed kitty, or got-in-a-bar-fight kitty. If you don’t have a projector, or you aren’t quite comfy free-handing, I have the trick for you.
Remember this little cardboard thingy that your cutters came connected to?
Well, I am hoping you didn’t throw that away. Besides being a useful reference tool, it’s ALSO just what you will need for this nifty trick I’m about to show you. If you did toss it out for some reason *shame on you, BTW* then all’s not lost, you will just need to find an image of Kitty, re-size it to three inches and print it out. If you were a good decorator and saved it, do this.
Lay a regular piece of computer paper over the cardboard, and trace around it using a permanent marker. I recommend tracing the whole image so you’ll always have it handy if you need it for something else.
Cut it out, and then you’re ready to begin decorating.
To make these cookies you will need:
- Black and White piping icing
- Red and yellow 20-second icing
- white flood icing
AND
- a PUSH-PIN…Is the suspense killing you yet?
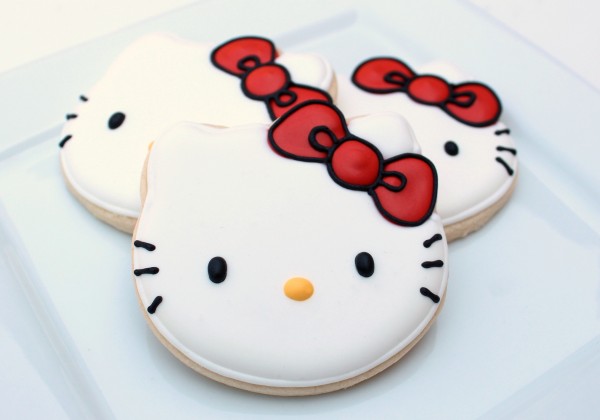
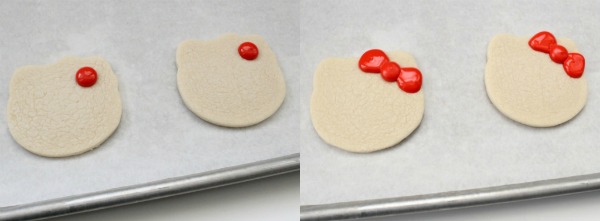
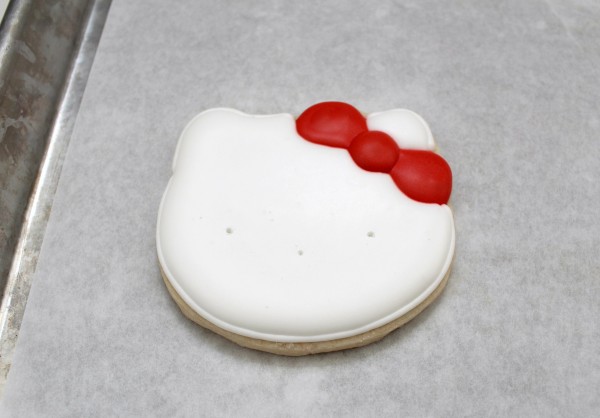
Now, we’re ready to go…pardon the pics, it was a semi-cloudy day, but with how hot things have been around here lately, I not going to complain. To begin, use red twenty-second icing to add the middle of the bow. Put it right smack dab between the two points on either side of Kitty’s right ear {well, technically her LEFT ear, but my right}. If you are having trouble visualizing where it should be, imagine or draw a diagonal line where with a food color marker to serve as a guide.
Let the middle section dry for about 20 minutes, then come back and add the loops.
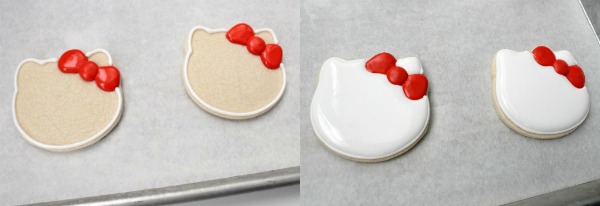
Let that dry for about an hour, longer if you have bleeding issues, then outline and fill Kitty’s face. Let this part dry completely, as in overnight.
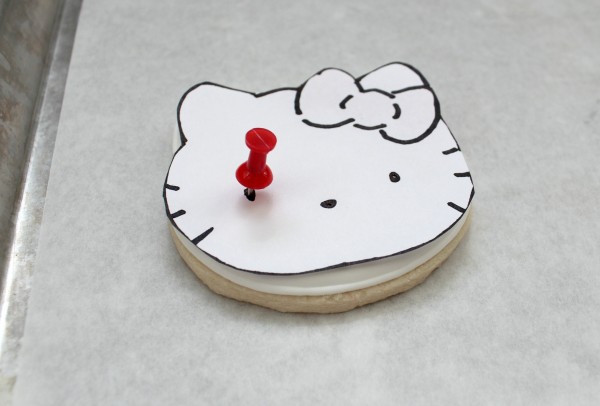
The next day you’ll need the kitty face you made, dry cookies, and the push-pin. Lay the image over the cookie, and use the pin to mark where the eyes and nose should be. I know it’s awful, but this always gives me the giggles. Seeing poor kitty stabbed in the eye, strikes me as funny. Maybe I need some sort of therapy or something but really, it gives me déjà vu. I’ve used this techniques before, in my Lego Man Post and the eye stabbing thing was just as funny.
After the violence is over, you’ll be left with the exact blueprint of HK’s face. Cool, right?!
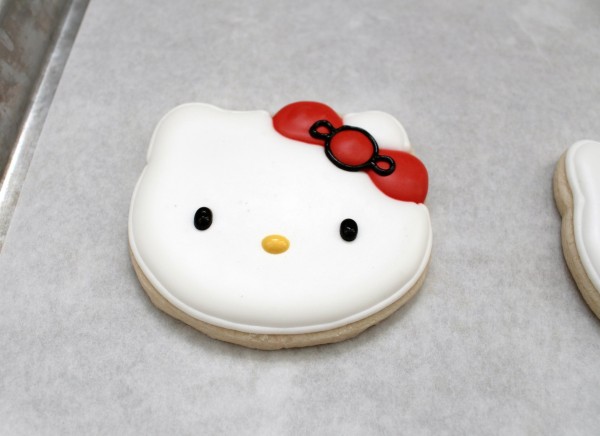
After that use the black piping icing to make the eyes and to outline the bow. Because of the way we did it, all you have to do is go around the circle and give it two little “ears”. Use the yellow TSI for her nose.
To finish up, outline the rest of the bow, and add whiskers. This is also easier than it might look. The middle whiskers are even with Kitty’s eyes. Add those first and the rest are a breeze .
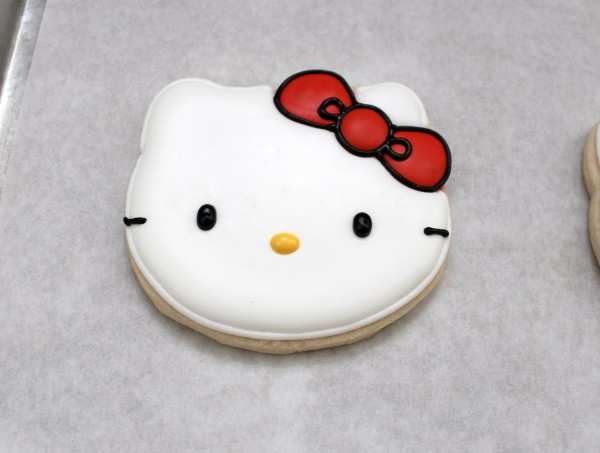
With the new Wilton cutters and the push-pin trick, making Hello Kitty cookies is easier than ever. No more “winging” it, simple, inexpensive, and works every time. Who needs a KopyKake? Push-pins work for me, and I hope they work for you too.
By the way, before I go, I have to ask, and I am asking on a whim, without Googling…does Hello Kitty have a name? As in a real one besides Hello Kitty? If you know, let me know.
Now you can decorate ol’ Kitty stress-free. ENJOY!




Glad I found you today!!! Your cookies look amazing! I’m on the search for anything HK for my little girl’s bday party. Thanks 😉
I will have another one you will be interested in pretty soon!
Hi! What tips did you use for all the colors?
Hihi! These are really pretty Hello Kitty cookies! In Japan, where HK was created, she is called, “Kitty Chan”. “chan” is a common affix to little girls’ names or really close girlfriends for that cute feeling~ 🙂
Have watched all of the episodes released in the USA multiple times over the past few years and her name is actually Kitty. When my daughter was little, she would say “Hi Kitty” and when we moved to Florida, she became “Howdy Kitty” but her actual name is just Kitty.
I love your site and thank you for all of the great tips and tricks that you share.
Her name was the million dollar question on “who wants to be a millionaire” !!! Crazy right??? They said it was kitty white c;
Pingback: Lego Ninjago Cookies
Why is the bow added first? Wouldn’t it be easlier to add after outlining and flooding the face all white? Just curious as I think I might make these for my niece’s 3rd birthday. Thanks!!
The only reason is personal preference. I am a big believer in decorators doing things that work best for them. I actually do it both ways depending on how the mood strikes. Do what works best for you no matter what I say. That’s my #1 cookie tip of all =)
Thank you! Your site and tutorials gave me the confidence to try cookie decorating. My cookie favors for my niece’s 2nd birthday were a hit last year. I now will only use you cookie and icing recipes (with lots of almond extract – yum!). I love that the dough needs no chilling prior to rolling out. Thank you for all you do!
=)
Is it completely wrong that I’m 49 years old and smitten with a cartoon kitten? Yes….but I don’t care!
Is it completely crazy to think that the same 49 year old woman, who has an anxiety disorder that causes her hands to tremble uncontrollably, wants to beautifully decorate cookies? Yes…so I’ll live vicariously through you if you don’t mind 🙂
Hi…Just want to say how much I love your ‘tutorial’ pages and I especially love the humour that you include in the instructions. I don’t really like reading long instructions but yours really make me want to keep reading till the end as it keeps me entertained ! Keep it up..Love your website 🙂
So I have been decorating cookies for a year now….. I struggle and am constantly learning. I have one question that I need an answer to. Sometimes when doing lines they end up with “holes” in them. They dry and within a few hours there will be holes in the lines. Help!! Any suggestions if you have encountered this problem.
Weeee i tried it and it worked! thanks sweetsugarbelle! now my hellokittys look like the real thing!
Wikipedia tells me her full name is Kitty White.
Pingback: Star Wars Jabba the Hutt Cookies with Printable Template – SemiSweet Designs
I almost fell off the chair when I got to the pic of you stabbing Kitty in the eye. Wonderful tutorials and am a fan now. I am learning techniques so I hope you will continue. If only my grandmother had been as fun when she was teaching me how to decorate cakes and make icing roses when I was little. Thank you!
Pingback: Learning From Others | Sugar and Spice: A Cookie Blog
Pingback: Fundraiser | Sugar and Spice: A Cookie Blog
Pingback: Mrs. Claus Cookies
Thank you for those great tips. I just got a KopyKake . Can’t wait to try it on these. Thanks so much.
I just had to say this, Hello Kitty’s name is Kitty White. ;D
I love your blog. I’m trying to kick start a bakery of my own and reading about your cookies inspire me a lot.
Pingback: Stop what you're doing and look at this!*% Kerry Cooks
Beautiful, beautiful, ?. May i can ask what size tip you used for piping the eyes and nose (and HOW!?), my hello kitty cookies looks bad, their eyes looks bad, and the nose….:( ..
Also what brand ….?.
Hi Sweet Sugar Belle,
I have to tell you that this hint probably saved my bacon! I live in South Africa and I’m new at this whole cookie business. I got an order for Hello Kitty cookies and thought easy peasy. Hahahaha.
Thank you very much for the wealth of knowledge you are willing to share. Discovering cookie decorating has been a bit like falling in love for me. I’ve never been this interested in something for this long.
By the way did you know that Hello Kitty is not a cat?
http://metro.co.uk/2014/08/28/your-whole-world-is-about-to-get-flipped-upside-down-hello-kitty-isnt-a-cat-4848542/
Thank you, thank you, thank you! I’m making these for my daughter’s birthday. They really are a tricky little cookie. You have made my night so much easier. You are always my go to when I have a cookie question or need some inspiration!
Pingback: Hello Kitty is not a cat, and other children’s party horror stories. | Bright Bird