How to Take Apart and Clean Your Airbrush
My relationship with my airbrush has not always been an easy one. My first attempt went well, but after that it was all downhill. A few years and several guns later, I’m finally have a better understanding of how my machine works, and what went wrong all the times before.
Most of my beginner airbrushing woes were the result of two things, the improper care and cleaning of my equipment, and not being able to reassemble a gun once I had taken it apart. So, when I ran across this amazing breakdown by Laura, of Cadillac Cookies, I begged her to share. I hope it helps others to avoid the frustration of my early airbrushing days.
Be good to your airbrush, and your airbrush will be good to you. I learned the hard way just how true this is. After a frustrating day of colors spitting and spattering on my cookies, I learned that if I wanted to continue airbrushing cookies, I would actually have to maintain my airbrush. Crazy, right?
Now, I’m a stickler for cleaning my airbrush immediately after use. In between colors, I rinse out the color cup with warm water and spray until clear. And once I’m finished airbrushing (or after using sheens), I clean my airbrush with warm water and a clear ethanol like Vodka or Everclear using The Bearfoot Baker’s method.
Regular cleaning is good, but to really keep my airbrush in tip top shape, I take it completely apart and give it a deep cleaning once a week.
Before you freak out, most people (as long as you’re not having problems with clogging or spitting) will only need to do this about once a month. But because I use my airbrush five to six days a week, I do it more often.
Cleaning your airbrush might seem complicated at first, but once you know the basics, you don’t need a mechanical engineering degree to do it.
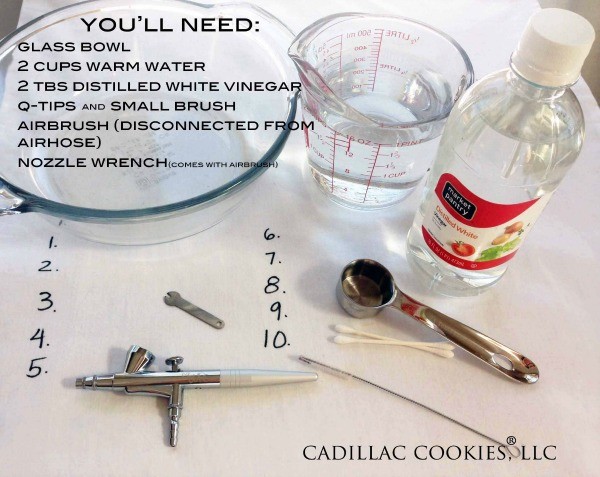
First, mix two tablespoons of white distilled vinegar with two cups warm distilled water (tap water is ok if you don’t have hard water) in a glass bowl and set aside. You can also use premixed airbrush cleaner, but be sure not to use any products that contain ammonia. It will corrode the brass parts & cause a funky build up. Ick!
Before taking apart your airbrush, make sure it is disconnected from the air hose. You’ll want to work on a flat, clean, light colored surface. Some of these pieces are itty bitty, and can be hard to find if you drop them (trust me). I use a white pillow case that I’ve numbered from one to ten. It’s washable and the labeling helps me keep the parts in the same order that I removed them in. I just spread that over my work table, and it makes the process go much more smoothly.
Note: I’m demonstrating with a Duff airbrush, but all gravity feed airbrushes are essentially the same. The only difference between cleaning the Duff and KopyKake airbrushes is that the trigger/main lever can be removed from the KopyKake model.
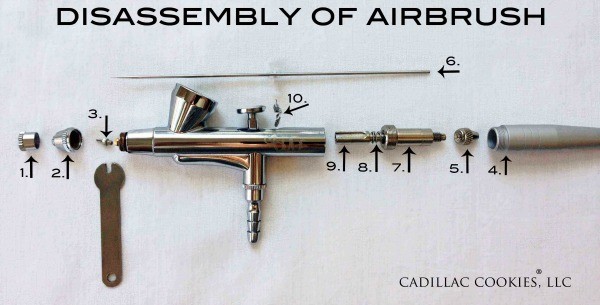
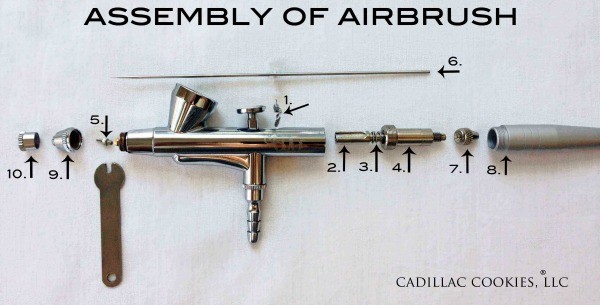
Now, for the fun…disassemble the airbrush in the order below. Here are some very brief instructions. Keep in mind there are a few different approaches, this is just my preference.
1. Unscrew needle cap
2. Unscrew nozzle cap
3. Use wrench to loosen and remove nozzle
4. Unscrew handle
5. Unscrew needle chucking nut
6. Very carefully remove needle, by pulling it out, towards the back. Sometimes, you might need to twist it a tad.
7. Unscrew spring guide. The threading is long, so it might take a while.
8. Remove spring
9. Pull out needle chucking guide
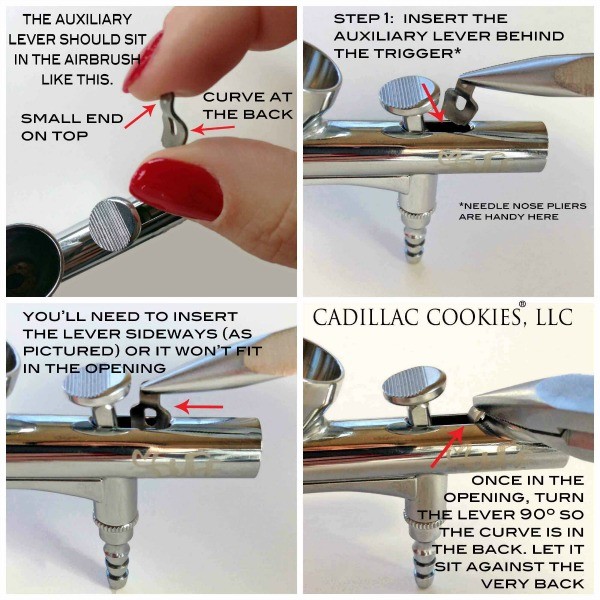
10. Remove auxiliary lever, by twisting 90º and pulling straight out.
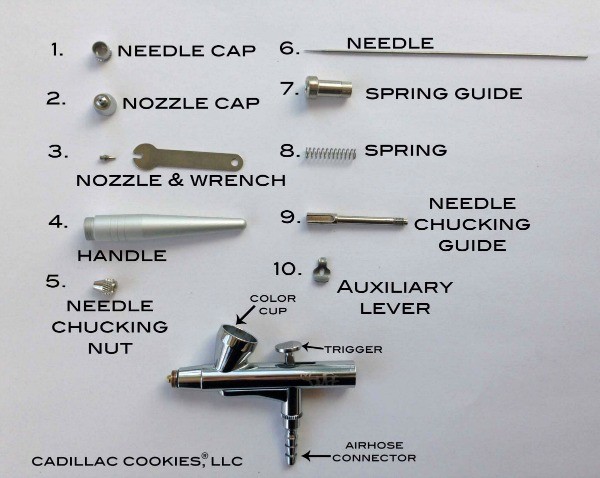
Have you ever wondered what all of these parts are called? No worries, I’ve labeled them just for you! That’s a mouth full, right?
Once you’ve disassembled your airbrush, you’re ready to clean it. It’s amazing all of the color build up you don’t see until you take it apart.
Keep in mind, it’s best not to let your airbrush parts soak overnight. It will not ruin your airbrush, but it can completely remove the lubrication that allows the airbrush to work smoothly.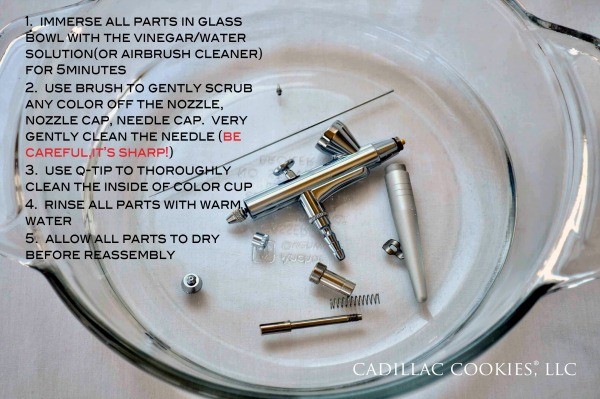
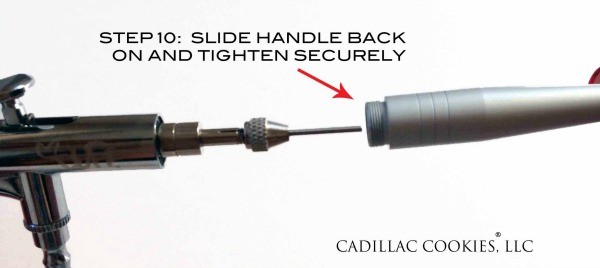
So, now that your airbrush parts are sparkly clean (and dry), you’re probably wondering how in the heck to put it back together. Once you get past the first step, it’s super easy! Here’s a quick peek at the order that they go back together,
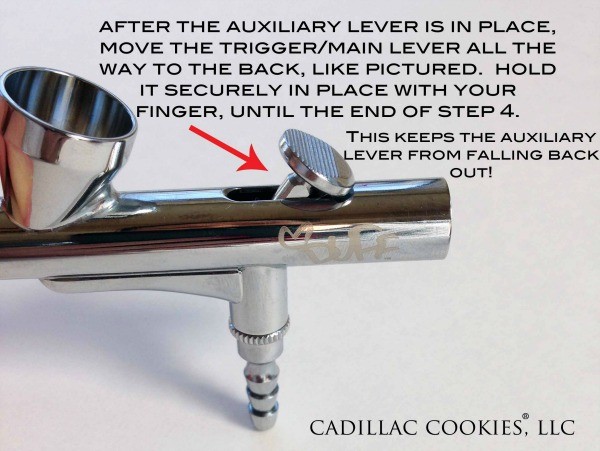
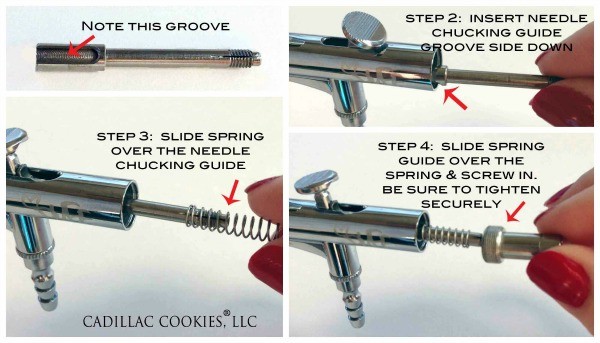
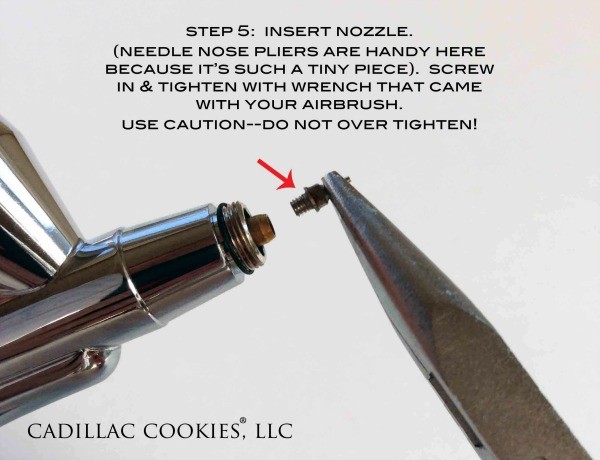
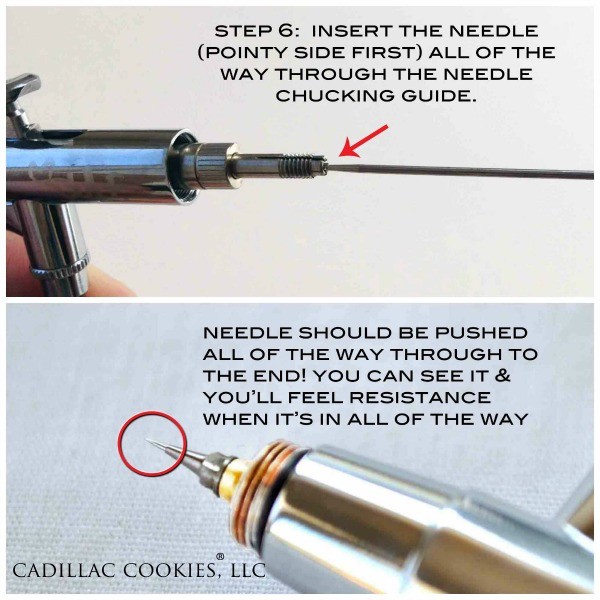
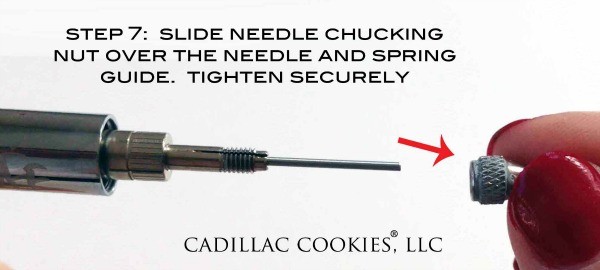
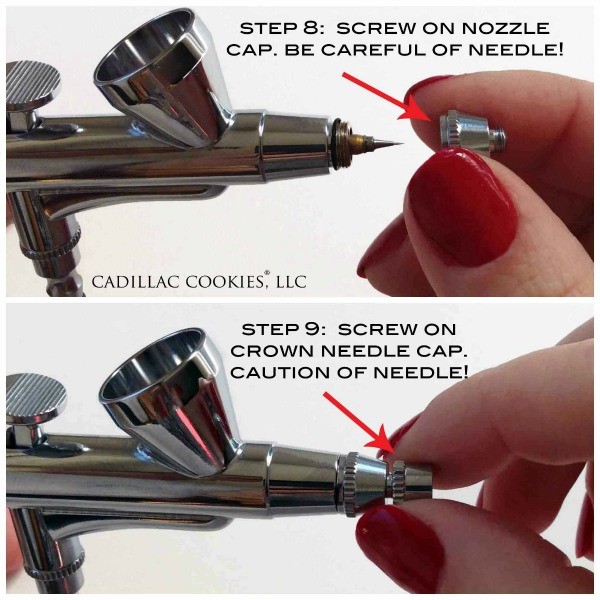
To assemble, follow the instructions below:
After you’ve replaced and tightened the spring guide (Step 4), double check your trigger. Pull it back and make sure it’s not too loose. If it feels too loose, then you’ve not tightened the spring guide enough.
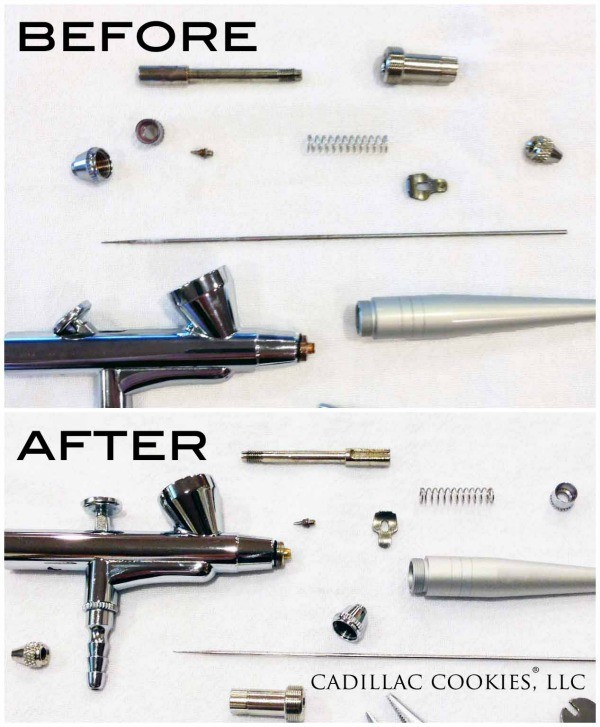
Voila! Your airbrush is clean! Here’s a before and after. You can really see the difference.
Before you go, here are some tips and additional troubleshooting. If you have any other questions, feel free to ask in the comment section below.
Airbrush sprays without pulling the trigger:
Make sure needle is in all the way–remove handle, remove nut, gently pull needle back about an inch or two, then very gently push needle back in to the very end. Tightly Replace chucking nut, and then handle. It’s ok for air to be coming out, not color unless pulling the trigger
The trigger is loose or does not have any resistance when pulled:
The spring guide is not properly tightened. See steps two though four above.
The trigger is stuck, or has too much resistance when pulled:
There are several possibilities. This includes improper assembly, mineral buildup (use distilled water for cleaning to prevent this), or loss of lubrication from repeated cleanings. To re-lubricate your gun, use a clean cotton towel to apply a light cooking oil such as EVOO or food-grade sanitary lubricant the moving parts of the gun. This includes the auxiliary lever, needle chucking guide, spring guide, and the portion of the needle that slides when the trigger is pulled.
Airbrushing with pearl sheens or white:
Airbrushing with sheens or white colors can wreak havoc on your airbrush gun. If you notice spitting or spattering when you normally don’t, it’s time to take it apart to clean it.
Now, that your airbrush is sparkling clean it’s time to go forth and spray ALL the things!
For more tips on cleaning and assembling your airbrush, check out the links below:
- How to Clean an Airbrush Gun via The Bearfoot Baker
- Cleaning Your Duff Airbrush Machine
- Cleaning Your Airbrush via AirbrushGuru.com
Don’t forget to hop on over and “like” Cadillac Cookies on Facebook to check out all of Laura’s amazing airbrushed designs.



Been wanting to get a new airbrush gun set. Which brand do you have if you don’t mind sharing
thanks nikki
Thank you for sharing this article! It is perfect timing as I am in the midst of a battle with Fat Daddio’s after purchasing their $200 airbrush system. It never worked properly, never maintained pressure. I should have purchased a Kopy Kake one but the supply store I use only sold FD units. It has been the WORST purchase I ever made and the customer service I have received from Fat Daddio’s is beyond horrible! We sent the unit back to them per their instructions, insured and packed it carefully and then I receive an email from FD Vice President accusing us of dropping it before we mailed it. After he realized we didn’t drop it, he said that we did package it well and the post office damaged it (yes, the post office made it more broken than it was, broken is broken right?) and he told us to file an insurance claim with the USPS. I filed a claim, before realizing that FD should have filed it and the USPS requires that the item be inspected so they sent a letter to FD to bring it into their local Post Office for inspection. Well, FD ignored the letter (they admitted they didn’t bother b/c the letter wasn’t addressed to anyone in particular so they never inquired about it) and the post office denied my claim due to FD not responding. Then the Post office asks why they didn’t file the claim and why they aren’t honoring the warranty on the airbrush since they told me to send it to them for replacement. It occurred to all of us that FD would rather me get compensated by the USPS than them and after telling Fat Daddio’s how frustrated au am since I am without an airbrush since September (bought it in May), I asked them why they would honor my warranty and then go after the post office for insurance themselves. I actually have an email from Fat Daddio’s saying they wouldn’t fix it until they were paid for the additional damage to the on/off switch during shipping. I asked what difference does it make since they were supposedly giving me a replacement unit? I also said that to lose me as a consumer far outweighs compensating me the value of the airbrush AND that it is unacceptable to tell me that after paying the amount I did that you won’t go ahead a fix it until the post office pays. So obviously they will use any excuse to avoid reimbursement and honoring their warranty since now it is dependent on the post office paying them.
I will never buy another Fat Daddio’s product. I was buying their fondant and now I will buy FONDX again. Do not buy their airbrush system. I’ve read reviews before I bought it that said it didn’t maintain pressure and I called FD for help immediately after the first use and they just say to read the directions which are terrible!! I “used” the airbrush four times and wound up needed to buy cans of luster spray to finish the cakes. I thought spending $200 would ensure a great system but totally wrong. I’ve never in my life had to fight with a company the way I have with Fat Daddio’s and I never filed an insurance claim or had the Vice President of a company tell me to on a product that was broken to begin with! I had to share this – I apologize for the rambling, but I do not want anyone to go through this or waste $200 on a FD airbrush. You’d be better off setting $200 on fire.
Wow, good to know!! Thank you for sharing! I will never buy this brand.
Thank you for such a thorough post. By following Laura’s instructions, I will have the cleanest and most efficient airbrush gun ever!
Great post….the best that I had seen lately
I was so excited to see this post. Purchasing an airbrush is next on my list of things to try. I find this information very helpful and timely! Thank you!
Me too! This tips the balance toward buying an airbrush. It just sounded so complicated and troublesome to operate and clean. Not anymore 🙂
This is a great article! I am saving it because I know I will refer to it again and again. I wish my airbrush had come with this set of instructions – it would have saved me a lot of grief.
Hi Callye! When I saw the headline I thought “Okay…” but after reading it I am not sure I want to purchase one – lol. Heck, I probably will get flustered… The post is very well written and the instructions are great! Thanks for sharing. I will put an airbrush way back on the get list. lol
THANK YOU! This has bogged me down more than once and I am thrilled with your always crystal clear and thoughtful directions! You are a gem!!!
very informative!
Thanks for the great article. i really appreciate it. it will be a great guide for my En ucuz asus zenfone thesis
Pingback: Gray Airbrush Color - Artfully Designed Creations
THIS IS GENIUS! I just used my airbrush & am following this as though my life depended on it.
Thank you!
thank you for the info – I wonder if anyone of your “cookie” friends have had problems with printers that print “edible wafers” or paper. ever so often I get orders to make cookies with pictures. I love making them but the printers always give me a problem. I’ve had 2 printers w/food color inks. And both have given me problems. I’m wondering if its because I have to maintain them (printer) somehow. I hope someone out there knows whats best to use.
Thanks for breaking this down so clearly, Laura!! I’ve had mine apart but not quite as fully as you do. Will have to try your approach the next time I am due for a cleaning. Thanks–Katy
Thank you so much! I am definitely pinning this! I just bought an airbrush and haven’t used it yet, but I want to be prepared for it.
Thanks! Very helpful!!!
Thank you soooo much! I did it! Will definitely keep a copy of this blog for reference, since I’m a newbie with this airbrush thing!
thank you for sharing, very helpful information.
Your instructions were so easy and clear cut. You saved my airbrush!!!
Thanks:)
When adding color the gun bubbles making it difficult to add enough color. Any suggestions?
Hi! I am experiencing the spitting and thought maybe I should clean my airbrush, but before I took it apart I notiCed I don’t have one of those wrenches. I have a Wilton airbrush. Can I still use this method for cleaning?
Thanks!
Brill, thank you! – just saved my airbrush 😀
After cleaning, I can’t get the needle to go all the way back in, what could I be doing wrong? I’ve followed your instructions but it’s just not going back in and I don’t want to force it.
Thank you! You’ve saved me! I thought I cleaned my airbrush well but I was wrong. Your step by step breakdown and rebuild was exactly what this novice needed.
My Duff air brush has been down for months & months… I came across this article & NOW it’s working… I am SUPER excited!!! Thank you soo very much for sharing ?
Althoigh I’m using a Luminous Air Makeup airbrush, your clearly written cleaning instructions saved me from spending another $100 for a new stylus when all I needed to know was how to reinstall the “toggle clip” as it fell out when I removed my needle to clean it! Luminous Air refused to tell me how the gun goes together. I was removing the needle for cleaning PER THEIR WRITTEN INSTRUCTIONS(which never mentions the toggle clip btw!). So THANK YOU, THANK YOU, THANK YOU! I am now up and running again, which is truly a relief as I’ll be doing my daughter in law to be & son’s hair & makeup for their engagement pictures later today!
Thank you for this article – will try tonight and will possibly save my wonky airbrush system… 🙂
By the way, I adore all your products! Been having a ball shopping for your stuff at Michael’s!!
Thank you SO MUCH for this post. I saved it in my “favorites” and refer to it every time my airbrush that I use for makeup gets clogged when I use it and don’t properly, at least, rinse it after use and it stops working.
Thank you for this tutorial, it is the best that I have seen! I just now have this one problem. After putting it back together, air does not come through at all. What do i do ? I believe it was put together correctly but I have to say I had tough time putting the operation lever and the lever guide in. How do I make sure the main operation lever is in correctly? It moves back and forth securely but doesnt push down. Any help would be greatly appreciated.