Gerbera Daisy Cookies
I love the look of airbrushed cookies, but I always get a little nervous when it’s time to break out my machine. So, today I’ve asked two of my favorite airbrushers (that IS a word) Laurie and Jeanette of SugarBliss Cookies to demonstrate how they create their beautiful gerbera daisy cookies and give a few tips on making airbrushing easier for those who are airbush-impaired (like me).
Almost all of our cookies are airbrushed these days. The airbrush is by far out favorite cookie tool and it is VERY addicting. It always looks like the design is missing something when we try to make a cookie and skip the airbrushing. It is a great, easy, fast way to add dimension and color to cookies.
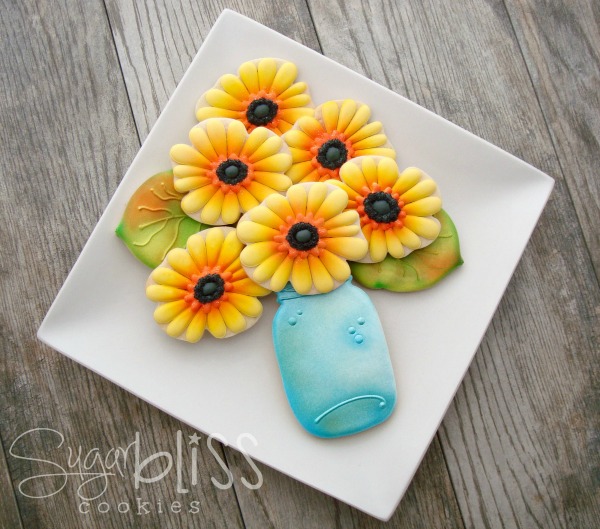 We get lots of comments from people that are afraid to use their airbrush. If you’re one of those people, here are a few tips and tricks to get you started.
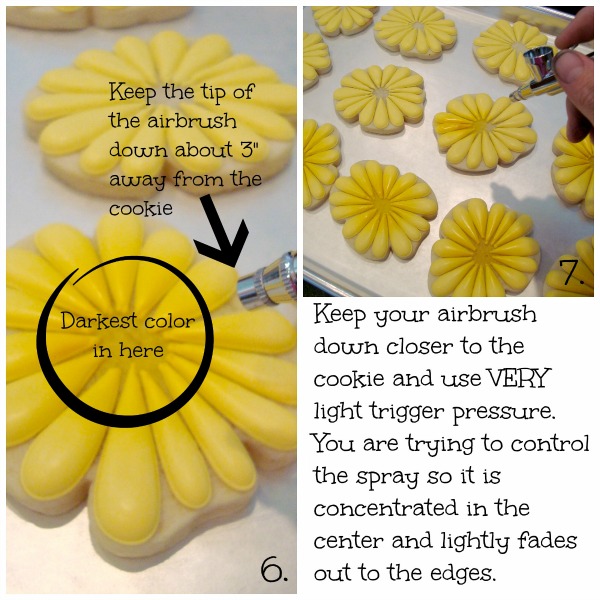
- Go easy with the trigger. Less is more!
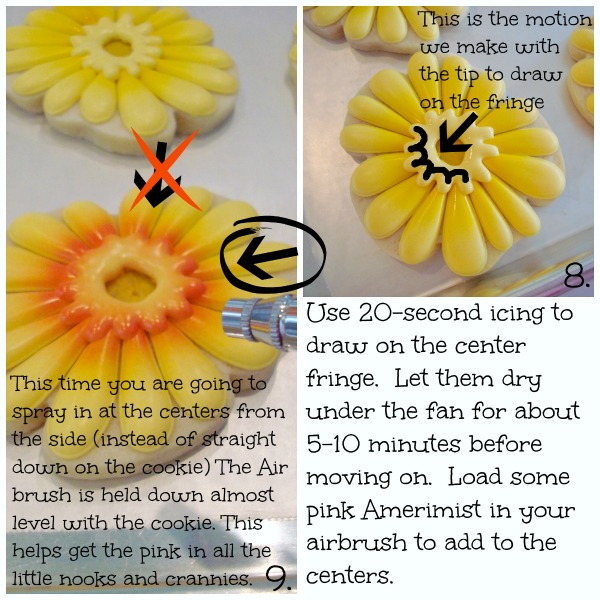
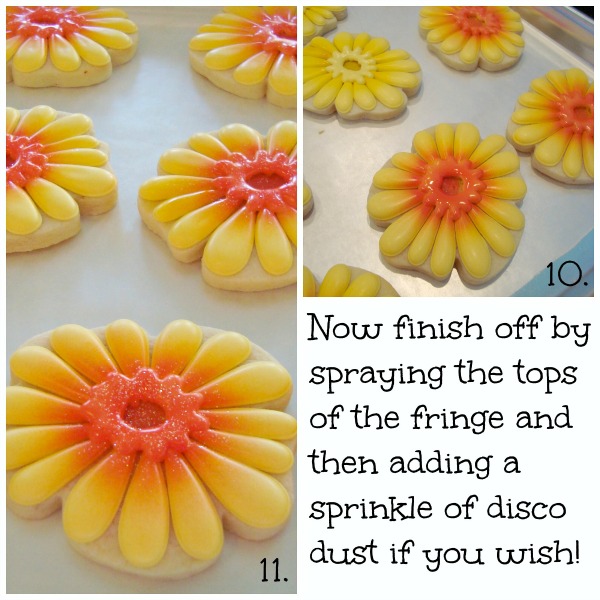
- You are never done with just one color. It takes two, three and sometimes four colors blended together before your get the shading and dimension right. Think highlights and low lights.
- Every airbrush behaves a little differently. Get to know YOUR airbrush. We have two of the same brand and they spray completely differently.
- We have totally made all of this up. This is SugarBliss airbrushing 101. We have never taken a class and neither one of us had ever used an airbrush before cookies. Everything we know is from trial and error. You will learn so much from actually using your airbrush that we could never explain in a tutorial.
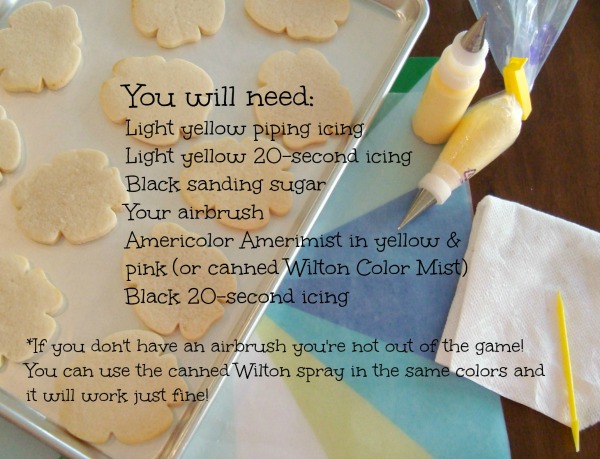
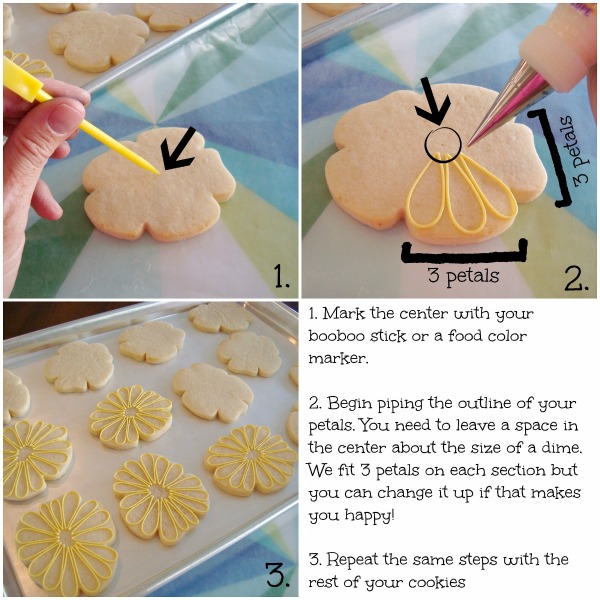
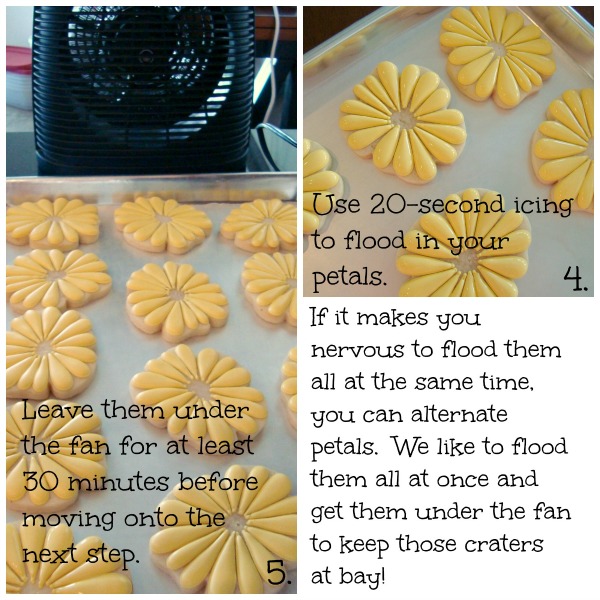
We like to use a sand dollar cookie cutter for our Gerbera daisies because we like the imperfect shape it gives them. You can find a similar one here.
Let’s get started.
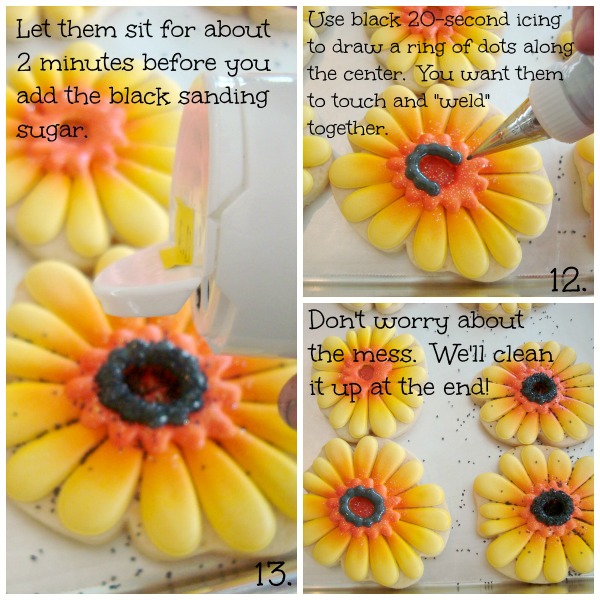 As we mentioned before, we’re entirely self taught, so we love hearing tips and tricks from other airbrushers. If you’re already a pro, please share your advice and experiences with all of us in the comments below.
![]() Be sure to like SugarBliss’s Facebook page to keep up with all of their latest creations!
Be sure to like SugarBliss’s Facebook page to keep up with all of their latest creations!


These cookies are just gorgeous! Thank you for sharing your techniques.
Thanks Ashley! We hope you’re feeling inspired to give it a try!
Doesn’t matter how many cookie conferences we hold…there are so many ingenious ways to accomplish gorgeous cookies! How wonderful to learn some great airbrush ideas here, I love the cookies!!
Thank you so much Susie!
Oh, I am definitely one of those AFRAID to use my airbrush thingy! Sensational cookies!! Thank you for this post 🙂
One of these days I’ll make friends with my airbrush. I love these flowers! I’m pinning so I’ll be able to find it when I’m ready to try!
Lizy, we’re glad to hear it! The airbrush has been such a fun and worthwhile purchase! You wont regret it.
I’m saving for an airbrush but do use (gingerly) the Wilton sprays. I was surprised to learn that you are also a tad insecure about spraying. And reassured! Good to know that I’m not alone! Thanks for sharing.
I am looking to purchase an airbrush machine, can you recommend any particular brands. Is there anything that I should stay away from? Would love your input.
Hi Andrea!
We use a Pegasus airbrush and love it! It is small and very user friendly. We have tried a few other brands and haven’t felt like they were as easy to control.
Thank you Callye, Lauire and Jeannette. I don’t have a machine, but have tried the can spray. It beaded up on me, so I thought I wasn’t doing it correctly. Then I took another look and was somewhat pleased. However, I was so beat down with my thoughts (when it beaded up) that I now am afraid to try again. lol (Tried several times.) Anyway, I purchased boards to prevent spray (the spray went all over the place, a disaster, a lot of clean up) so I am contemplating trying again. lol Thank you so much. (I hate all the clean up, etc. That stops my progress.)
Hi Dona,
The can spray can be messy! You are right about that! The airbrush is actually easier to control and it doesn’t cause as much over spray. The beading you experienced might be from too much color all at once. Maybe it would help to try applying 2 or 3 lighter coats. Good luck and let us know how it works out!
thank you so much for this wonderful tutorial! I can’t want to try it with my not-used-enough Duff airbrush. By the way, everyone, even if you mess up…it is just a cookie and has another use….stuffing in your mouth! Keep practicing and don’t forget to wear your stretchy pants when you are unsure of your results!
Hi Kathy, we hope you’re feeling inspired. We have used a Duff airbrush and it handles very similar to the Pegasus that we use. You are definitely right about those cookies! There are always people around here that are ready and willing to take care of those “mess ups” 🙂
Gosh these are SO beautiful. I have an airbrush that I’ve never opened (2 years now). These ALMOST make me want to open up the box. They are just so pretty. Beautiful job Laurie & Jeanette. Thanks for sharing! Cristin
So pretty!
I was one of those afraid of my airbrush! Once I got it out and gave it a try, I wanted to airbrush everything. Thank you for sharing more tips, you’re cookies are always gorgeous!
Pingback: Twenty Decorated Flower Cookie Tutorials
Pingback: Delicious Mother's Day Desserts That Will Melt Your Mom's Heart - Top Dreamer