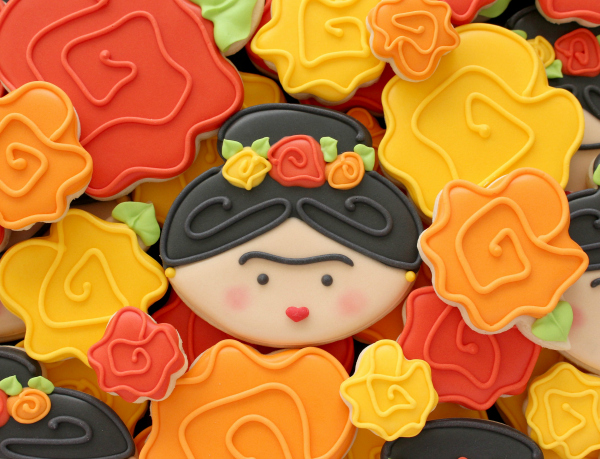
How to Make Frida Kahlo Cookies
Growing up in west Texas gave me a special love for Mexican culture. I love the the food, the art, the beautiful colors, and traditions.
I especially love the self-portraits of Mexican artist and cultural icon, Frida Kahlo. So much, in fact, I dressed my daughter as Frida last Halloween. 
That led to cookie ideas, and this year I finally got a chance to make Frida in cookie form.

This cookie was created with the skull cutter from my Shape Shifters set, which is now available in select Joann stores. If you don’t have it, the template will translate well to the skull from my Halloween set.
Below are step-by-step instructions on how to decorate this cookie. I’ve also created a free printable template to help you recreate the design. To get yours, click here!
Step 1: Print provided template.
Step 2: Cut the template into two pieces along the hairline, place on the baked cookie, and use a food-safe marker to divide the space into two sections. If you need a breakdown of how to use the templates, check out this post.
Step 3: Outline the two sections in the appropriate color (black for the hair, flesh-tone for the face)
Step 4: When the outline is dry, fill the two sections, allowing the first section to dry before filling the second. This will prevent the two colors from running together in addition to icing bleed.
Step 5: Add “squiggle roses” to Frida’s hair. To learn how to make easy royal icing roses, click here. If you prefer videos, you can see me in action here, about a minute and ten seconds in.
Step 6: Add the finishing touches by outlining her hair, adding an eyebrow and eyes, and by blushing her cheeks (I use a cotton swab rather than a brush these days.) I attached a red heart sprinkle for the mouth…you can drop it on in step four for a little extra security, but it can also be piped. Add earrings and a few tiny leaves (see this done in the video link in Step 5,) and you’re finished!
Add color and interest with my favorite rose cookies, AKA the EASIEST ROSE COOKIES EVER, made with my nested flower cutters, also in select Joann stores now. To see the post and instructional video, click here. Oh, and if you prefer your roses to have leaves, you can add them like so, OR purchase a version with leaves here.
This cookie design was inspired by a design created by Esther Ruiz of Fairy Cakes. You can check out the original here.
Be sure to head into your local Joann store to pick up all the supplies you’ll need, or shop online by clicking here. They’re currently offering $5.99 flat rate shipping on all orders.


You are just sooo good at what you do!
Cute kids too!
These are adorable!! I love them so much. Thank you for sharing!! <3
The cookies are seriously great, but where is her mustache?
Beatiful!
I used your skull with flowers to also make a version of Frida. I loved the flowers!
You always inspire us with your talent. Thank you for sharing. Such beautiful children.????
Lol…didn’t mean those question marks. Stupid spell check.
Your children are precious! And I have always loved Frida (I grew up in New Mexico, now live in Texas)–I have saved this post to make these adorable cookies next year!!! Your ideas always inspire me.
Aww, your littles are so darling, I’m guessing the one hidden under the mask is as cute as the other 3. Thank you for the detailed instructions for Frida.
On a completely different subject, you recently ask about mini cutters. How fun would it be to have a mini set of the eyes, from the Halloween set, to cut into the coffin so they’re “peeking” through the lid.
Perfection! You are SO good at this, it’s unreal!
This post couldn’t have come at a better time because I was asked to make these in 2 weeks for a Frida themed birthday party!
OMG these are simply adorable!!!!