Decorated Golf Ball Cookies {Guest Post}
I have been following The Bluebonnet Bake Shoppe from the beginning of my cookie decorating adventure and may just be her number one fan. Besides being one of my favorite decorators, Jennifer also makes the best sugar cookie I’ve ever eaten. I first discovered her work on Flickr, and eventually we became real life friends. I’ve always loved her simple straightforward decorating style, and these brilliant golf ball cookies are no exception.
![]() I am so thrilled to be here while Callye is off doing all sorts of cute and cuddly things with that new baby girl of hers. I’m also just a little bit excited to be doing my first ever guest post too. Of course, now that its all done I can think of a bazillion things I’d do different (like why didn’t I use pretty backgrounds), but no matter how I slice and dice it, this technique is still pretty simple and straightforward.
I am so thrilled to be here while Callye is off doing all sorts of cute and cuddly things with that new baby girl of hers. I’m also just a little bit excited to be doing my first ever guest post too. Of course, now that its all done I can think of a bazillion things I’d do different (like why didn’t I use pretty backgrounds), but no matter how I slice and dice it, this technique is still pretty simple and straightforward.
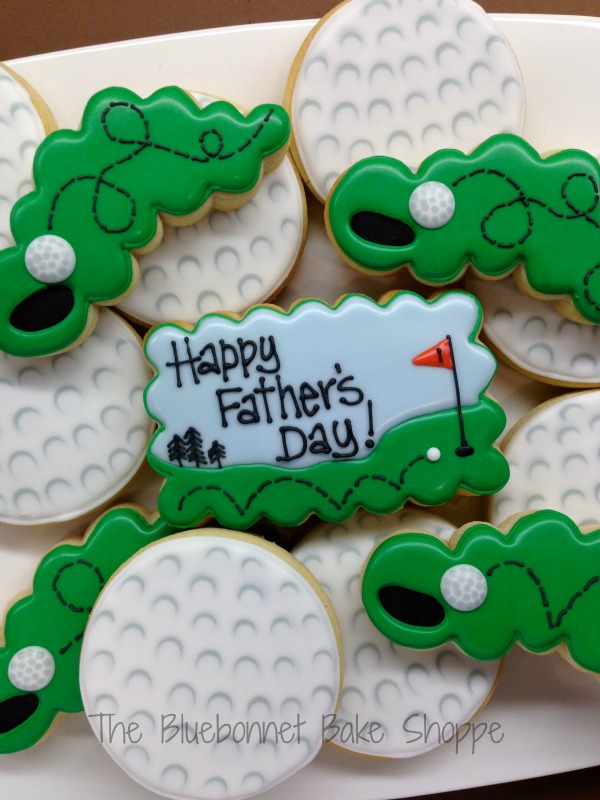
If you’ve ever done a golf-themed set of cookies, you’ve almost certainly done the balls with little white dots for texture, which makes it very difficult to personalize with name or writing. Well, one day last fall, as I was about to create even more bumpy golf balls, I couldn’t help but think there there MUST be a better way…and right then and there, the idea came to me of doing shaded looking dots that sank in rather than white dots that sit on top. It was a true “lightbulb” moment that forever changed the way I do golf balls.
- White outline icing with tip #3
- white and grey 12-second flood icing both with tip #2 or #3
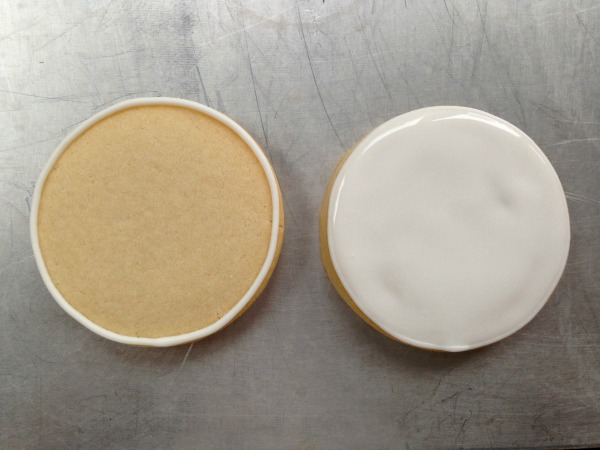
 First, outline and flood a round cookie with white icing. The trick is not to overfill the white at this point since you’ll be dropping in a lot of white and gray dots. Using a larger tip outline helps to hold it all in place.
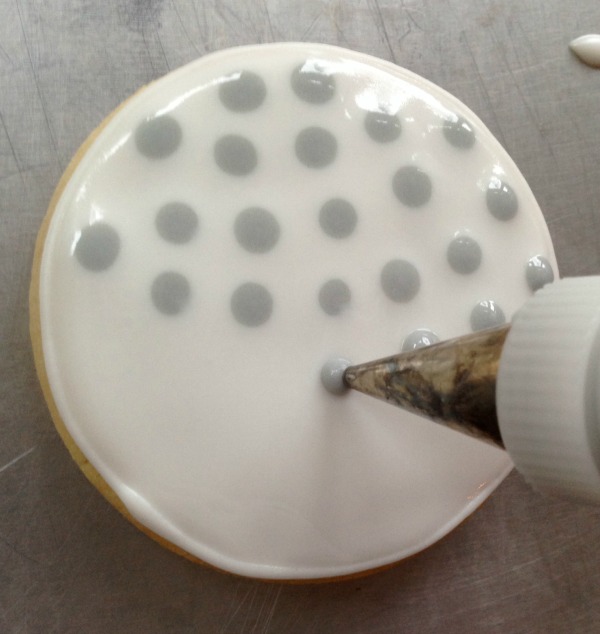
 Next, drop in grey dots. I like to do these in lines that have an upward curve, which gives the ball a more rounded look. Plan on working sort of quickly because it’s wet on wet. Using a looser flood icing will also help everything smooth out nicely in the end.
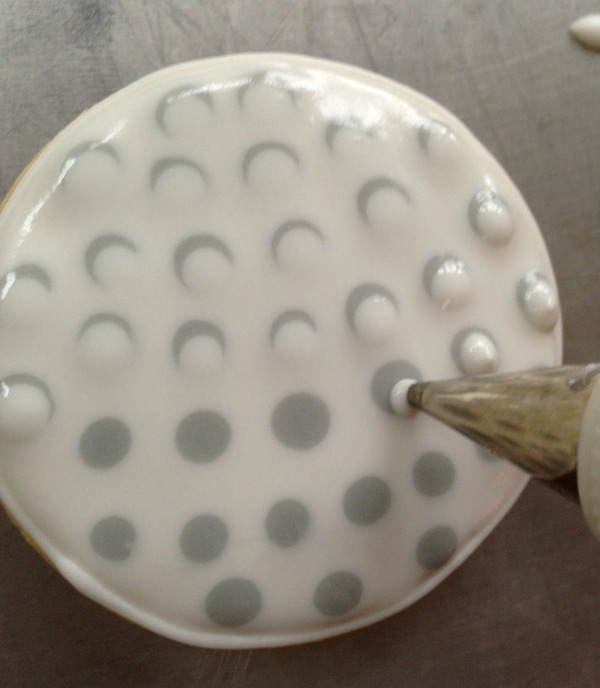
 Immediately drop in the white dots just a smidgen below each gray dot to create a cool “shadow effect” on the dimples. Be sure to cover the bottom edge of each gray dot or it’ll simply look like you have a white dot inside of a grey circle. That’s not the look you’re going for. Just remember to work as quickly as you can, but don’t worry about it being perfect. Let dry, and pipe some grass, words, or nothing at all it that looks good to you.
If it helps, here’s a short video to show how I drop in the white dots and push it up into the grey to create the uniform arches. It may look lumpy at first but if your consistency is right it’ll all smooth out in the end.
I hope you’ll try these soon, maybe in time for Father’s Day?


Jennifer, this is brilliant! I’ve been looking (and looking) for a great way to do royal-iced golf ball cookies that don’t have raised bumps. PERFECT!!
Thanks Elizabeth! I’m happy this will work for you. 🙂
Jenn, you are absolutely brilliant!!!!! These are fantastic! What an excellent and clever idea! You have changed the world of golf ball cookies!
Tracy, your encouragement means so much to me…thank you!
This is one of my favorite techniques, thanks to you, Jennifer!!!
Jill, to know that I’ve contributed to your bank of decorating techniques is a true honor!
this is genius! We have a golf tourney here, and I always try to make cookies since I met my love at a PGA tourney. I have done fondant trying to get that look, but these are perfect!!! Thanks for sharing this! Now…if I can squeeze in some more cookies!
I will definitely not be the first person to say that these golf balls are just brilliant! Sometimes the most simple techniques yield the best results. Thanks for sharing!
LOVE!!
I love this!!! So smart!!
Brilliant! When I saw the pic, I truly thought they were airbrushed! Love it!
These are fantastic! I was just getting ready to make a golf set. I’m gonna try this!
Unbelievably cool technique Jennifer….I can’t wait to try it!! I’ve been using Callye’s sugar cookie recipe since I started decorating cookies 18 months ago. I’ve tried others but always come right back to hers. So, as you can imagine I am more than a little curious about yours since she says it’s the best….that’s quite a compliment! Would you mind sharing your recipe with us? I would love to try it.
Dyan – believe it or not I’ve never even made another sugar cookie recipe than the one I have, so I’m not sure how it compares to Callye’s, although I hear great things about her recipe all the time. I don’t give my recipe out, but I can tell you that it’s a soft cookie that I roll 1/2″ thick. Maybe there’s just more cookie in each bite lol!
This is fabulous! Genius! Thanks for sharing, I love it!
HOLY MOLY! That’s genius!
Jennifer!!!
OMG! I just LOVE your tutorial!
Amazing idea to make the ball dots with grey and White RI!!
And I love how you used that warm cutter!!
Thank you for this Amaznig tutorial!!
xoxo
Absolutely BRILLIANT! Thanks for sharing 😀
Fantastic. I have to do 20 dozen golf ball cookies in 2 weeks and I was dreading using a chopstick to make all the dimples. What cutter did you use for the green? Maybe I’ll mix some of those in too.
That’s a lot of golf balls! I used the Wilton worm cutter for the curvy little greens. I’d love to see how you do them too!
These are amazing looking! Well done – you are very talented 🙂
Aww, to see your work up close and personal is as good as it gets! You’re the best!
Kim – thank you sooooo much!
Best looking golf ball cookies ever! This technique is brilliant.
These are awesome! Great job Jenn!!
Thanks Kim!!!!!!!! 🙂
Sheer brilliance! Thank you!
Genius and just in time for Father’s Day!
What a great technique for the gold balls! I also love the golf ball trail; so cute!
Pingback: Father's Day Cookie Ideas - The Bearfoot Baker
Do you know that I had forgotten that I used this technique on al radio microphone cookie way back when? It worked out perfectly! This technique is genius. Now I gotta find that photo… You’re the best Jennifer!
I made these today….I am so happy to have seen your awesome idea! There is a Master’s champion and PGA tour golfer that is going to be happy to share cookies with his kids at this weeks tour event! Thanks!
Do you think the gray shadow technique would work well for a colored golf ball? I’m doing red and purple golf balls to go with a mini golf theme. Should the shadow maybe be a dark red against a bright red background instead?
Pingback: BAZAR LXI – Galletaslombardero | cookies on time
Pingback: Simple Golf Cookies - The Bearfoot Baker
Pingback: Decorated Golf Cookies
Pingback: 20 Fun and Simple Decorated Cookies for Father's Day
Pingback: Easy Hole in One Golf Cookies
Pingback: Decorated Golf Balls | The Best Golf Courses
Pingback: Memorial Day Golf Ball Sugar Cookies | Sarah D.'s Sweet Adventures
I’m so happy I found your site!! I can’t wait to make all of these golf cookies for my son’s first birthday in November. I love your step by step instructions!!
I love this! Can’t wait to make some! Looking at the other golf cookies in the picture with the green for the grass…they look kind of glossy…mine always look extremely matt. Do you know what makes yours look shiny?
I think that using a fan or dehydrator to dry them is the best way to make them shine. Here’s a post to explain. https://www.sweetsugarbelle.com/2011/04/my-1-fan-wfmw/