Creating Expressions using Royal Icing Transfers with Arty McGoo {Guest Post}
Happy Easter, everyone. Today, I have a very special visitor, the amazing Elizabeth Adams, otherwise known as Arty McGoo!
I always feel so special when Mrs. McGoo comes to my place because I’m one of her biggest fans! I could go on and on, but instead I’ll let her amaze you in true Arty McGoo Style. Enjoy!
![]() Hi, my name is Arty McGoo and I’m so excited to be here today! I really wanted to babysit little Liv and french braid all that hair, but it looks like I’m going to babysit Callye’s other baby today. I guess this would be called blogsitting? I had all kinds of grand plans to repurpose those baby themed cookie cutters we all have. I rolled out my dough, cut out the bib and the rattle and pacifier… I sat and stared at those things and then I realized… Crud, I’m not Callye! I suck at re-purposing cutters. Then I ate the cookies and I felt better.
Hi, my name is Arty McGoo and I’m so excited to be here today! I really wanted to babysit little Liv and french braid all that hair, but it looks like I’m going to babysit Callye’s other baby today. I guess this would be called blogsitting? I had all kinds of grand plans to repurpose those baby themed cookie cutters we all have. I rolled out my dough, cut out the bib and the rattle and pacifier… I sat and stared at those things and then I realized… Crud, I’m not Callye! I suck at re-purposing cutters. Then I ate the cookies and I felt better.
I had another project I was in the middle of and I am so excited about what I learned while doing it, that I thought I’d share those results with you instead. The inspiration started at CookieCon last month. That magical conference where nobody gets tired of talking about cookies and making cookies, and then we dream about cookies, and wake up and it starts all over again and continues for three wonderful days. During Myriam’s {Chapix Cookies} class she demonstrated how she uses royal icing transfers. I usually only make royal transfers when I pipe roses, but she opened my eyes to all the possibilities. I loved the dimension it gave and how easy they were to use and promised myself I would use this technique more when I got home.
 Myri and I. I am squishing her!
Fast forward to a couple of days ago: I was working on this guy {let’s call him Meester Bunny} and I was thinking I would paint some eyes on him, but then got a little nervous. He was looking so cute and I didn’t want to screw him up! Eyes are such a focal point and the right expression makes a huge difference. I’m sure I’m the only one that gets a little nervous when it comes to decorating faces, right?
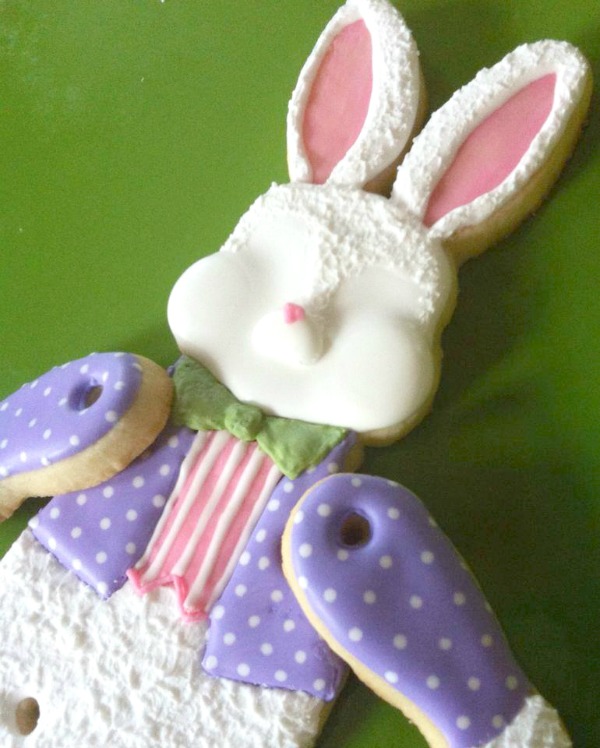 Then, I remembered the promise to myself to try more royal icing transfers and decided this would be a perfect time to experiment and virtually fail-proof! If I didn’t like how they looked, I didn’t have to use them. I grabbed some wax paper and filled my piping bags. Let’s take a second to talk about consistency. I’m new to the royal transfer family and by no means an expert, but I’ll tell you what I used: a soft piping consistency and it worked beautifully. I barely thinned the frosting, just enough so it wouldn’t keep a peak, but didn’t completely settle down. This thickness gave me the dimension I wanted and also dried super fast.
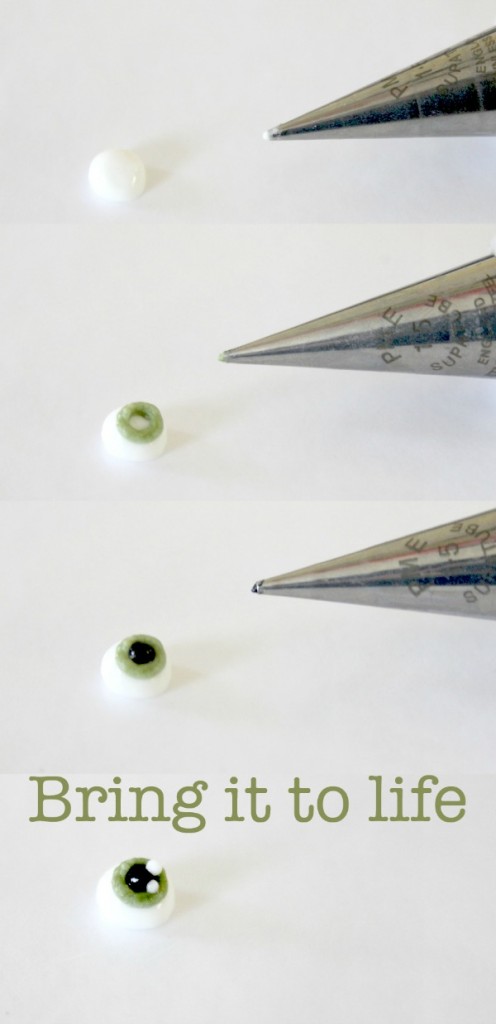
Because I was making small details, I only used 1.5 PME tips, but a 1 or 2 of any brand would work great as well. I started out with a squeeze of white, piped a little green circle, and filled the middle with a dot of black. I didn’t wait in between, it was just bing, bang, boom. The next step is my favorite because it brings the eye to life. I added one or two dots of white for a highlight and voila! I had an eyeball. Okay, that was easy and fun. The next step is to make a billion more. The beauty of RI transfers is that they are so fast and easy that you make a bunch and odds are, a couple of them will be pretty close to identical and the transfers you don’t use keep a really long time in a sealed container for later, you know? for that jar of mismatched eyeball cookie you’ve always wanted to make.
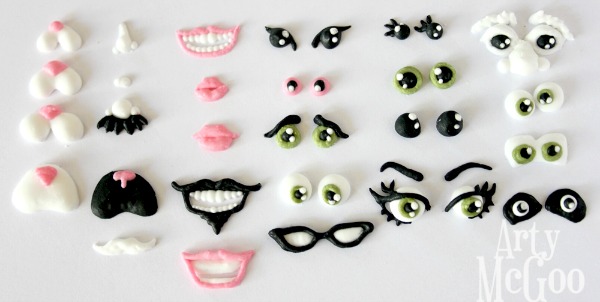
 Let the transfers dry. I know overnight is probably suggested, but I am impatient and peeled these puppies off about an hour after I piped them and I had no casualties, yes even the eyebrows. If you are a rebel like me, be careful and take the humidity of your area into consideration and always make more than you need.
The next step… go crazy. I knew I wasn’t going to put big kissy lips on Meester Bunny, but it was too fun piping different eyes and mouths and noses. Make different sizes, different shapes, it’s amazing how many expressions you can create.
 The next step is to play Mr. Potato Head, and put the different parts together. It was fun to try the different faces on Meester Bunny. I experimented with the spacing of the eyes, how high they were on his face, and I loved trying out all the options before committing to one.
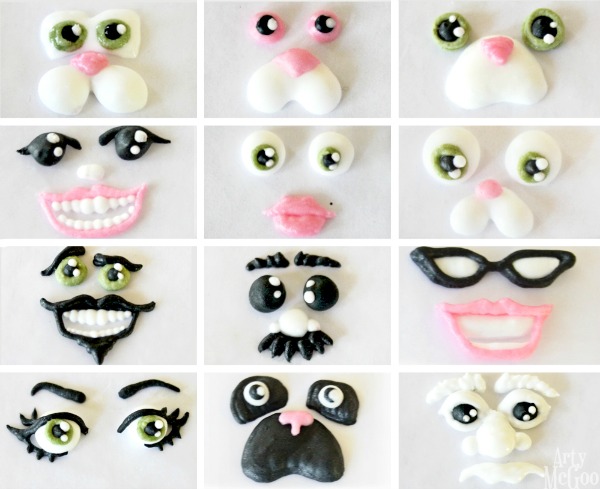 So after playing around with the different facial features, I picked a nice pair of eyes, put a little dot of white royal icing on the backs and placed them where I had practiced. I loved discovering this fuss-free way to decorate faces and I know I will be using the royal icing transfer technique a lot more in my designs.
 Thanks for having me blogsit, Callye! Next time I’ll trade with you and I’ll be on baby duty.
![]() Pssssttt…I’m not usually one to call my idol a fibber, but that whole thing about not being creative with cutters? Total whopper. If you don’t believe me, just click here.
Pssssttt…I’m not usually one to call my idol a fibber, but that whole thing about not being creative with cutters? Total whopper. If you don’t believe me, just click here.


Just so adorable!!
Awesome! You guys are the perfect “idol couple” to me.
Can you also teach us how to make those bunny cheeks so perfect? Thanks
Awesome post, Ms. McGoo!! I love that you made a bunch of different options and played Mr. Potato Head. I don’t use transfers much either and I’m excited at the possibilities! Plus I love how much dimension it adds to the cookie. LOVE! Thanks for sharing with us!
Wow! That was great! Thanks!
awesome share Liz!! i have been fearful of trying them…now might just have to dive in a try it 🙂
Okay…how did you do the cheeks??
Love it! I will be trying out the transfer technique for sure. Looks like a lot of fun and possibilities.
It’s amazing how you can create different faces. It looks so real.
Regards!!
Love the gallery of fabulous, facial royal transfers! Can’t wait for Liz’s class in June! 🙂
I love love love more ideas for RI transfers! Time saving and you can devout time to detail without waiting for stuff to dry!
One question… on these and the santa cookies from the holidays… how are the cheeks done? They have such dimension !
I’ve been meaning to do a cheeks/dimension tutorial for years! It is a visual thing, so I need to make a video… I will try super duper hard to get it done soon!
Just came across this most adorable Mr. Bunny, he is the loveliest I have ever seen. Can you please where you get the cutters for his body? And how did you get the furry effect? Do you have a tutorial on this?
I live in Melbourne, Australia and have no chance of attending your classes. But would truely love to try to make Mr. bunny for my granddaughters.
Thank you so much for the wealth of information. You have given me on Royal Icing expressions, cannot waite to try them.
Thank you so much Rosetta! I hand-cut all his parts. I sketched him out on card stock, trimmed it and then used them to cut around on the dough. For the furry effect I flooded him in white, then a couple of hours later, I pounced on some more (not thinned) royal icing with a paintbrush.
Thank you Rosetta! I hand-cut all the parts for him. I sketched them out on card stock, cut them out, and then used them as templates to cut out the dough.
For the furry effect, I flooded the white normally, then after a couple of hours of drying, I pounced more (not thinned) royal onto the surface with a paintbrush.
It’s hard to imagine you being scared of painting anything because everything you share always looks so splendid! Love this bunny and the darling transfers. Thank you for babysitting! ; )
Me encanta tu trabajo cuando vienes a california me e ncantaria organizar una clase cuales son los requisites porfavor mi tel es 3232712476 vivo en los angeles ca .
Oh, these are just lovely! What a great idea for having flexibility in facial expressions. Thanks for sharing it!
Could you make a tutorías step by step? You are amazing, i love your cookies. Thank you. Blessings 🙂
I love your ideas please keep me posted with anymore royal transfer ideas I would love to learn more about royal icing transfer
Thank a million.