Rudolph The Red-Nosed Reindeer Cookies with Semi Sweet Designs {Guest Post}
It’s pretty obvious that I think about cookies all day, every day. No matter where I am, there seems to be inspiration all around. I see ideas EVERYWHERE…while shopping, on Pinterest, and believe it or not, I am often inspired by other cookie artisans.
There are certian times of year when everyone has the same cookie in mind. What I love most is watching several people approach the same idea and come up with an idea that is completely their own, along with inspiring unique spins by others.
Today one of my favorite cookie inspirations, Mike, of Semi Sweet Designs is here with his spin on Rudolph the Red Nosed Reindeer. Enjoy!
![]() Hello SugarBelle fans! Or, as I like to call you… SugarBellievers. I’m Mike, fellow Belliever and cookie blogger over at Semi Sweet. Callye’s blog was what started it all for me. Her cookie tutorials was THE inspiration I needed to whip up a batch of icing and pick up my first piping bag. So needless to say, I was ecstatic when Callye asked me to share a tutorial of my own with you. So happy to be here! Now, lets get started.
Hello SugarBelle fans! Or, as I like to call you… SugarBellievers. I’m Mike, fellow Belliever and cookie blogger over at Semi Sweet. Callye’s blog was what started it all for me. Her cookie tutorials was THE inspiration I needed to whip up a batch of icing and pick up my first piping bag. So needless to say, I was ecstatic when Callye asked me to share a tutorial of my own with you. So happy to be here! Now, lets get started.
There are many ways to make a reindeer cookie. Callye showed us using a bear cutter, The Jelly Bean Trail made some out of a gingerbread man, and recently Krista showed us her whimsy version using a gingerbread girl. I want to show you yet another way to make a reindeer cookie using a baby cutter along with some inspired techniques from Callye herself.
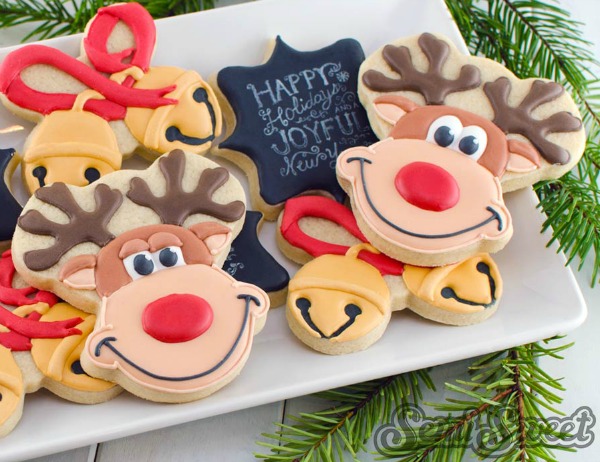 These goofy Rudolph cookies were made using an upside-down baby cutter sold exclusively at Karen’s Cookies. I love this cutter because, you’ll see in a moment, the placement of the ears on this baby shape makes room for some adorable dimples on Rudolph’s face.
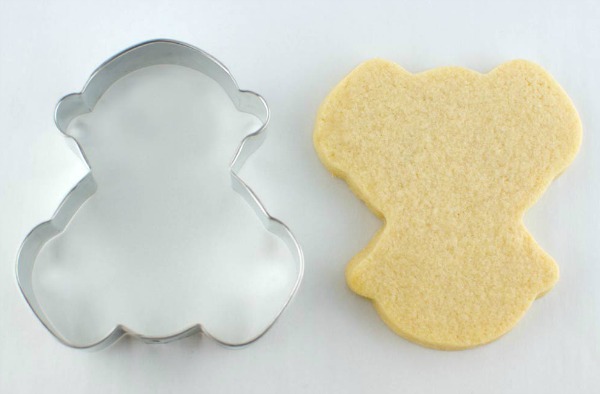 To decorate these cookies, you will need:
- Tan piping and flood icing (I used ivory with a small drop of warm brown.)
- Warm Brown piping and flood icing
- White 20-second icing
- Chocolate Brown piping and flood icing
- Red 20-second icing
- Black 20-second and piping icing
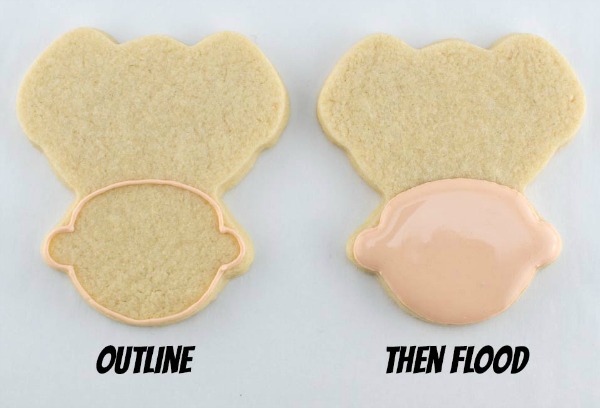
Begin by outlining the lower, “baby head” portion of the cookie with tan icing, then flood the middle. Let it set for about 20 minutes to crust over.
 The eyes for Rudolph were directly inspired by Callye’s turkey face cookies and follow similar steps. With warm brown piping icing, pipe an arch in the middle of the cookie for Rudy’s skull. With white 20-second icing, add one eye, then wait for it to set before adding the other eye.
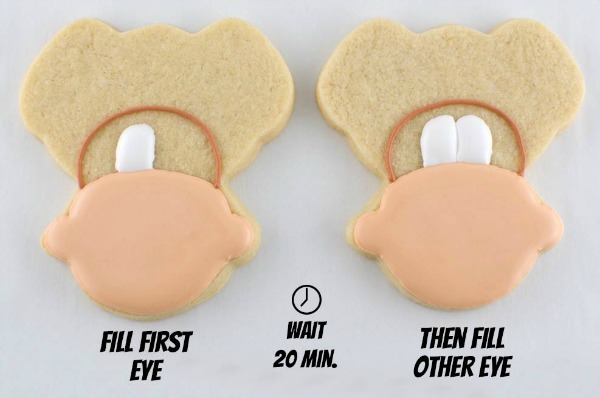 After the eyes had time to set, outline around the eyes with warm brown piping icing, then fill the middle with flood icing. Use a toothpick to guide the icing into the tight corners.
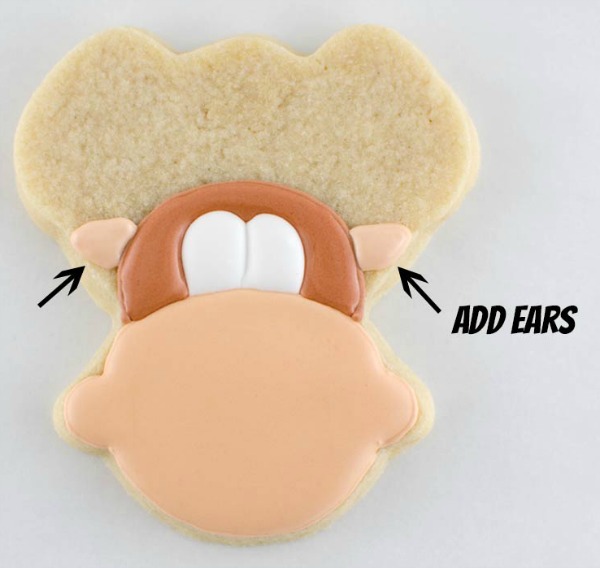
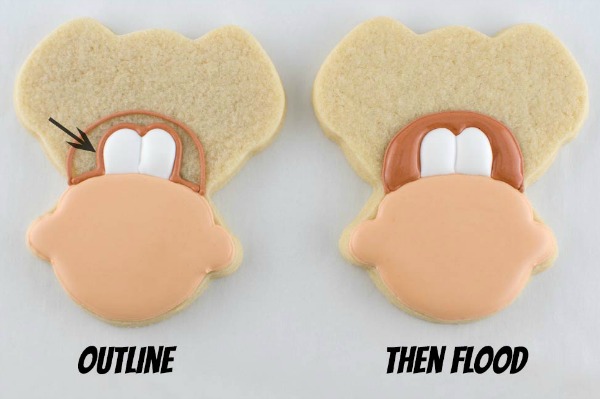 Next, add almond-shaped ears with tan icing to the sides of the head. Give the icing time to set.
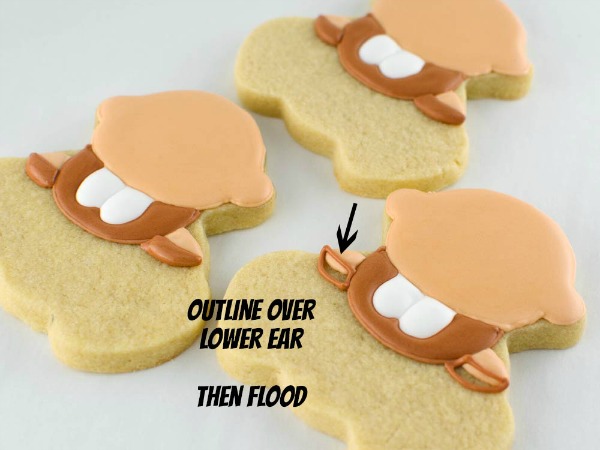
 After the lower, tan parts of the ears have crusted over, add the top portions with warm brown icing. Outline slightly over the tan color, then fill the middle with flood icing. This overlap of icing gives it nice dimension.
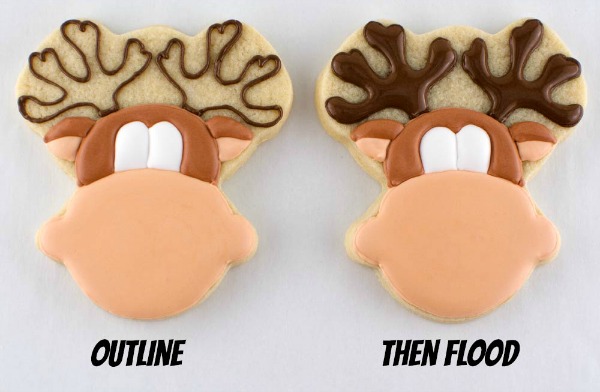
 Next step is adding the antlers. The shape can be up to you. I just came up with something that would fill up most of the top space of the cookie nicely. First outline with chocolate brown icing, then fill the middle with flood icing. Use a toothpick again to guide the icing in and around the tight spaces. Let the cookie dry completely before moving on.
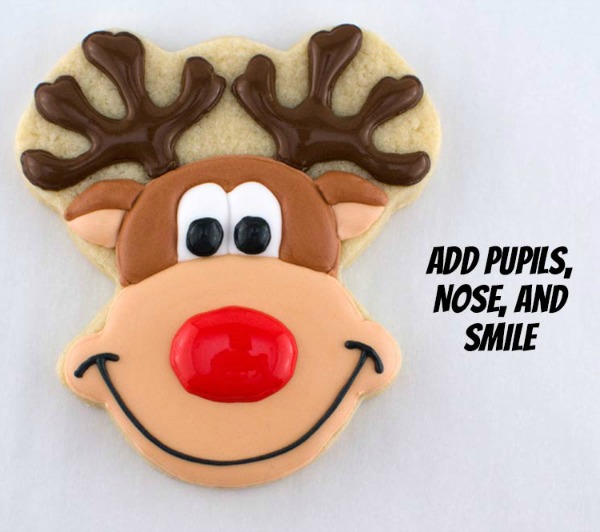
 After the cookie is completely dry, add the details. Pipe a smile and pupils with black icing, and add a big red nose with red 20-second icing.
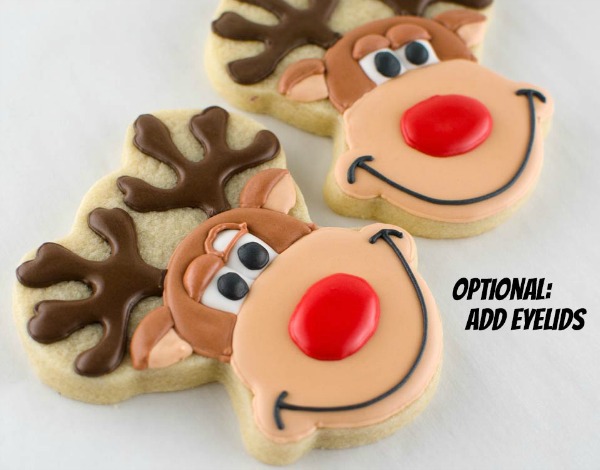
 This next step is optional because I can’t seem to leave well enough alone. I debated whether or not to add eyelids for a more relaxed look. To add eyelids, follow the same steps as the top portions of the ears. Outline over the eye first, then flood the middle. Similar to the white eyes, do one eyelid at a time, with time in between, to create dimension.
 The finished Rudolph cookies should look something like these…
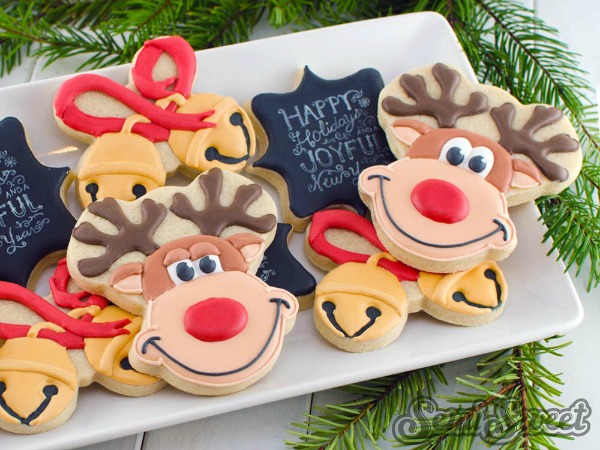 As you can see, these Rudolph cookies were actually part of a set of holiday cookies I made for a party platter. You can’t have Rudolph without sleigh bells, right? I made the sleigh bells using a butterfly cutter. I also made stamped, chalkboard art cookies to complete the set. If you’re interested in seeing how I made these chalkboard cookies, swing by my blog for the detailed tutorial.
 Thanks so much, Callye, for having me over! I hope everyone has a wonderful holiday and a happy new year!
For more sweet Rudolph cookie ideas, check out these links:


great job Mike! I always love new ideas using the cutters that I have, and I actually have the baby cutter. YAY! The bells are just as awesome! You are very talented, and creative. Thank you for sharing these with us.I may have to try the reindeer this week. 🙂
These are absolutely adorable!!! What a great use of the baby and butterfly cutters. Love your work Mike!
I just love his adorably goofy grin!!! Really nice job. And I also really like the starkness of putting the black cookies with the whole set. Works perfectly!
The reindeer & blackboard are great but those jingle bells are the best I’ve EVER seen! Mike, I think you earned your PhD at SugarBelle’s School of Cookier Wizardry! The whole collection is totally knockout!
So excited to receive your newsletter and excited about this new adventure. Love you ideas/tips!!!!
I love ’em, Mike! While there are lots of great Rudy cookies out there, yours has the biggest happiest smile! Fantastic job!!
Always amazing mike
Mike guest posting on Callye’s page? It’s like sitting in a bar and seeing Brad Pitt and Angelina Jolie at the next table. I can’t handle it!
These reindeer are so stinkin’ cute! I’m glad you didn’t leave well enough alone Mike, those eyelids make Rudolph look dreamy like it’s December 26th. Gah, adorable.
I just fell off my barstool.
Adorable, delightful cookies and excellent tutorial!!
I love Mike’s cookie designs and it was fun seeing him here today!
Totally adorable Rudolph cookies Mike and a great tutorial. Will definitely be popping over to check on how you made those beautiful chalkboard art cookies!
I am so glad that I found your website. I am in the process of closing my cake decorating business, but will continue with cookies! You just can’t stop being creative all together.
Thanks for sharing your wonderful ideas and tutorials!
I am in awe of the creativeness of these ideas! Thank you for making us look good!
Mike !!
The tutorial is adorable!
The design is clever , creative and so Cute!!
Congratulation and Thank you so muvh for sharing your Amazing work!
From a huge fan of yours
He is just too darn cute! The eyelids are the perfect touch (I would never think to add them!) and I love his huge grin! Thanks for the fabulous tutorial, Mike!
Pingback: Jingle Bell Cookies and a Printable Template
Ridiculously cute!!! Great post, Mike and Callye!!
Hello there! I am a 11 year-old girl but I can already tell that I want to have a future in baking. I love love love your website. But do you have any advice for me? And I started a baking blog and if you could check it out that would be great!
-Alice
Pingback: Decorated Moose Cookies