Creating an Invisible Outline with Royal Icing
Cookie decorating is more than a hobby, it’s an art. With time and practice we develop a style and technique all our own. After four years of practice some of my “techniques” are so ingrained that they’re habit.
One particular technique that seems to interest people is creating a invisible royal icing outline. I’ve done it for so long that I didn’t even notice until a friend pointed it out. This is what gives my cookies that seamless “poofy” look. It’s a little tricky at first, but with patience you can create an invisible icing border too.
 Begin by outlining the cookie. I usually prefer a #2 tip.
 The most important elements of invisible royal icing outlines are icing consistency and an offset spatula. The icing must be thin enough to flow but not so thin it runs over the edge of the outline. There are variables such as climate and recipe that might affect consistency, but basically you’re looking for a something similar to honey or shampoo. It may take a little time to figure out what’s “just right” so don’t give up.
Flood the cookie as pictured below, starting with the outline and moving toward the middle of the cookie.
 You want just enough icing that the outline is full but not so much it overflows. When the cookie is flooded, use an offset spatula to quickly spread the icing. The trick is to cover the outline without going over the edge.
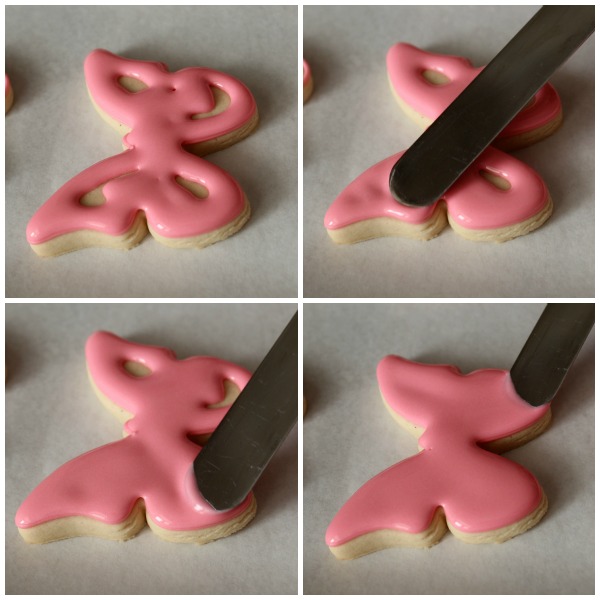 See? The outline is almost invisible from above.
 This is one of those things that’s a little easier to understand by watching, so in case you missed it on Facebook here’s the video version.
Since I don’t have the knack for making pretty butterflies, I relied on Al-Bee’s Bake Shop for inspiration. I’m almost afraid to share the original design as I may’ve butchered them a little, but this is what I was going for.
 For your viewing pleasure, here are more butterfly themed treats:


