Consistency Is KEY…Twenty-Second Icing and Beyond
You might as well sit down and get comfortable, because the dreaded icing consistency lecture is finally here.
If you read many cookie blogs, you might have noticed that consistency is a pretty hot topic lately. That’s because as a cookie decorator, icing consistency is the single most important factor in your success OR failure as a decorator.
Hear what I am saying, this is important stuff.
When I make cookies, I ALWAYS start with my basic royal icing, which you can read about HERE. This is what it looks like.
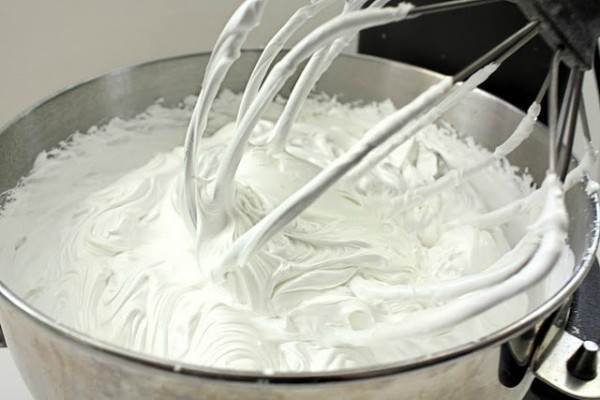 From there, I generally use three to four consistencies of icing. Piping icing, 20-second icing, {which I’ve explained in-depth HERE and HERE} flood icing, and very stiff piping icing for when I make things like THESE ROSES.
Lots of people ask what my favorite consistency is. Truth is, I don’t really have a favorite. It really depends on what I am doing that day.
When dreaming up cookie designs, I begin by picturing the steps I will take to create the picture in my mind. I usually do it in my head, but it you’re a beginner, it really helps to sketch or write out the design before you begin.
After I have plan, I decide what consistencies to use. This is based on a variety of factors including design, how much work time I have, whether or not I am in the mood to make 38 different bags of icing, and whatever else comes up. I can’t offer a lot of advice on which to what consistency to choose and when, except to say practice makes perfect. The more cookies you make, the more you’ll learn about what works best for you.
Now to break down the consistencies…
Piping Icing
Piping icing is similar to toothpaste in consistency. When you squeeze the bag, it should come out in a smooth line without breaking or cracking. I most often use this consistency for outlining, detail work, and writing. You can see my video on piping consistency icing HERE.
 For tips on outlining cookies, click HERE, or watch my YouTube video HERE.
Twenty-Second Icing
This is the icing consistency I get the most questions about. First of all, there is no special recipe for twenty-second icing. It regular royal icing thinned with water . I most often use this consistency to create dimension, decrease prep and decorating time, and to prevent cratering when filling small spaces. Here are a few examples.
I made these cookies in a hurry so I used 20-second icing to skip outlining.
 For these cookies, I used 20-second icing to create dimension.
 For these New Year cookies, I used 20-second icing to reduce cratering when filling small spaces.
 Now, I have to say that 20-second icing in not the only way. I’ve heard it called by many names. It really boils down to personal preference and how fast you count. Marian calls it 10-second icing, Georgeanne prefers 12-second icing, Lisa does the 15-second version. If you want to get technical, I think my 20-second icing might be a little closer to 17-second icing. The point is, it has to be thin enough to flow, while remaining thick enough that it doesn’t fall off the side of the cookie. Tomato, to-mah-to, right?
Anywho, my most favorite thing about 20-second icing is that when I use it to outline and fill it creates a nice “poofy” look.
 To see a video about 20-second icing, click HERE.
Flood Icing
Finally, let’s talk about to flood icing. Flood icing is probably the easiest icing to make because as long as it has a nice flow you pretty much have it right.
The way flood icing works is pretty simple. Begin by thinning regular royal icing down to liquid form, being very careful not to make it TOO thin. My personal preference is a flow that resembles that of shampoo or honey. After outlining the space you want to fill with a #2 or #3 tip, the liquifies icing is used to “flood” the enclosed area.
 I used mostly flood icing to create the cookie above. Not only did it work well as a base, I also used it to create smooth, even royal icing run-outs, or transfers, to drop onto the flooded cookie.
 I love the liquidity of it {I made that word up, I think} because it flows nicely into a smooth flat surface. This is what it looks like when I flood cookies.
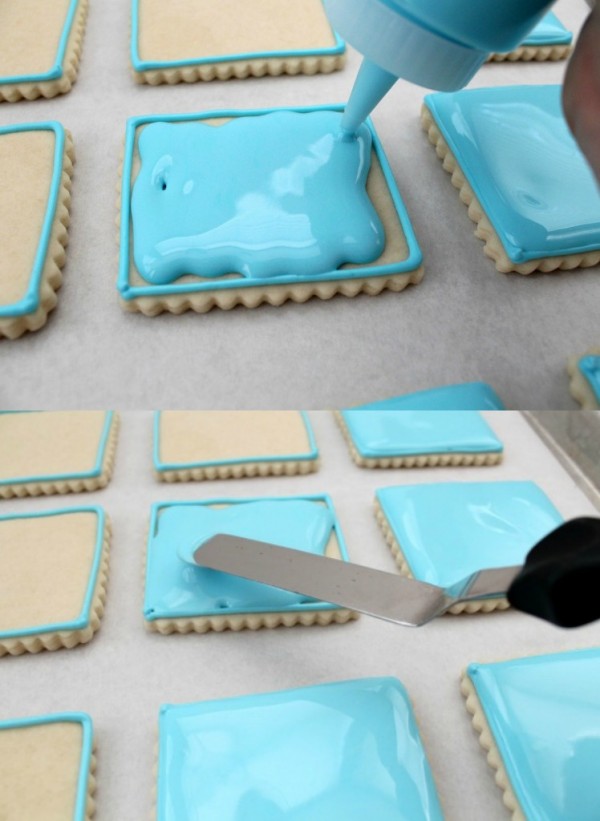 If you’d rather see a video of flood icing consistency click HERE.
Here is a cookie using that eventually featured all four consistencies explained above. It’s kind of hard to tell from the photo, but after I finished, these cookies became blushing brides. I ultimately used stiff icing to create ribbon roses for the bouquet. Can you see where each consistency was used?
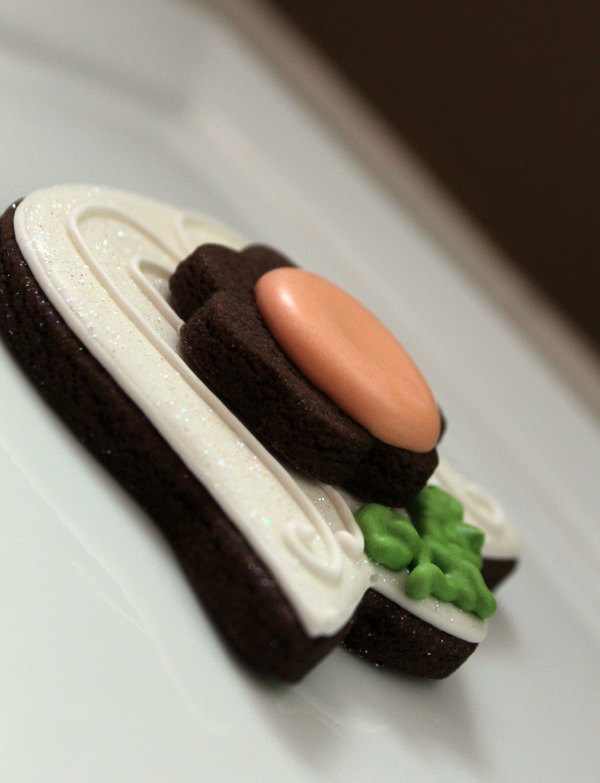 Okay, I’m finished. I hope that wasn’t too painful. I really could go on and on about the importance of mastering icing consistency, but I am going to stop here and leave you with a few tips:
- First and foremost, do what works best for you. This is the golden rule of cookie decorating. Remember that cookies are art, and like any artist, each cookie decorator has their own style. So, if you’re not down with the 20-second thing, play with it until you find what you like.
- Try using a spray bottle as Gail suggested HERE for thinning your icing. It is probably the most useful tip I have ever learned regarding icing consistency.
- Speaking of coloring and preparing royal icing, I have a helpful little tutorial on that HERE.
- Sketch and plan. I’m a little bit of a hypocrite in this department, but it really can prevent some big boo boos save you lots of frustration.
I hope this wasn’t too painful. Now that we got that over with, we can get back to the business of creating fun cookies. As I said, mastering icing consistency is the key to successful decorating. Hopefully this sheds a little light on the subject.
Have a great weekend, I’ll soon be back with more cookie fun!


Awesome! I have read a crap ton of articles on Icing consistency but this one by far is the best I have seen in actually showing something that can recreated at home without looking at the screen constantly. Giving the common day things we use all the time to let us know just what thickness it should be was perfect!
where can i see those bride cookies? they look like they are going to be adorable!!!!!
It’s nice to know that there is not just one right way to prepare the icing. That is such a great take home point from this post… to think in terms of how the finished product will work.
Thanks for the explanation it helps A LOT!!
Now here’s my question… do you think the thicker the icing, the harder it dries? Or is this only the case for the very stiff icing made for details… I try to image what the texture of the cookie when I’m deciding which icing to use.
I have a crazy theory on this…I have notice that when I use my paddle rather than the whisk, the icing is denser and dries harder. It also separates more slowly. I prefer using the whisk so I get this lighter, more aerated texture, even if I have to stir it a bit more. I have also noticed if you fan dry the cookies for the full duration, the cookie is not as soft, but if you only fan dry until the icing has set, then let the cookie dry, it seems like more moisture soaks down into the cookie rather than evaporates out, creating a softer cookie, therefore softer icing in a way.
Don’t apologize for being a little theoric and technical! Those who don’t like it don’t belong here. OF COURSE one needs to know and understand this kind of information to just *hope* being one day able to make cookies just half lovely as yours. Thanks a lot for this highly instructive post!
Thanks so much for the great tips! I’m making decorated cookies for my blog soon, so your tips will be really helpful!
You are the queen of good icing and decorated cookies! Love it!
Thanks for this great explanation! This is definitely what I struggle with the most and hope to improve in the future.
Hermoso todo. Soy de Chile y por mi situación económica no he tenido acceso a estudiar inglés por lo tanto no lo se y tengo mucha necesidad de aprender a decorar galletas. ¿no estará esta página en español o tendrá alguna que me recomiende en español? Gracias y bendiciones.
You did it again Callye! You explain things so well and make decorating cookies easier and fun. Thanks for sharing this with us:)
Callye….I really love “reruns!”…..
Between you and Lisa………..if I don’t get icing consistency by these great tutorials, I never will! But, a post like this only makes me curious! What were the red clock things? And the brides? How can you tease us like that?
I also had a double epiphany when I read your “comments”. I have been using the paddle…………my icing was a bid “harder” than normal. I’m going to switch back to the whisk. AND….I’ve been putting that fan on my cookies for hours…that could be another issue. I kind of thought I was doing good to get them completely dry, but I think it’s actually “drying them out” too much.
Well, I actually had a triple epiphany this week….I have been making your cookie dough and sometimes it was amazing and sometimes kind of flat. Well, had I COMPLETELY read the instructions, I would know not to put it in the fridge to chill or freeze it. So, now I use it when I know I’m making cookies right away….but trying to find a good recipe to “freeze” when I have time to make a bunch of dough.
Thanks for these tutorials………….I am always finding there is something to learn!
Callye, these are really important tips. I read something the other day where everyone was confused about how long to leave the cookies under a fan. It might be helpful to add these tips to your post. I also have always used a paddle to make RI. think I will have to break out the whisk next time to see the difference! May I ask how much icing is in that first picture (size of recipe)? the bowl looks really full!
Thanks so much for the time and effort you take to educate all oF us! it is greatly appreciated!
Please, help! LOL
I live in Brazil, so when you say 400 degrees for 7-8 minutes means 400 degrees Celsius or Fahrenheit
Fahrenheit.
Thnaks Jodie!
Great post Callye the photos are beautiful
Not painful at all…and I love revisiting cookies, the gilded numbers are so pretty! Spray? Luster dust? I am heading to the archives for the New Years post!
Callye,
This is my problem and I’ve been reading your posts and working on it every week! I ended up measuring the same amounts of icing, counting my “squirts” and writing it down. I found I never could remember from batch to batch what I’d done. Thanks for all your posts! I’m gonna get this right yet!
Happy weekend, Cheryl
Hi! I am such a fan of yours and a beginner on many levels but certainly get better with each batch–and yes just like in housing it is location, location, location with cookie decorating it is consistency consistency consistency!! I have gotten really good at flood and piping–and i would say my flood is prob even a bit too thick versus how you say–but it works for me b/c i like the dimension i get and it still flows–it is the stiffer versions i have trouble with–b/c as you say–what is each person’s way to count–and count till what till almost disappears, just about, totally? it is all in the eye of the decorator!! I am going to watch your tutorials!!
Excellent post! I have been “conversing” with a gal in Eastern Europe via Facebook who has been asking me lots of questions about royal icing consistency, etc. Since I learned everything I know about cookie decorating from your blog, I am going to send her a link to this post. I think it will be very helpful!
I allways lear something else when I read you, Tanks a lot.
Always love your tips! Great photos too! So much easier to understand with the corresponding pic!
This is a really great tutorial. I haven’t experimented very much with cookies yet, but your blog has helped make it seem much less intimidating. I wanted to let you know that liquidity is a real word, it’s used in economics to describe how easy it is to access the monetary value of a particular asset. Cash has the most liquidity and things like RRSPs have the least.
such an informative post callye! i think you hit on everything when dealing with icing consistancy! but the best piece of advice i got from this was you “golden rule” of do what works best for you…that is so true!! when i first started i would get so frustrated when i would try what other decorators said they liked but i wasnt happy with the results i was getting:) it definitely is best to try a bunch of stuff and see what your own personal favorite is!
Great post Callye…lots of good information and tips.
Thanks for sharing all of your decorating tips! The Best cookie decorating blog on the web!
Great post and helpful links!! Thank you for sharing this info!! P.S. your work is truly amazing!!
Great post on a topic we can’t get enough of!! (And liquidity is too a word, it used to describe my 401K before the economy went crazy!)
Thanks Callye! What an awesome post!! Oftentimes when decorating cookies and trying to figure out what consistency to use — I can’t remember which one to use) — oftentimes I try to cheat (and rather than make the 20 second icing), I dunno what I do, but then I have it running all over the place. And with the thick icing, sometimes I think I make it too thick that I have problems when squeezing it out .. or the dreaded craters!!! Thanks for all these tips all in one post!!! 🙂
Thank you! A question: what is the best way to get a single piping tip, not in a kit? I have been wanting to get a #1 Wilton tip for fine detail work, but am not in the market to get a whole new set of tips (the smallest i have is the #2 Wilton). Or wouldn’t you recommend a #1?
How could anyone possibly think that was painful. I love posts on technique as even if I already know the general techniques, these types of posts always reinforce and often remind me of stuff (like that spray bottle tip which I remember you sharing but I have never done). Thanks 🙂
Linda, you have GOT to get a spray bottle. It’s life changing!
Thanks so much, this was very helpful. I am still experimenting with consistencies, but I think my cookies are improving each time. It is definitely a lot of trial and error for me right now!
Great post! Icing consistancy is the most important thing and the hardest thing to achieve in the beginning (especially for me). Love the lamb cookies, they are adorable
This wasn’t painful AT ALL! On the contrary, I need all the help I can get with icing cookies, especially from you! I love your poofy 20-secong icing, which I really need to work on. The dimension looks so amazing!
MAYBE someday, when I visit my daughter in Lubbock, you can show me firsthand!?! 🙂
Pingback: How to make Yoda Cookies
Thanks for the tutorial. I love the way you decorate! My hopes are one day to be 1/10 is talented as you. My question is why or how can I get rid of the “dimples” in my frosting? My consistency seems to be correct… Any suggestions would be appreciated.
Pingback: Cute Pizza Cookies
Hello 🙂
I just had a quick question: what’s your ‘rule’ for piping and flood icing (i.e. twenty seconds for the twenty second rule)
Thanks!
Pingback: Agent P AKA Perry The Platypus Cookies » GeekMom
Thank you ! Love this site 🙂
Pingback: Daisy girl ballerina cookies | paddle attachment
Pingback: Spray Painted Cookies [plus Product Review] « Sweet Anne Handcrafted Designs
I like the teaching with dis hint i will be able to carry out mine
Pingback: Wedding Dress Cookies for a Summer Bridal Shower | Make Me Cake Me
Pingback: Cow Cookies, Just Because | Make Me Cake Me
Pingback: Garden Watering Can Cookies
Pingback: Paint Splatter Canvas Cookies
Pingback: 101 Essential Cookie Decorating Resources
Pingback: Hello Kitty Bow Cookies
Pingback: Piping icing | Questionhypoth
“Royal Icing Run outs” needs more explaining… were the numbers iced onto parchment paper and allowed to dry completely? Just a guess but I’d love to hear more!
Ok. So I got the recipe for your basic royal icing, but you don’t say how to get from the basic royal icing to the piping icing. Is the royal icing the piping icing and you add more water to get the 20 second icing, and even more water for flood icing? Thanks!! 🙂
This is a very useful post, I find it difficult at times to get the right consistency when it comes to icing and the books don’t help very much, but now I have a much clearer idea.
I don’t know what I’m doing wrong, but my flooding icing always ends up with tiny bubbles that rise to the surface. I want the nice, smooth finish that your icing has. What am I doing wrong?
Pingback: Cookie Chemistry « Small World Supper Club
Pingback: Making Callye’s Cookies | pollysentrick
Pingback: Simple Dora the Explorer Star Cookies
I need help with rolled Royal Icing. it cracks and sticks when am rolling it. how do i get a good thickness which rolls out well and can be covered on a cake without difficulty?
help plizz, rolled royal icing
Pingback: A Strawberry Festival in Florida & Mini Strawberry Cookies | Make Me Cake Me
Pingback: Happy Easter Bunny Cookie
Pingback: Royal icing consistency problems | Pretty Bakes Blog
Pingback: Royal Icing Bow
Pingback: Smart Cookies + Printable!
Pingback: Mexican Royal Icing Border
I have a problem with the icing bleeding-how can I make sure my icing doesn’t bleed? Thank you
I would try drying with a fan. I live in a very dry climate so I don’t have that trouble. I have heard of people using dehumidifiers, fans, adding cream of tartar to their recipe, ect. I hope that helps. I am not really qualified to give advice in that department.
Pingback: Shark Fin Cupcake Toppers {Hello Summer} I Heart Nap Time | I Heart Nap Time - How to Crafts, Tutorials, DIY, Homemaker
Pingback: Potion Bottle Cookies
Pingback: Canadian Themed Maple Cookies | ovenloven
Pingback: My First Ever Cookies & How I Quickly Improved | Make Me Cake Me
Hi~
your tutorials are very helpful, thanks~
hope you dont mind i’m using my poor english,
i just started to try making icing decoration cookie, and it must be very interesting to draw picture on cookie,
after i read most of your posts,
as my understood, i need to perpare 3 difference type of icing, 20s icing, piping & flooding icing.
i would like to know that, can i only use 20s icing for piping and flooding??
if i use 20s icing in #1 or#2 tip, can it show same effect with piping icing? and i can draw some detail on cookies?
because i do not have enought place to storing them if i need perpare 3 difference type of icing in each color
thanksssss
I guess I just have a question. Why is it that you use outline icing, flood icing, and twenty-second icing? Why don’t you use your outline icing and 20-second icing? It seems to me that 20-second icing and flood icing serves the same purpose.
Sometimes it doesn’t flow as well for what I’m trying to do. Also, it’s not as forgiving for wet on wet work. If I decided to use twenty second icing it’s often to skip the pre-outlining step. It really all depends on the look I’m going for. More consistencies allow for more variety.
Pingback: Cake Inspired Cookies | Comet Confections
I’ve made your RI in the past and it turned out great! But tonight it became very foamy(!?) I don’t know what I did wrong?
Pingback: Recipes | Sugar and Spice: A Cookie Blog
Pingback: Royal Icing: The Basics | The Simple, Sweet Life
Hi there 🙂 Just wondering what you suggest for black royal icing when a significant amount has to be used? I know that it will not have a nice taste – any ideas?
Also – I have to do 200 cookies, flooding in white then a logo on top… Any suggestions or tips that with the flooding portion that will help me NOT get massive hand cramps? lol…
Such an amazing site – thank you!
Rhea
I can ALWAYS taste it. I just try to use it sparingly…or maybe start with a brown base. For flooding, use a bottle, thinner icing, and take breaks. GOOD LUCK!
Wow amazing and inspiring, thankyou 🙂 xxx
Pingback: Decorated Scarecrow Cookies
Pingback: Royal Icing: The Basics | The Simple, Sweet Life
How do I get shiney cookies
HI,
Thank you so much for your tutorials!
I am wondering why the icing loses its glossy and smooth texture over a couple of days?
It gets some lines and other flaws and not even anymore.. I usually use your recipe and only water to thin it… Could you please tell me what am I doing wrong?
Thank you a lot!
Consistency is key seems to be the key to many different aspects of life!! =)
Pingback: Sweetsugarbelle's Royal Icing Recipe
If we don’t use egg.then what we have 2 use in cookies or icing
Pingback: Mardi Gras Cookies | Do We Get a Grade for This?
Pingback: Baby Boy Shower Cookies | Cookies and Cravings and Calories, Oh My...
I was wondering if I could use this 20 second frosting to create eyes on a cookie that I would have frosted with the same icing (after drying time).
Thanks!
When icing with different colors, how do u keep the colors from bleeding? This literally gives me nightmares! Lol when I finish a cookie late at night, the first thing i do in the morning is go check if the colors bled ????
Pingback: Sugar Cookie & Royal Icing Recipes | Rebecca Cakes & Bakes
Pingback: Easter Egg Cookies - Sweet & Delish
Pingback: Peace Rose Sugar Cookies | The Trial and Error Kitchen
Can you help me please? I keep getting small bubbles in my flooding and it’s very annoying as I never get the finish I see on your cookies. What am I doing wrong and how can I fix this problem?
Thanks a lot for your help
Bernardette
I’ve read before to use a toothpick to pop and bubbles before they set.
Gently tapping the cookies on the counter top helps with the bubbles too.
Pingback: Welcome Baby Cookies for Brixton with Tutorials | Mara's Flour Power
I know you probably have written about this somewhere but maybe you can point me to the post. I did some transfers the other day. In the past I have attached transfers to a dry iced cookie. I had issues with the transfer not lying flat on the cookie. I’m guessing I need to work on filling the cookie so it’s smoother? Anyway, I thought I’d try dropping the transfers onto a wet cookie so it would lie better. It was all good until the blue of the filled cookie bled onto my what had been nice-looking Superman symbol. I was reeeeaally bummed. Learning the hard way but I know there’s got to be a way around this!! Help please!
Pingback: Butterfly Cookies | Knits, Bits, and Bytes
Is there a way of “fixing” a batch of royal icing that was affected by humidity… as a result I got a puffy, shinny, soft drying royal icing (it doesn’t dry 🙁 it’s too humid right now in San Diego, ca. And I need to work!! Already messed up two batches… that’s in advance!
Pingback: CTR Cookies- A How To - Eat, Think & Be Merry
How do you get the air bubbles out of your icing??!! I had a really hard time with air bubbles with my last batch of cookies.
Thank you for your help! Love your tutorials! Quick questions: Is there a problem with your videos? It seems they are not available… or it is my computer??
Pingback: Mardi Gras Cookies - Do We Get a Grade for ThisDo We Get a Grade for This
Thank you so much for this explanation. Your recipe for frosting was perfect. My cookies turned out perfect! Thanks again.