Baking the Perfect Sugar Cookie
*This is my basic sugar cookie recipe converted to grams. For the original, standard American measurements, click here.
A good cookie base is an essential component of perfectly decorated sugar cookies. It takes a little practice, but with the right recipe and a few tips it’s very easy to bake perfect sugar cookies very time.
First of all, I would like to say, I am not an expert. I haven’t been to a fancy pastry school or had any sort of formal training, just a lot of trial, error, and experience.
LOTS and LOTS of experience.
Keep in mind, my way is not the only way, and maybe not even the best way, but it’s what I like and what works for me. The purpose of this article is not to tell you what you should do, but rather give you an idea of what happens in my kitchen as a foundation to build upon so you can come up with a method that works well for you.
I begin every single cookie project with my favorite cookie recipe. Not only is it quick and easy, it’s also a very forgiving recipe. You can find the original, printable version of my recipe in standard US measurements HERE.
Most people find this recipe easy and delicious. However, I have a handful of readers that don’t get the same results that I do, and a few others who are more comfortable weighing their ingredients. So, for these readers, I’m posting my recipe by weight. PLEASE go easy on me. I am not at all comfortable with this method, but I am trying!
Ingredients
- 227 grams unsalted butter
- 175 grams confectioner’s {icing} sugar
- 1 egg {room temperature}
- 1.5-3 teaspoons extract or emulsion {any flavor}
- 1 teaspoon salt
- 2 teaspoons baking powder
- 400-425 grams all-purpose flour
Instructions
- Cream together butter and sugar.
- Add eggs and extract and mix well.
- Sift together flour, baking powder, and salt, add to wet mixture little by little until well incorporated.
- Roll and cut cookies into desired shapes, dusting with flour as necessary.
- Bake cookies at 200 Celsius for 7-8 minutes until tops are appear dry rather than shiny. Do not brown.
I think I did okay on the conversions, but these numbers may as well be in Greek for what they mean to me, so if I goofed, shoot me an email, I’ll get it fixed. Please don’t call me stupid or leave me nasty comments. It kinda puts a damper on my day.
As for me, I still measure like my Nanny did. I call it the “old-lady method”. Nanny kept cups in her flour, sugar, salt and baking powder bins and she never ever moved them. Most of them weren’t even real measuring cups, she just knew what they were and what they did, and she got consistent results every time. If you need a little more information on measuring, I suggest this article on properly measuring dry ingredients from My Baking Addiction. It’s REALLY helpful and informative.
Of course, I use real measuring cups when I bake, but like Nanny, I never ever take them out of the bin that they belong in so my dough is pretty consistent.
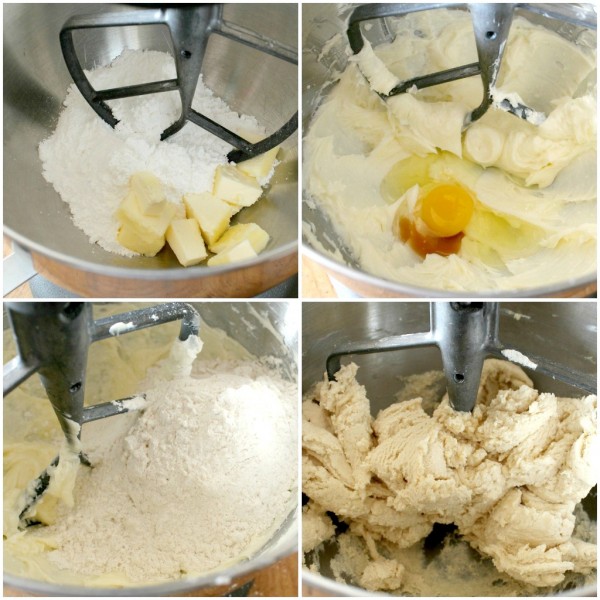
Mixing the dough is pretty simple. The most important thing is to mix ingredients in the proper order. Begin by creaming together the butter and sugar, then add the egg {room temperature} and vanilla, then, after sifting together the flour, baking powder and salt, add it to the mixture little by little until a dough is formed.
Be sure the egg is room temperature and the butter is not over or under softened. Usually I set it out two to three hours before baking and let it come to room temperature. If you forget, no worries. Chop the butter into small pieces and wait about 30 to 45 minutes. It will be perfectly softened when you’re ready to bake.
Try to resist the urge to microwave it. Nine times out of ten, you will end up with a butter puddle, and over-softened butter WILL affect your dough. Once again, I’d like to send you to My Baking Addiction if you’d like to know more about perfectly softened butter. I could write a novel, but there’s no need, because Jamie already has it well covered.
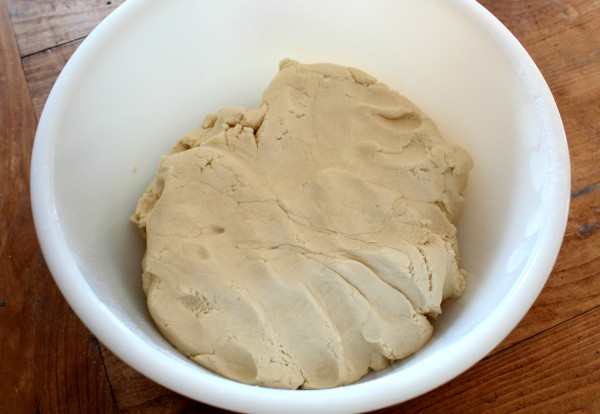
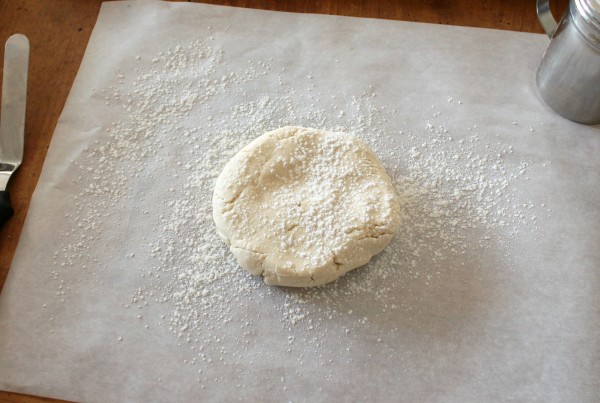
When the dough is mixed, it will be soft, but not sticky and will look like this. I find that it firms up as it rests, so I often give it five or ten minutes before working with it..
For those of you who like to work ahead, I do not recommend refrigerating or freezing this dough. I’ve tried it, and it completely changes the final product. Fresh dough creates a fluffy, light, non-greasy cookie with minimal spread. In my experience, when the dough is refrigerated for a long period of time, it is harder to work with and produces flatter, greasier cookies with significantly more spread than fresh dough. I’ve also noticed that when chilled, the dough darkens and becomes crumbly and the cookies have dry crackly tops when baked.
Rather than pre-making dough, I prefer to set aside a baking day, make two to four batches of dough and use it immediately. This doesn’t mean I will hunt you down and kill you if you decide refrigeration works best. Remember, your way is the best way for you!
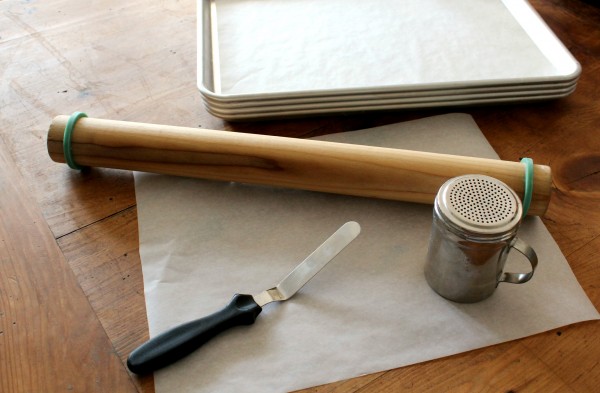
While the dough is resting, I set up what I call my rolling station. I gather all of the tools I need and set them up in the area where I will be working . These are parchment lined baking sheets, an offset spatula, cookie cutters, a rolling pin, and flour for dusting my workspace and dough. I prefer to roll my cookies on parchment paper, so I also have a sheet for rolling.
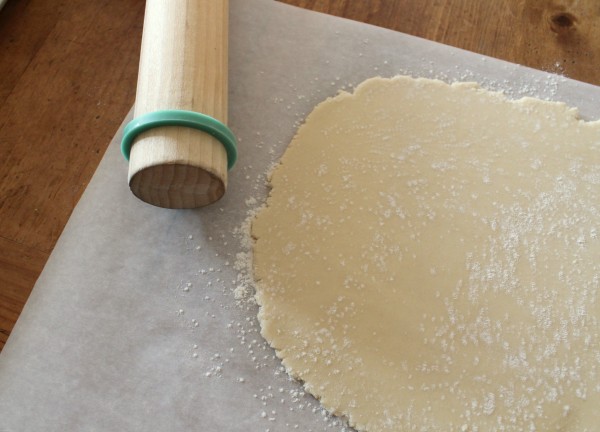
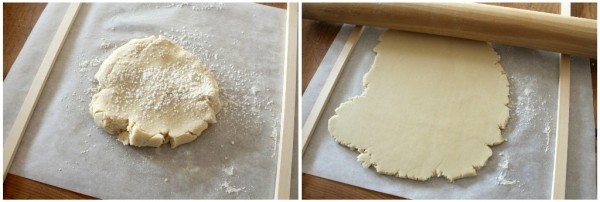
Beginning with a six to eight inch dough round, I lightly dust it with flour and begin rolling, turning the parchment 45 degrees at a time, until I have a 1/4 inch thick circle of dough. After baking, will expand to 1/2 of an inch thick.
Have you ever wondered how to roll perfectly even sheets of dough? It’s easier than you might think. I use rolling pin rings, which are basically big rubber bands that fit on my rolling pin to create a perfect space between the surface and rolling pin. I love them, but if these aren’t for you, there are many products on the market that will do the same thing, like Do’ Boards, the preferred tool of Cookie Crazie Pam.
If you don’t have the time or funds to pick up any of the tools above, don’t worry…you can also use square dowels. They can be found at almost any hardware and craft store. Just choose the thickness you prefer {I recommend 1/4 of an inch} place them on either side of the dough, and roll the pin over the dowels.
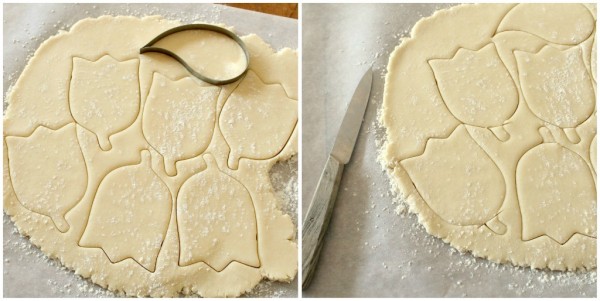
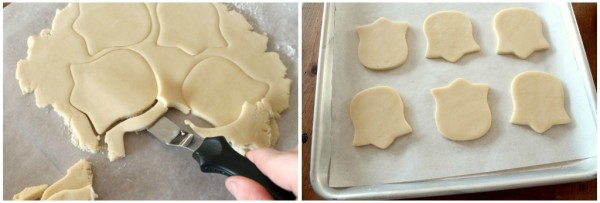
After the dough is rolled, cut out the desired shapes, as closely together as possible. You can use cookie cutters, or plastic and paper templates and a paring knife. Also, don’t be afraid to trim existing cutter shapes to make them work for the project at hand, or even piece together shapes from multiple cutters. Add the scraps back to the dough and continue doing this until all of the dough has been used.
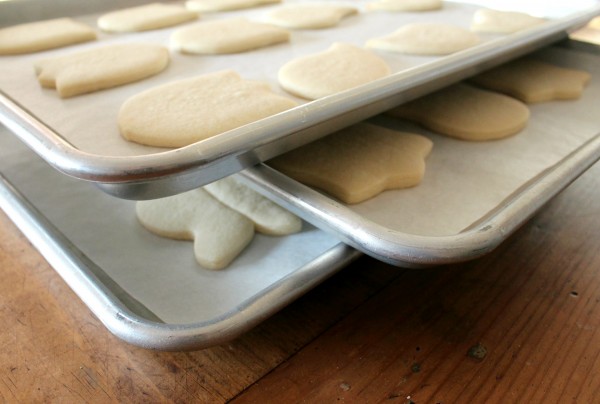
When the cookies are cut, use an offset spatula to transfer them to a parchment lined baking sheet. I am pretty good at this, but if you don’t feel comfortable moving cookies once they’re cut, I suggest rolling them on parchment and transferring the entire sheet to a pan after removing the scraps.
If I happen to have extra dough, I use it to make minis or circle and square cookies to freeze. They often come in handy later.
As the sheets are filled, bake the cookies. Seven minutes at 400 degrees works best for me BUT, my oven and I are old friends. Until you are comfortable with the recipe and your oven, I highly recommend buying an oven thermometer and sitting right by the door until you know what works best. It may be five minutes, it may be seven minutes, it may even be eight. The key to perfect cookies is to watch them until you know exactly what the end result is going to be.
Keep in mind to not open the oven a whole lot while baking them. It will affect how they turn out. Just peek in here in there to keep an eye on things. It may take a few batches to get it right, but once you figure things out, the results will be pretty consistent..
Be sure not to over bake the cookies. Some recipes are meant for a little color. My recipe is meant to create a lighter, softer cookie. If you’re looking for brown and crispy, this isn’t the recipe for you.
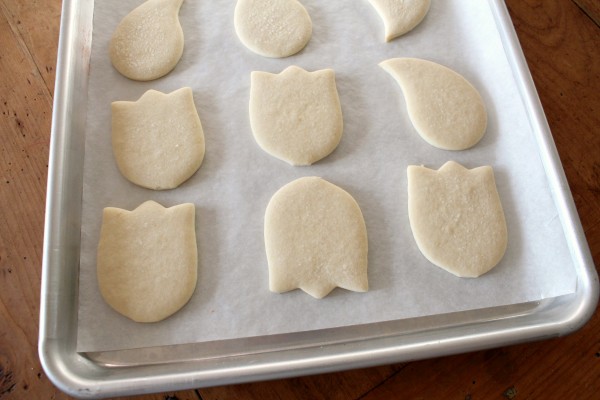
Most of the time, the end result is a smooth flat cookie that makes a wonderful base for decorating. Every once in a blue moon the cookies have crackly tops, but I think that is from adding a bit too much sugar or letting them sit too long before baking. I don’t spend a lot of time worrying about it though, because they are usually hidden by icing.
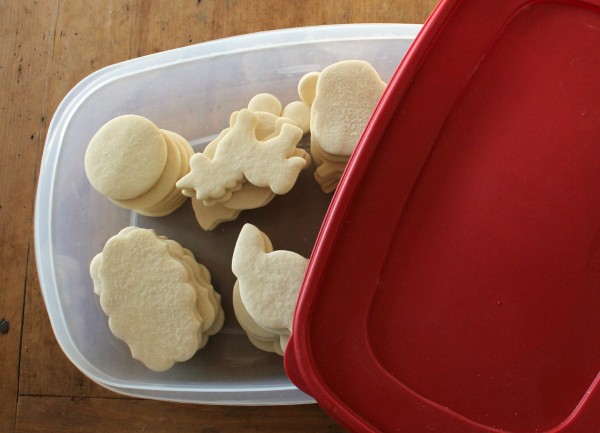
Freshly baked, the cookies will be a bit fragile. I always let them cool on the sheet for at least four hours, sometimes more before moving them into an airtight container.
I prefer waiting until they are a day or two old before decorating them to reduce the chance of oil from the cookie leaching into the icing and causing icing spots.
Once again, this is how I make perfect sugar cookies every time. It works well for me, but do encourage everyone to experiments and try what works for them.
Now, for some frequently asked questions about baking:
- How far in advance can you bake the cookies? I bake the cookies up to a week ahead of time and store them in an airtight container until ready for use.
- Can your cookies be frozen? Yes, they freeze well after baking. They don’t need any special treatment. I don’t even waste wax paper. I just stack them in an airtight {Tupperware} container and pop them into the freezer.
- How long should the cookies thaw before decorating? I have taken them out, put them on a cookie sheet and started decorating within fifteen minutes, but I am a procrastinator. It’s probably wiser to pull the container out about an hour ahead of time, give them a bit to thaw and then start. Either way, it’s not something to get too wound up about.
- Can you freeze decorated cookies? Hypothetically yes. Do I do it? Not so much. I’ve done it TWICE and then never again. It’s too nerve wracking for me. Bad things can happen. Long story short, if you do decide to freeze them, layer the cookies between sheets of waxed paper, and when you thawing DO NOT OPEN THE CONTAINER UNTIL THEY ARE COMPLETELY THAWED. I could go on, but that’s a whole other post.
- How far ahead of time can you bake the cookies? I would say a month or two, if you freeze them. If not, about a week, maybe a little more.
- How long are the cookies good for after they are decorated? Ideally, I’d serve them within three to four days of decorating. But this isn’t always possible. The thing about cookies is that they have an amazing shelf life in most cases. Think about the cookie aisle of your local grocery store. I’m betting that fresh Vanilla Wafers and Oreos are to die for, but even if they are days or maybe even months old, they are still edible, and pretty darn good. Same goes for decorated cookies. Keep them in an airtight container, and they will last a LONG LONG time.
- I’ve always been told leaveners are the ENEMY of cut out cookies. Your recipe has a LOT. Can I just leave it out? Yes. BUT, it will change the recipe. I’ve done just about everything that can be done to my recipe. The baking powder contributes more to how the cookie rises than how it spreads. If you leave it out, it will be a flatter, denser cookie. You’ll also have to roll it to exactly the thickness you’d like it to be, because it will not rise much at all.
- Do I have to use confectioner’s sugar? Won’t real sugar work? Again, you can do anything you like. It’s always good to experiment. But I’ve tried real sugar and it does not produce the same cookie. They are thinner, and greasier, and spread a lot.
- I don’t like almond extract. Do you have any other flavors of dough? Changing the dough is as easy as changing the flavor of the extract used. You can use any flavor that suits your taste, just make sure to use the same amounts called for in the recipe.
- Why do you prefer to decorate “old” cookies? Cookies that have had a day or two to sit are less likely to leach oil into royal icing.
- I followed your recipe and it didn’t work. What happened? This is one of those things I can’t help you with, unfortunately. If you measured the ingredients, weigh them. Otherwise, I’d have to be standing beside you to help. There are so many variables, oven, climate, quality of ingredients, etc. that can affect the final product. My best advice in this case is to try again, making sure that you added all of the ingredients and have not mis-measured.
This is how I make perfect sugar cookies time and time again. I hope this helps you to make beautiful cookies too. If you have any questions, feel free to leave a comment. I’ll do my best to answer them.
The most important thing of all is to keep baking and find what you like.Stay tuned for in-depth posts on decorating with royal icing, my favorite baking tools, storing and freezing cookies, and more. Have a wonderful weekend!
Happy baking!



Thankyou thankyou thankyou! I’ve just finished a practice run of cookies for my daughters 1st birthday party and this recipe is fantastic! I have a mountain of absolutely perfect cookies and I had a great time making them – your tutorial left me with no doubts as to what to do. Fingers crossed I don’t ruin them with my amateur icing skills! I’m off to check out your tutorials. Thanks again x
question for you … you mention after rolling the dough out and cutting add the scraps back to the dough until all of it is used. can you guestimate/have any suggestions on how many times you would do this? i’ve heard that the more times you roll the scraps the tougher the cookies become once baked. so, i have been rerolling the scraps at least once then disgarding. i feel as though i’m being wasteful.
ps: your cookies look GREAT! wish i had your talent.
Thanks for the great ideas
Hi there! Thank you so very much for your wonderful tutorials. I am going to attempt to make my very first batch of homemade cookies. Ever. I have 2 easy questions:
1) When you are adding ingredients and mixing the dough, what speed(s) is your mixer on, and for how long?
2) After taking the cookies out of the oven, do you let them cool on the hot baking sheet, or transfer them to a wire cooling rack? I’m worried about the bottoms over-cooking.
Thank you once again! Keep your fingers crossed!!!
Brooksley
lower speed, like two, not sure exactly how long. Let the ingredients combine, but don’t over do it. I leave them on the sheets for hours after baking, but if you need to move them wait til they are cool. They’re fragile
Hi,
So thankful for sharing this recipe and detailed method. I’ve just tried it and they came out perfectly. Well…. Some a bit brown on the side but that’s my fault. They were the first batch. 200C is too high so I reduced it to 180C. Between 5-7minutes.
Very tricky! I thought baking cookies is easier than baking cupcakes. At least , with cupcakes I could tell if they are done by the toothpick method. But this one I watched and watched , I couldn’t tell! I poked still I couldn’t tell! I let them turn light brown on the side to make sure they’re done. Well, I guess practise makes perfect. I’ll try on other batch tomorrow.
I can’t wait to decorate them!!!xxx
I am allergic to eggs, so what can I alternate the eggs in the cookie. Please help.
I knw that royal icing is impossible to make without eggs. So no question about it.
A lot of royal icing recipes don’t have eggs in them.
I know Amanda’s at iambaker.net doesn’t.
can you tell me what grams measurement is i dont have that measurement?
You are amazing. What a fabulous wealth of knowledge and a beautiful blog with amazing pictures. I’m going to use your cookie recipe now (fingers crossed) and make some scrabble cookies that I saw on Pinterest. Thanks for sharing.
Thank you so much for sharing this recipe. I have used it several times now & it’s been a big hit with everyone who has eaten the cookies. Now I just have to master the icing part!
Hi,
I tried this recipe it turned out to be great….. Everyone loved it….. Thank u soooo much for this very best recipe.
I have a question for you..
What type of the try is perfect for baking cookies?
Sorry for typo error it was what type of “tray” is perfect for baking cookies
I like half sheet commercial baking sheets. I buy them in packages of two at Sam’s Club!
Hello, I just made your cookie recipe and is the best I’ve tasted! I had so much fun haciento your recipe is easy and fast! thanks from Spain, the perfect measurements.
Sorry for the error “haciento” (use google translator to translate) ——> I had fun “doing” your recipe ….
I’m ready to give this a whirl, but I noticed that in the recipe you have baking POWDER, and when you speak about the order to add ingredients you say baking SODA. I’m assuming it’s powder since that’s in both of your recipe posts, but I am a nervous nelly when trying new things.
Thanks for your help and keep doing this blog; it’s beautiful, inspiring, and so informative.
Ive just made some of your biscuits to this recipe. Oh my! They’re lovely! Thank you 🙂
Hi Sugar – thank you for all the information you provide us. I am going to try your cookies, but I have a question. You say that you like to leave your baked cookies on “the sheet’ for at least four hours before moving them. By “sheet” are you speaking “cookie sheet” or “sheet of parchment”. I don’t think I have enough cookie sheets to leave each batch set for four hours and still get the entire recipe baked in one day. If it’s “cookie sheet” – I guess I am off to Sam’s Club to buy a slew of cookie sheets. LOL Also, I am waiting to hear a response on the other blogger’s question on are you speaking of “baking soda” or “baking powder”. Again, thank you so very much for all you share.
Its baking “powder” (not “soda”). I made these last night using US measurements and they came out perfectly (with baking powder).
I also only had 1 cookie sheet available and very limited counterspace, so I moved the sheets of parchment to a cooling rack immediately after they were done and let them sit there for about 1-2 hours before putting them away. I’m sure the longer you leave them sitting out the better, but they seemed to have worked out just fine for me this way.
I found the conversions on an older post, I am trying it now… but still if you have any advice on the cracking when I roll it out I’d love to know! Thanks
When it comes to the baking powder/baking soda debate, I just learned that baking powder helps with the rising of baked goods. Baking soda, on the other hand, contributes to the spreading of a baked good. At least that is what is proclaimed by Buddy Valastro in Baking with the CakeBoss. I haven’t cross-referenced that information with Shirley Corriher’s Bakewise yet. (Sorry, I’m a nerd that likes to bake so I seek out the how’s and why’s.)
All I can say is…thank you!
I was very skeptical about your recipe, with all that baking powder and the powdered sugar, but I kept trying different recipes and kept getting mixed results. So a few days ago, I baked 4 different recipes and yours came out the absolute winner. The dough is very easy to handle, no refrigeration needed (aaaahhhhh!) and virtually no spreading.
The search is over! Thank you so much!!!
I’ve just tryed this recipe…is divine!
Thanks for sharing!
Do you have any advice for making this dough without a “kitchen aid” stand mixer? 🙁
I like rolling out my dough on parchment paper–cleaner, no sticking to my counter. How in the world do you keep it from moving all over? I tried to tape it, but the tape won’t stick. Help?
I prefer to roll between two sheets of waxed paper and there is no slipping and no need to add extra flour because this dough doesn’t stick.
I tried your recipe today and it was great! In my GE XL44 oven I first did 7 minutes at 400 but it was too much, so then I reduced the heat to almost 400f but for only 5 minutes.
I should say, mine still came a tiny brown, so maybe it was still too much heat.
Thanks again for your recipe, tomorrow is decoration day!! yay!!
I would like a recipe for the glaze please….
Just tried your recipe and I have to agree with all the other posts, they are delicious and easy. Do you have an easy gingerbread recipe as well?
I just love your sugar cookie recipe! The first two batches I made came out absolutely perfect. Then ever since each batch is spreading and I can’t for the life of me figure out what is causing it. I keep trying over and over – last night I wanted to make cookie pops for a welcome bouquet for a new cousin and as careful as I was, I still got spread. Do you have any helpful insight that might be worth a try?
I omit the baking powder because of my altitude and there is no spread. Try omitting half the bp first and all of it if necessary. The cookies are amazing without it.
This recipe is awesome! I’ve always been a little hesitant with sugar cookies. I’ve only tried it a couple times and I’ve never really liked the finished products and cutting them out was a pain. Since there is no refrigerating the dough is nice and soft and easy to work with. The finished/baked cookies were fluffy and soft. Thank you so much for relieving me of my phobia…now onto the icing!
Hands dowm the BEST sugar cookies I’ve ever made! I used 2 tsp of almond extract & 1 tsp of vanilla extract.. so good!
Hi, although some may prefer the recipe in grams, I’m like you and like it in cups and spoons, would u be able to send me the original recipe? I love to bake but don’t even own a scale:p thanks in advance. Xo
Hi there, I know that you said that your cookies are over done if they are left to brown. I go that one step further and let mine brown and they are not dry and just taste great.
OH that is good to know, because people always ask me for a crisp cookie! I will be glad to tell them this works, it’s just personal preference, I guess!
Hello,
Thank you so much, the recipe works just perfect, I love almond flavoring too!! I wanted to let you know of the neatest rolling pin made by Joseph Joseph, I purchased it through Williams Sonoma mail order. The price is $19.95, it has adjustments for 3 sizes. I had seen in your pictures of the rubber ring method on your rolling pin, this is so much better and easier to work with.
Thanks again, I love your website and your creativity.
Carol
Ooooh, I just got that pin for my birthday and it is THE best hands down. I second the recommendation.
I exclusively use this sugar cookie recipe and it is ALWAYS perfect! I used to constantly be trying new recipes to find one that was better or “the one” but now that I have found it I no longer stray. I live above 5,000 ft so I omit the baking powder completely, bake them for 9 minutes, and I end up with perfect, flat cookies each time.
I also have followed your advice on using LilaLoa’s chocolate cookie recipe which is simply amazing as well. Thanks for you wonderful site – I love reading your musings and you are a constant inspiration. And I will admit that I am completely envious about all of those cookie cutters!!!!!!!
I’m about to try you’re recipe for the first time. I’ve been using a 100 year old German recipe ever since I was about 3 when my Mom first introduced me to the art of iced sugar cookies. Now, don’t get me wrong, our recipe is probably one of the most treasured one in my box, however, the dough must refrigerate for at least FOUR HOURS, and it’s best if it goes overnight. I have grown to be impatient in my adult years and realize that life is short and waiting on dough to chill is not something I want to do. I want to cut and bake NOW so I can get to the good stuff. With all that being said, I recently purchased a Silpat liner after reading rave reviews on Amazon. What are your thoughts on using one of these? I know your photos show the cookies on parchment but I’m new to this contraption and wondering if you have seen good results. So far I’ve made chocolate chip and our old sugar cookie recipe on it and wasn’t very impressed. But I may be doing something wrong… Any comments, suggestions, thoughts?
OMG, THEY WORKED!!! Unlike other “No spread” recipes I have tried on the net, this one actually worked!!! Thank you so much, you’ve changed my world xoxo
Hi!
Great post!
I want to try your recipe but I only use cups and ounces. If I have converted right, is it 1 cup/8 ounces of butter, 1 1/3 cup confectioners and 3 1/8-3 1/3 cups flour? Thanks!
Lyndsay
Lyndsay,
It is 1 cup (two sticks) of REAL unsalted butter, softened
1 1/2 cup confectioner’s sugar
1 egg
2-3 teaspoons flavoring
2 1/2 or 2 3/4 cups all-purpose flour
2 tsp. baking powder
1 tsp salt
Hope this helps!!
Carol
Thanks so much!!
muy buena la receta!!me salieron geniales!
Hi Sugarbelle!
I dream and plan to try cookie decorating for a long time now, and I am about to jump in! I plan to try your basic sugar receipe and I read all your tips and advices, but I still have a question: I never remember where to place the cooking sheet in the oven: top, bottom or middle ? Or do you use convection heat and uses all places at the time?
Thanks!
I place them on any rack but I know my oven. Until you know what they will do, I think you should try the middle and just watch them very closely!
thankyou for replying to this question, i cooked a double batch today, first tray was a coffee colour (7mins, near the bottom – didn’t shift shelf) 2nd tray some of the cookies had brown bits, 3rd tray roatated tray half way through cooking and only cooked for 6 1/2 mins so that there was a brown corner here and there all over the tray and not just one corner of the tray. kept experimenting and got some white ones out but they seemed soft underneath. left them for 1/2 hour and they were fine, so looks like i will have to invest in my trays. will move shelf to middle next time in my fan forced oven (i hate it, had an old gas oven before, but will keep ploding along) how do you make the cookies not spread as much, they spread a little too much for me, what is levener ? i am from australia so some things i figured out eg allpurpose flour – plain flour, confectioners sugar – icing sugar. just another note some people are allergic to Nuts – almond essence is a big no no. if making cookies for others with almond in them tell people
Hi,
I cooked the cookies following your instructions, and they are exactly like yours in the picture. Thank you!
I hope that I ll’ be also able to decorate them as well…
Ciao!
Hi there! I’m new to baking and i want to try out this recipe of yours. Can you advise me on the suitable temperature and how long should i bake it for? thanks 🙂
Can you refrigerate the dough and for how long?
I don’t personally refrigerate it. I think it changes the texture and end result. However it makes so quickly, it almost isn’t necessary.
how long does it take for your icing to set?
You have such an amazing website! Thanks so much for sharing your talent in such detail!
Pingback: Easter Bunny Cookies « Running Blonde
So…I just finished up my sugar cookies for the easter egg hunt my church is hosting this Saturday, and I have to say, your recipe is the best. I used it this past Christmas, and everything came out perfectly; this time, expecting several hundred people, I decided to go ahead and use store-bought dough to save time, and it was so soft all my carefully shaped eggs came out as lumpy blobs. 🙁 Next time I’ll know better! Thanks for sharing your wisdom and experience.
Hi there,
What is emulsion?
I found a definition for it being: Definition: In the culinary arts, an emulsion is a mixture of two liquids that would ordinarily not mix together, like oil and vinegar.
What do you add to the cookies for an emulsion?
Thanks!
Jodie
I found this explanation at LorAnn Oils to be really helpful:
What is a bakery “emulsion”?
Emulsions are water-based, alternatives to extracts. The flavor is micro encapsulated in natural stabilizers and suspended in water. This encapsulation enables the flavor to not lose its integrity when exposed to high heat.
Which means….Use baking emulsions instead of extracts with better results!
When it comes to flavoring, professional bakers almost exclusively use emulsions over alcohol-based extracts.
Emulsions have a more potent, robust flavor.
Won’t “bake-out” when exposed to heat
Water-based
Gluten Free & Sugar Free
Do you leave the cookies on wax paper & then put them in the oven? Every time I have tried it the paper will start to burn. Does this happen to anyone else?!?! It’s hard to transfer the cookies before baking them to a cookie sheet without messing them up. Any tips?
She used parchment paper. I have used waxed paper and it does burn. Parchment paper is way better.
I tried this recipe for the first time and i was wowed. Came out perfect . I am still fearful of decorating cookies but i hope to try soon.
Greetings from England. I have just finished making your cookies for my daughters 4th birthday party on Sunday. OMG they are absolutely scrummy. I used a different recipe last month on a practice run which had the same ingredients apart from they used caster sugar instead of icing sugar. I have got to say I prefer the icing sugar method, the taste is unbelievably different. They are Minnie and Mickey mouse shaped and I will be outlining and flooding them tomorrow, wish me luck.
With love and kindest thanks.
Jayne xx
Pingback: Cookie Chemistry | |
Hi there, I was trying out your cookie recipe yesterday
And the result was a bit brownie but it was really good though 🙂
How about chocolate cookie recipe? Is it just add some cocoa powdered? Thanks
😀
Ive recently made your cookies (YOUR recipe) as well as royal icing (again, YOUR recipe) and was more than thrilled with the result of both. I couldn’t help but save some for myself 😉 (for those reading this comment, I HIGHLY HIGHLY suggest reading each step as well as the recommendations for other sites/friends she has posted- they’re EXTREMELY helpful).
I have a baby shower this weekend that I was asked to bake cookies for. Would it be ok in your opinion to bake them tomorrow & decorate them Thursday and Friday so they’re ready for Saturday? Also, do you have any suggestions for packaging? They need to be delivered by Friday night so they could be individually wrapped but I don’t want the royal icing to be scratched, etc.
Thank you for your help, advice and most importantly your recipes!! I’m truly inspired but your vivid talent & as for someone who works by trial & error over and over again, it makes REAL bakers like you hope for someone like me in the future!!
Thank you so much for sharing!! I tried looking in youtube but couldn’t find video tutorials that I felt comfortable trying. Just about a week ago I found this website and I can’t stop looking through all your tips, instructions and recipes!! You make it look so simple! Definitely trying soon! Specifically the sugar cookies & royal icing recipes!! Thanks again!! 🙂
Excited to try your recipe, im having my niece’s birthday party coming up, surely will try your recipe! btw, can your recipe be used for ‘slice & bake’ method? instead of using cookie cutter, can i chill the dough & slice it then bake? pls help
HELP… I bought David’s Cookies 4oz pre-shaped sugar cookies “rounds” in the hopes that I could cut them with a sunflower shaped cookie cutter. I did have a hard time getting the cutter through them since they are quite thick, but managed. Some of the flower “points” did get stuck in the cutter, but that’s not my issue right now. Problem is the cookie spread out SO much that now they look like a baked blob!
What am I doing wrong?? I used parchment paper on my cookie sheet, baked at 365 degree oven… I am so distraught… I need to make 100 of these for party favors! I’m glad I experimented, but really need to resolve this problem.
Thanks in advance,
Eileen
Hi- I’m wondering how long do I mix the ingredients until it starts turning into dough? I use a stand mixer. Thanks!
Hi- I am wondering how long does it take the ingredients to turn into dough? I use a stand mixer. Thanks!!
This recipe is amazing !! I made it twice now and always turned out perfect ! Bare in mind that I am a beginner , I only tried to make sugar cookies once before, other recipe and that was a disaster. But this one is so simple and easy to make and the taste is amazing. So happy I found it! Thanks so much for sharing! Love your work!
i just tried your recipe for the sugar cookies. they are the best sugar cookies i’ve ever had! even my 7-year old daughter agrees. thank you for sharing the recipe.
Thank you Gale! That really makes my day!
Hi I live in fla and want to make graduation cookie favors for my daughter but it is in Chicagoo.. I leave for Chicago on thursday and the party is Sunday Best recipe to do Wed nite? best way t lif sirvive the flight? Best shelf life?
Just a hint that works for me – roll your dough and then freeze for about a hour. It is wonderful to cut the dough in the fashion and then bake at that point. I have had great luck.
I love this recipe, but I am having one small problem, okay actually two small problems. First it cracks a bit when I roll it out, I have tried kneading it more but it still seems kinda dry and cracks. Is there any advice you can offer to help fix this problem. Second, I was wondering if you had the recipe that hasn’t been converted into grams…I am thinking I am messing up on my conversions and not making them properly and this is why I am getting the cracking. THANKS SO MUCH!
us measurements are available right above this recipe on this page where the blue HERE is… i finally found it too!
Hi will like to ask if my mom’s a vegetarian will it be possible to make the cookie dough without egg?
This is the best recipe I have ever made. I am a elementary school teacher so I make a lot of cookies and this one is delicious and perfect!!!! Thank you. Now I’m going to try decorating with your RI recipe. Wish me luck!
I made this for the first time. I live in AZ where it’s 112 today….my dough was pretty sticky even with 3 cups of flour. Also, the cookies had kind of “poofy”, soft edges and not crisp straight edges (I made stars). Any idea what I’m doing wrong? PS…I usually use the roll sugar cookie dough so this is a big step for me 🙂 Thanks
Lol I feel your pain, I too live in the scorching state of Arizona. I don’t know if sifting helps, but my cookies turned out pretty much exactly how the looked before going into the oven, my stars had a little bit of rounded tips but still recognizable. Maybe your baking powder is old? I guess it expires after a certain date, and wont work as strong as it should. Or maybe the dough is too thick? I recently went to Joann’s and the Wilton 1/4 inch dowel rods were 3.99, but I went to the wood craft aisle and got the same exact thing for only 99 cents 🙂
Oh my goodness, you’re amazing.
I just found your blog today, and I am in love with it!
Thanks for all your wonderful posts!
xo Dakota
Pingback: Recipe Reality: Patriotic Sugar Cookies « Lifestyle Blog
Hi,
Is the perfect sugar cookie recipe the same as the basic sugar cookie recipe you have posted?
I guess it pays to read lol. I just found the answer to my question in a old post.
Pingback: My Confectioner Sugar Cookies | Every Day is a Miracle
Pingback: BBQ for 35 guests - Classic Entertaining
Just came across your blog today and I love it! I am going to attempt to make cookies for my daughter’s birthday and your site has been great. I love that you include so much detail and even photos for all of your stuff. Can’t wait to try your sugar cookie recipe and some of your super cute decorating ideas! Thanks for the inspiration 🙂
I have been obsessed with making sugar cookies after discovering your blog lol. I have a question though, I have been buying the 2 pound bags of CH powdered sugar that is 10x, but I found a 50 pound bag at Costco that is only 6x. I was wondering if you or anyone else has tried using the 6x one, and if there is any noticeable difference.
I LOVE your blog, and I am so glad I finally found confidence in myself to start baking. Thank you SO much for all of the wonderful tutorials, recipes, and links to your friends, as well as stores.
Thank you for this wonderful post! My husband just loves sugar cookies, and I can’t seem to get them right. I feel confident in trying again; you make it look so easy!
Just tried these this morning, and on the first go-round, hit it out of the park. I used half almond extract and half vanilla extract, and boy are they tasty! I like how using the powdered sugar gives them a powdery, fall-apart texture when bitten. Sifting really does make a difference, too. Thank you for this recipe!
Pingback: Great Links for Learning to Decorate Cookies with Royal Icing « Home Schooled Baking
Hi I just have to let you know that you have the BEST blog ever. I love to bake and found your blog so interesting and very helpful,you are so good at what you do. Love it,love it love it.regards from downunder
hello i really love your blog! Do you have no sugar added cookies recipe? Its because my diabetic problem. Thank you so much.
will this work with gluten free flour?
Pingback: No decorating and watching ‘Pretty in Pink’ at the same time. | Sugar Dayne
I’m in the process of making some wedding cookies for my daughter’s bridal shower (which is only 3 weeks away.) You mentioned in the FAQs above that freezing the decorated cookies was a “whole other post.” Did that post ever happen? 😉 I really want to start baking and decorating ahead of time, to lessen the stress on this MOB, mother of the bride! Thank you in advance for any tips you may have.
I never got that far. Basically you can layer them between sheets of waxed paper. Free them, and when you are ready to decorate, let them thaw completely, ABSOLUTELY completely before opening.
Pingback: Car Show! « Oily Geologist
Hi
I have printed this off to have a go this weekend!!! Your cookies look amazing!!!
I’m not so good with coverting! U use grams, can u tell me how to use3 cups?! Ur cookies look perfect and Iwould love to try them!
Can I bake cookies in low temperature to let icing dry quickly?
Please can you describe emulsion to me? I suspect the equivalent here is vanilla extract but I’m not sure. In Ireland and the UK, emulsion usually refers to house paint and I’m fairly sure that’s not what you are putting in your cookies 🙂
Hi! I’m from Monterrey, Mexico 🙂 and I love your blog, I’m so ashamed for telling you this but the measurements in this recipe are wrong! Here are the corrects(acording to your original recipe!)
600 gr flour, 350 gr sugar, 180 gr butter. I follow the instruccions of this post but. I trying soon with the original recipe
Angie, I did not convert my recipe, I actually weighed it, so it doesn’t mathematically convert…however, I weighed it as I measure myself and these are the numbers I came up with.
Hi!
I realize this because I did the cookies and add more and more flour, almost 700 gr… then check your blog again and find the link with the original recipe, the cookies with this recipe are just fine but I want the “Perfect Sugar Cookies” 🙂 so I’m trying today!. Thank you so much for inspire me!
Pingback: Happy Birthday, Cupcake! « Small World Supper Club
How do you know when the cookies are done?
Pingback: Cookies for Rookies « Kitchen Submission
Hello! I’m from Southeast Asia and I just tried your recipe today and I’ve never tried baking sugar cookies prior to this. There was a problem with the dough which I’m hoping you’d be able to help me out with. I used a hand mixer…I found that my dough turned out very greasy and yellower (it did not look as pale as the picture above) than yours, and it did not stick together. (There was even oil leaching out from the dough at the bottom of the bowl!) It didn’t stick to the beater of my hand mixer. The only change I made was that I reduced the amount of confectioner’s sugar to about 100g in total.
In the end, I got frustrated and I just kept adding more flour hoping it’d stick together eventually. It got slightly less greasy, but it was still crumbly. My dough was not sticky by the way and I used pure creamery butter. I rolled it out eventually and cut them into shapes to see how they’d turn out. The rolled out had like small cracks in it and the finished product did not have a smooth top as expected. They did hold their shape, though with almost no spread.
I hope you can shed some light on why my dough turned out that way…was it because of my mixer? I don’t have a stand mixer with a paddle attachment though. And yes, I did measure the ingredients by weight. And I let the butter sit out til it softened. Where I live is humid if that helps (tropical climate!). Again, I’d be ever so grateful for your thoughts on this…I’m eager to give it a second go!
Pingback: Pumpkin Cookies | thecookiemaster.com
Pingback: Lollipop Cookies | Abusymom's Blog
hi just found your site and it is brill .i live in the uk and have a passion for all things usa as for a short while i lived over there. i love how your all so seasonal and enjoy to celebrate all holidays..i have a small passion for cooking and cookies(biscuts as we call them!) and now would like to take the next step into icing,,its a bit daunting but im going to follow your instruction and go for it…x
Haha, by the time I can decorate them I probably have eaten them all…
What an unbelievable site! THANKS! Loving it. Can I successfully substitute margarine for butter in the sugar cookie dough recipe?
I just found your site…….JACKPOT!!!!!!!! What a wealth of information recipes and ideas. Thank you. Cannot wait to start Christmas baking this year. I will be on your site many many times, and not just for Christmas cookies, but for all holidays. THANK YOU!!! 🙂 Cheryl …. (aspiring cookie baker)
Hi I stumbled upon your blog this morning and can’t wait to try some of the recipes; Thank you for sharing.
I read the comments about having to add more flour. It has to do with the quality of flour you use. I travelled and lived in many countries and discovered this when I baked with the same recipe but using different types of flour and butter. I would though all flour is the same but it is not. In some recipes you might have to add a little more flour till you get the right texture / consistency.
we have never been so delighted with a biscuit recipe. Light and soft with a teeny bit of cumble after 2 days (the kind I like). We didnt want to decorate them as they were sweet enough.
I could cry at how wonderful these are x
Pingback: Basic Sugar Cookies « Bicil The Baker
Just wanted to give you another tip about warming butter, it comes from Mary Berry of The Great British Bake Off, she is somewhat of a baking guru in the UK. Cut the butter into small squares and place in a bowl of tepid water for 10mins, remove and you have perfect room temperature butter ready for creaming.
Thank you! Thank you! Thank you! I love your website! You offer so much good advice. I will be trying these cookies today. I am on a mission to make decorated sugar cookies that look like the ones in those specialty coffee shops. Obviously, you are very talented. I have a LONG way to go! Thanks for the help!
Hello! I’m new here and I’m just wondering, do your cookies spread? I’m going to try this recipe out but I would just like to know. And also, your cookies look so thin! Not at all like 1/2 inch. Are they really 1/4 inch, bake to 1/2 inch? I’m just very nervous that they won’t come out well… Thanks!:)
I tried it today!:) but 200 degree celsius 7 mins made them brown at the edges and crispy. And 200 degree celsius 4 min made them lighter but slightly golden brown at the edges and it tastes SUPER SALTY why is that so?:( i think they’re darker than yours because i accidentally spilled my egg white. Clumsy me. So it was more yellow. And it spreaded a little bit during baking but that was because my dough was rather sticky and didn’t peel off well. All in all the recipe is easy and consistent with your pictures, but the end results are completely different. Btw, all the cookies taste salty. So it could be because i used self raising flour and dusted a lot or because i aded wayyyyy too much salt. But i doubt the second one. If i did, only some cookies will taste salty right? I’m now chilling my dough because i’m going out. Hope it’s still okay. Thanks btw for the recipe!:) and i will try it again properly soon!:D
metric works just fine. I prefer to weigh my ingredients, for any baking I do. There is a big difference.