Slice and Bake Candy Corn Cookies
I have a problem.
Little things bug me. A LOT.
It’s true. I cannot let the little things go.
I’ve been wanting to make these cookies since I ran across them on Pinterest.
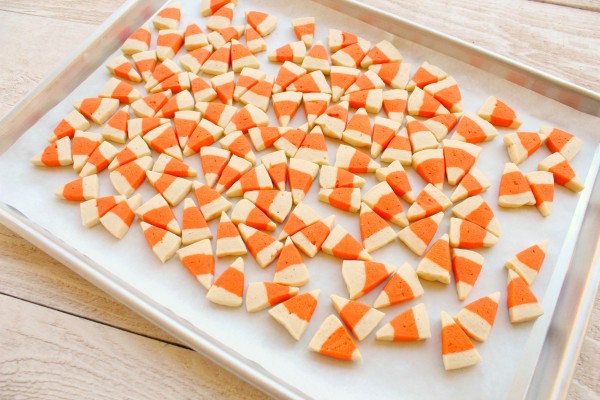
But I should really say, I’ve wanted to FIX these cookies since I saw them on Pinterest. Now most people wouldn’t give this a second thought, but it kills me that all the candy corns don’t really look like candy corns. They are supposed to be yellow on the bottom, orange in the middle, with a little white tip. But, if you make them like the instructions say, they don’t work out that way. Every other corn ends up with a yellow tip and white bottom.
Trivial yes, but I couldn’t let it go. That left me with two options…eat the duds, or fix them.
At first I figured I’d WE’D just eat the rejects, but besides messing up the diet I go on once a week, I’d have to bake two batches to equal one, so I put on my thinking cap and came up with another way to fix the problem.
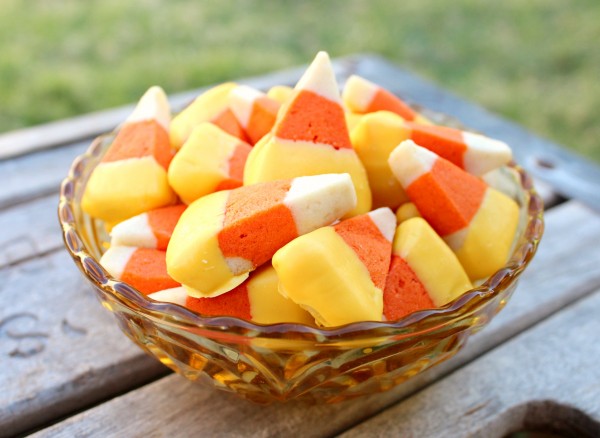
Pretty, and perfect. Two things I like…except in the case of supermodels. That’s just unfair. But that’s another story.
Anyway, I’m going to tell you how to make these. First of all because I like y’all, and second of all, because these aren’t as simple to make as the recipe led me to believe. I figured by explaining how I did this, I could make things a little easier for everyone else.
For the cookie dough, I used the recipe from Land o’ Lakes adapted just a tiny bit to suit my taste this week. By the way, in my defense, I think backward candy corns bugged the Land O Lakes people too because I noticed that they only used the good ones in their recipe picture.
Ingredients
- 2 sticks of butter, softened
- 1 cup confectioners sugar
- 1 egg
- 2 teaspoons vanilla
- 2 teaspoons almond extract
- 2 teaspoons orange juice
- 1/4 teaspoon salt
- 3 cups all-purpose flour
- 1/2 teaspoon baking soda
Instructions
- Cream together sugar and butter. Add egg, vanilla, almond extract, and orange juice. Whip until light and fluffy. Sift together flour, baking soda, and salt and add slowly to the wet ingredients until well incorporated. When the dough is formed, remove it from the bowl, and divide it into thirds. Tint one third of the dough orange {I used egg yolk yellow and tulip red Americolor} and leave the other two-thirds uncolored.
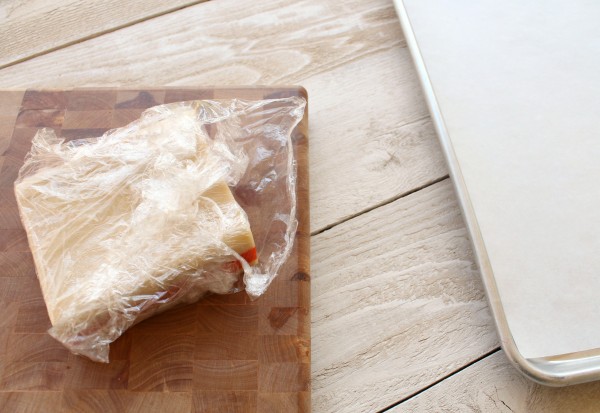
- Afterward, line a 9×5 loaf pan with plastic wrap. Press one third of the white dough into a flat layer on the bottom. Next, add the orange dough on top creating the second layer. Finally, use the last of the uncolored dough to make layer three. Cover the top with the overhanging plastic wrap, and chill, preferably overnight. Slice into “candy corns” and bake at 375 for 7-10 minutes.
As I mentioned before, things didn’t go as expected. If I had gone by the written instructions ONLY, I might have thought I was a HUGE failure. I made things work, but it took a little more brain power on my part than I liked. Nothing was precise.
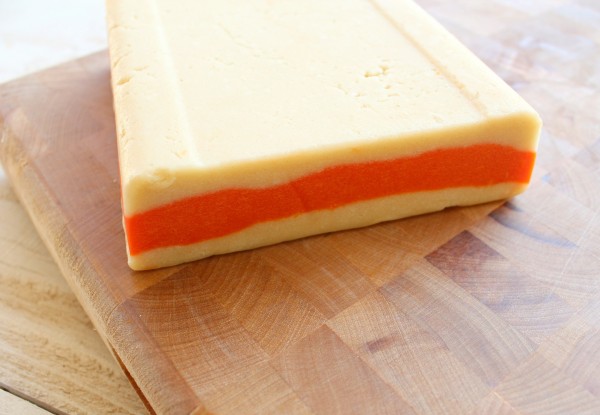
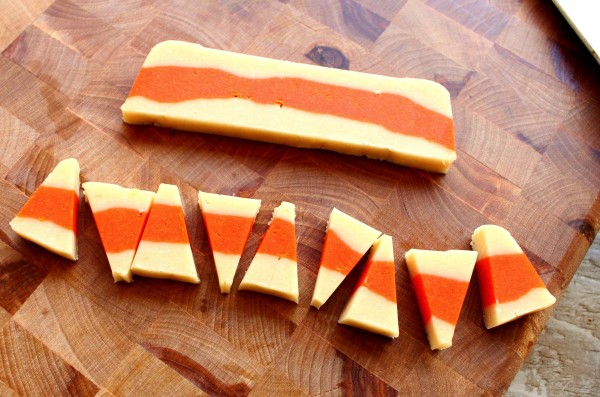
I started with this brick of dough. That was the first surprise.
I thought it was pretty, but it definitely didn’t have the height I had anticipated. Maybe it was the fact that my pan was a teensie bit bigger than 9×5. Only by decimals, and I don’t know how much of a difference it makes, but my cookies were way smaller than they appeared in the picture I saw.
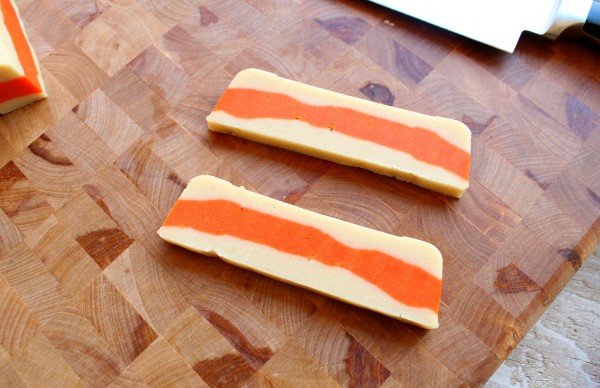
Anyway, I took this “brick of dough” and sliced it into quarter inch slices with my big ol’ butcher knife.
Then, I sliced them again to make candy corns. This was discrepancy #2. The recipe says to slice each strip into six sections, but when I did that they looked funny. So, I did about eight sections. It worked, but I don’t like it when things like that happen, because it always makes me think I messed something up.
Turns out, this is perfectly normal and okay, but I didn’t know that until later. {Thank you instructional video that I found AFTER I finished!}
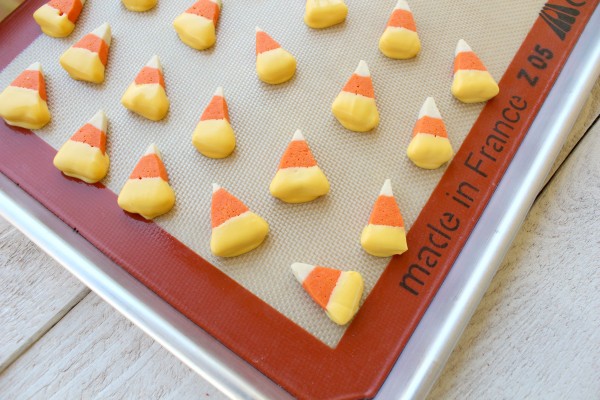
Anyway, I baked them, and ended up with a whole bunch of these,
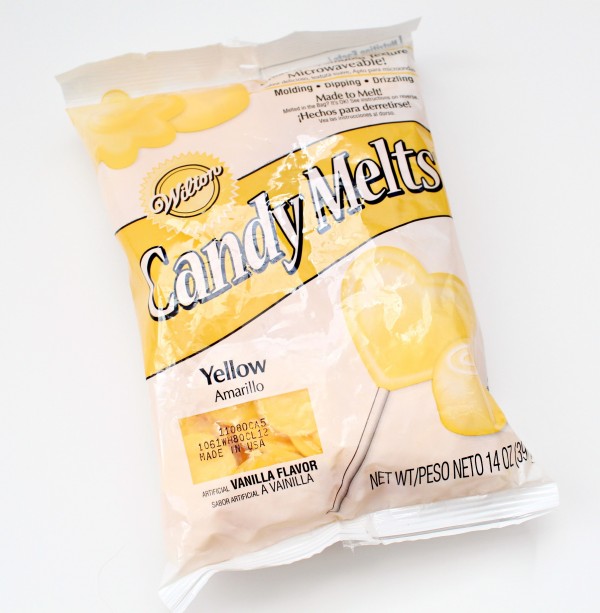
which brought me to the whole OCD fixing the candy corn thing, which required a bag of yellow candy melts.
You can get your own HERE, and believe me you may need to. Another thing I have learned from this project is that there seems to be a shortage of yellow candy melts in crafts stores. At first I was perplexed, but then I decided to blame the cake ball gals. I have a theory that some yellow cake ball creation has surged in popularity and that the cake pop girls have snatched up all the yellow. But that’s just a theory…
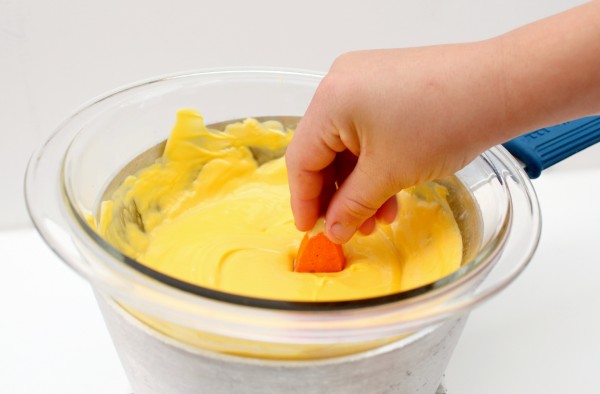
Anyway, the fun part of this, is that the kiddos can help. After scorching the first bag, {I do stuff like that sometimes} I followed the instructions on the back of the melts and then I let my oldest do the dipping. Hypothetically younger kids can help, but in my experience they get a little overzealous when it comes cookie dunking, so mine got assigned to eating the “oopsies” and Evan did all the real work.
Once they were dipped, I let them cool on a Silpat. You can use wax paper, but for some reason, I seem to have the amazing ability to make things stick to wax paper…so after a little mishap, I decided to stick, or UNSTICK, rather, with silicone.
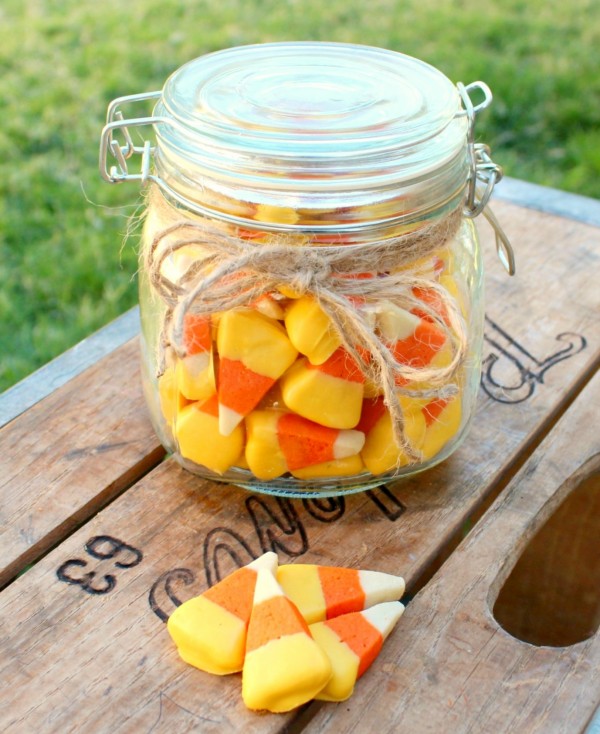
After all the dipping, I let them cool, and put some of them into a little jar I found at the dollar store. I thought they would make a perfect little thank you gift for my neighbor, who just hooked me up with some cool vintage baking gear.
And, that’s that. Easy breezy OCD slice and bake candy corn cookies. Talk about a mouthful!
PS… Did I mention that all my friends like candy corn too? That’s one of the reasons we’re friends, of course! You should check out their candy corn creations.
My buddy Glory put together a gorgeous Candy Corn Cheesecake Mousse. Kristan made the CUTEST Candy Corn Meringues I’ve EVER seen…and Shelly, well Shelly did that thing she does and made Bugles into something amazing! Her Candy Corn Bugle Snack Mix is sooo cute, and frankly I am a little bit envious of her ability to use wax paper like a normal person.
Between the three of us, you should be busy all week. If not, I’m sure we’ll think of several other things to add to your to-do list!
Happy Monday everyone, thanks for coming to see me today. Here’s to a GREAT week!


were they as yummy as they look? I love cute cookies but if they dont taste good I would rather not bake 🙂
Kiddos and hubby LOVED them…I’ll get a review from my neighbor tomorrow. If you don’t like the vanilla candy melt, you can also do regular old chocolate…Good stuff!
Love these! Is there any reason why you couldn’t dye the bottom layer yellow?
The way they are cut, the bottom layer is yellow on one, and white on the next…I wanted them all to be yellow because things like that bug me…
Well, after all your work they sure look great!!
These look so cute. Yes little thing like the color order of candy corn would bother me too 🙂 So glad the yellow candy melts arrived in time for you project! I’m sure your neighbor LOVED it.
That backward color thing annoyed me too!! I spent 5 minutes at the store staring at a bag of candy corn trying to figure out how to fix it – make concentric circles maybe? – and never could come up with it. Your solution is awesome – Gracias!
Pingback: Candy Corn Bugle Snack Mix
Very cute! Love the step by step…I always think I am doing things wrong especially when it comes to stuff like this!
Those are really cute, and this method is a great fix for the color problem. Which would have totally have bugged me too!
The candy corn cookies look great. The color thing would bother my OCD mind as well. Great solution.
I saw these too! I have a recipe all stored away just waiting for me to cook ’em in October. I love your chocolate dipping idea as I am a bit OCD about these things as well! Thanks for sharing!
These cookies are darling & such a great idea!
“And, that’s that. Easy breezy OCD slice and bake candy corn cookies.”
hahahahaha
I LOVE your way of doing them. The backwards ones would drive me crazy too!! And I bet the yellow candy adds extra sweetness too. Which is something I’m never against!!
These look adorable! Thanks for the how-to. I’ll definitely have to keep this recipe in mind as Halloween gets closer :).
What if you made the dough into a circle instead of a brick and cut wedges? You could color the bottom yellow and avoid the candy dipping part – unless you want to dip them.
Kelly, that was my thought too. I guess you would have to cut it a but differently but I think it would work! Yellow around the outer edge, orange next then a circle of white in the middle! Hmmmm?
Ha! I probably wouldn’t have noticed on the Pinterest shot, but yours look fantastic! 🙂
LOVE these! I had made them last year and did them with the brown, orange, and white but they were kind of bland…I LOVE the idea of doing white, orange, white and then dipping them in the candy melts. It would add sweetness too to make them taste better! Definitely going to have to try that this year! LOVE your blog!!!
Yum! I’m knee deep in candy corn posts at Edible Crafts. Gotta include these. 🙂
I LOVE Candy Corn and know a lot of ladies who do as well! These are adorable! I’ll have to give these a try using a round cake pan. Thanks!
I am an great appreciation that you ‘fixed’ the candy corn cookies. It also bothered me that they were not going to the in the right order every other cookie. Now to find the yellow melts!
fabulous! Omg I am such a huge fan!
A brilliant fix!! I would have never thought of that!
Those are so cute. I love pintrest. I’ve been addicted to it, lately.
These are so wonderful! I’m a little OCD, too and would’ve opted for the fix and you did it so well!
Have you considered going ahead and making part of the dough yellow then making a few mini discs with white in the middle and yellow on the outside. Make the discs the desired thickness of the cookie, and just slice the dough like you would a pizza. Then, they’d all come out with yellow bottoms and white tops.
WOW is all I can say! I missed these, haven’t got the hang of pinterest down yet! I’m glad you cleared up the confusion, because I would have been upset. I have 100+ kiddos for Halloween, and when I start baking, I need things to go smoothly! You can send any extra goodies to me!! I need all the help I can get!!
Happy Monday to you!
Carrie
Oh man, I am so happy you figured out how to fix these! It always bothers me too when the wrong color is in the wrong place.
LOL I love easy breezy OCD stuff! 😉 This post cracked my up Callye (maybe because we are cookie sisiters and I can totally relate to every single word you said?!). 🙂
Thanks for sharing! Perfect for us “non” decorators.
BEST IDEA EVER!!!!!!!! LOOOOOOOVE!!
Those are too cute, I love the presentation in the glass jar.
I really love how detailed you are in the instructions, makes it easier for the “newbies” like myself. I really liked the presentation of the cookies in a jar. Gives me some ideas for Christmas gifts from the heart.
I adore candy corn! No wonder I like you so much! These are beyond fabulous!
Agreed! If you are going to make candy corn, the colour combinations have to be in the correct order. You (and Evan) have an extreme amount of patience to have gone to the process of dipping all of these little guys but your efforts certainly were worth it. Your neighbour is going to be bowled over by this gift.
The book Cookie Swap has candy corn cookies instructions that always make a cookie with white on the top and yellow on the bottom. You roll each color into a long rectangular log and then stack the colors on top with yellow, orange and then a smaller white on top (it kind of ends up looking like a wedding cake cookie cutter). Then you slice pieces and cut them into triangles. They make a regular-sized cookie but I assume if you make the logs smaller and longer it’ll make perfect mini candy corn cookies. My directions are probably pretty terrible but the book makes it so easy, and they have a picture of it too, which I always love.
These are seriously adorable! And I love that you made them all the right way…my OCD would have kept me from making them the wrong way too:) The candy melts were a great idea!
Perfect solution to backwards candy corn. It had always bugged me when making them as well. I like this recipe variation. My recipe calls for orange zest and lemon zest. Great job!
Ah, so these are the million dollar yellow candy melt cookies! Good to see them. They look great!
I always get a laugh out of your posts…most likely because I TOTALLY feel the same way……about the little things that is. Awesome cookies……which is a given with you. They look great, the texture of them make me want to make them….N.O.W
🙂
The fact that some have white tops and some have yellow would drive me nuts too. I just watched the video on Land O Lakes and I am convinced the reason they roll them in sugar when they come out of the oven is to disguise the fact that half of them don’t look like what candy corn is supposed to look like! Your cookies look like the REAL thing – another great idea!
These are so adorable and creative! And great photos and instructions!
Candy Corn is my FAVORITE!! I was elated when I learned that October 30th is National Candy Corn Day. As a teacher, I give candy corn to my students on that day. I just might have to switch and give cookies this year! Thanks for the great idea!
I LOVE LOVE LOVE candy corn but we can’t get it in the UK! At least now I can pretend 🙂 thank you!
I don’t understand why you did have to dye every other one with a white tip. If the big side needed to be dyed yellow wouldn’t the other side need to be dyed white, or you would end up with two yellow sides. What am I missing? Am I crazy? These are so cute, I’m going to make them next time I have to bring snack to school.
Ok I’m a duh head I get it now, you only had white a orange layers. Should have kept reading!
You know what? After reading this post I realized that I’m pretty sure I tried to make these exact cookies last year – only I’m not as creative as you and when they didn’t work out I just got irritated and had wonky candy corn cookies.
This, however, is the PERFECT substitute for that! Great thinking, girlfriend!!
Girl…..you need to show us the vintage baking gear! STAT! Yes, I’m obsessed with any and all behind the scenes stuff!
I won’t admit that I’m OCD, because my house sure doesn’t reflect it. but I too like my candy corn to look authentic. I don’t even like the “harvest”/brown” ones in the store.
If you can’t find yellow melts you could always color the white ones yellow.
They stores were out of candy color too =(
Colouring white chocolate with yellow colouring would work just as well as the candy melts- way yummier, palm oil free and it should be cheaper (here in NZ candy melts are $$$). Even though I have never had candy corn (and tbh dont really know what it is) they look so pretty and yum- I might have to make some anyway!
I am OCD and *you* are genius. This is exactly why I had never made these myself… Thank you!
I am glad that we have YOU to fix things like this for all of us who are candy corn clueless!! Now, do these go as good w/ peanuts as the real thing? Who cares! YUM! (w/ a side of cute)
What an adorable idea! I’d love to make these with my kids this Halloween.
That bothered me too!! Every single time I looked at them! Can’t wait to try and do it your way!
I just love the colors and the way you put them in this cute like packaging ! So adorable ! Check out : http://nothinlasts.blogspot.com/
You are so freakin adorable Callye! I love your posts and look forward to them every day!
Cute cookies! I love candy corn and my DH thinks it is horrid. I decided at one point I would have to stop buying candy corn, because when I did I wouldn’t stop eating it until I had a really bad sugar rush (not a good one!) coming on. It might as well have been called “crack” corn instead of candy corn for me!
Nice job Callye – Those kinds of things bug me too! 🙂
these are so darn cute. after an act of gluttony on candy corn as a kid, i cannot choke it down, but this may be the answer. i adore candy corn colors…one of these days i am going to have to block some time and get my pinterest going, i have heard tho it elapses time,,,,
Drool…
omg thts such a good idea i luv it <3
Okay, so this is a BRILLIANT idea once again. But the thing I am most hooked on is how good these are going to taste all dipped in chocolate candy melts! (PS — GORGEOUS photos too!)
Once again… so STINKIN’ SMART!! I LOVE it! Always ahead of the pack. I’ll be lucky if I get a single halloween recipe up before OCTOBER. Can’t wait to pick your brain some more to see what else is in there 🙂
Have you considered rolling the dough together with the white in the center, then orange, and then yellow, chilling it, and then cutting into wedges? I will give it a whirl and let you know how it goes!
Thanks for sharing these! They are adorable and I’m definitely going to make some.
These are the most adorable little cookies. I can’t wait to make them. I have to admit that flaw with having every other cookie with a yellow point instead of white makes me a little crazy too. I love your idea of how to fix the problem but I wish I didn’t have to do that additional step. I don’t thin there is anyway around that though. 🙂
Ellen
http://everydaysisters.blogspot.com
Super cute. Super easy. This little cookie is going straight into my Halloween treat basket I give out ever year 🙂 Thank you so much for the idea and the recipe!
the are so adorable, i tried baking them yesterday for a bake sale at work today i made them white purple and pink, for some reason the didnt hold in the oven and the now look like pretty pink and purple blobs the taste great but they dont look like candy corns HELP!
– Mayra
I’ve made similar cookies, but not with the yellow candy melts~great addition! They look perfectly FUN!
These are great!
And I think your yellow candy melt shortage was probably because Wilton doesn’t ship Candy Melts to the craft stores in the hot weather. They ship all they need for the summer on May & then not again until Sept, so your store may not have gotten re-stocked yet.
I’m planning a Candy Corn Post for October, would you mind if I used one picture and linked back to your page? These are adorable, and I love how you “fixed” them 🙂 I would love to include this great idea. Thanks!
anisfavoritethings at gmail dot com
Featuring your awesome idea on my blog today! Feel free to check it out!
http://anisfavoritethings.blogspot.com/2011/10/candy-corn-crazy-and-few-other-fall.html
Thanks for such a great idea!
I have the perfectionist in me, too! I ended up making a log of dough by making a log of white, then adding orange around it and finally yellow. It went in the fridge overnight, then I sliced it (the slices looked like targets with white as the bulls eye). I then sliced it like a pie – and got six little perfect candy corns per slice! I took pictures in case you’d like them. I don’t blog, but LOVE yours! I learn so much from you, I’m delighted to share a different idea!
Ooooh what a great solution!! Love this.
I made them with the chocolate and they came out really cute. I plan to post on my blog this week.
Ellen
http://everydaysisters.blogspot.com
Super cute fix! I’ve been putting off making those because of the rejects too. LOL
& I’m sooooo glad to see another wax-paper inept-ee! 😉
Super cute! My solution would be to make 2 batches of dough to layer in the same pan . Layer yellow, orange, double layer of white, orange, yellow. Slice 1/4 in slices and then cut “x”s making all the points white.
LOOOOVE these! I used my own sugar cookie recipe but followed your technique for layering the dough. The other idea for the yellow is to just a basic yellow frosting or thick glaze. I made these for work today and they were a HUGE hit! Thank you. You’re a genius. I constantly marvel at your work!
I meant to post this the day this post went live, but alas I have a bit of ADD… I’m easily distract…. Ooooh, butterfly!!
Anyway, I figured out a way you could do the candy corn cookies easier without having to dip the bottoms. That’s always good, right? Since I’m a very visual person, I did a graphical step-by-step explanation. It should work out well for you if you substitute this log for the ones you made in your process.
http://img.photobucket.com/albums/v17/mslaynie/CandyCornCookies.jpg
Hope it helps, and you could use this process to make lots of other kinds of slice-and-bake cookies- flowers, animals, etc. GREAT technique!
Pingback: Halloween Ideas :: Candy Corn Sweets and Treats! | The TomKat Studio
Brilliant solution!! Love your blog.
Wait… Why didn’t you just roll them? Have a small roll of white (tube-shaped), then roll the orange layer around that, and then roll the yellow around that. Freeze for 20-30 minutes so that you can slice the roll more easily, and then divide each slice by 6, so you get the triangles?
There are several ways to do it, this was just the method I liked best. As long as you get to the same result, any method you like will work.
Although, that probably is the best method, I have heard so far, and never seen. You ought to put together a tutorial on that method. I think it would be a REALLY good idea.
That’s what I came up with. See my comment below. 🙂
So, so cute! My sister would love these! =}
LOL!! I am so glad I’m not the only one that is a bit of a perfectionist when it comes to stuff like that! I googled candy corn images at least 3 times to make sure I had the colors in the right order when I was making a simple candy corn Jell-O treats! (http://sidetrackedmom.blogspot.com/2011/10/candy-corn-inspired-jell-o-treats.html) Thanks for figuring out how to fix all those “non-realistic” oddities 🙂
I was having the same “OCD Moment” with the colors being backwards on half the cookies. Here’s how I solved it: http://beckybakesandcooks.blogspot.com/2011/10/candy-corn-cookies.html
Hope you’ll check it out.
I love Halloween baking, and can’t wait to add these to my repertoire. I notice your cookies look fairly thick (1/2 inch or so?), which I love. Can I assume that these cookies don’t spread too much when you bake them, or did you do something special to keep them from spreading? Thanks, love looking through your site.
OK, these are very cute and on my list to try before Halloween season is over. I on the other hand, decided to make Candy Corn Macarons. Hope you’ll come visit me there and see me too. http://www.GreenEyedSusan.blogspot.com
Pingback: Dollar Store Crafts » Blog Archive » 40+ Ghoulishly Good Halloween Ideas
I made these with my 4-yr-old doing the candy dipping. Delicious and cute to boot! I will give some to the daycare teachers and gym class teachers, and use the rest for a work party. thanks!!
Pingback: Candy Corn Inspired Halloween Desserts | Holiday Helpings with Taylor Harkins
What a great idea! It was driving me crazy too. Thank you for finding a solution.
People against wax paper unite! I only buy parchment paper now. Worth every penny.
Wax paper has been resigned to crafts; no longer experiences the joy of baked goods. Poor wax paper. Maybe if it had done its job in the first place, it wouldn’t be so lonely.
Thanks for your adorable (OCD) post. I love it!!
Pingback: Candy Corn (Day 21) « elliesbitesdecoratedcookies
Pingback: 6 Spooky Halloween Treats | Occasions Magazine
Pingback: Second Annual Candy Corn Roundup #2 « Cynchronicity
Pingback: Happy Halloween from The Swedish Chef / The Brooklyn Baker
Pingback: Happy Halloween | cookiecuttyer
Made these for a party last night and they were a HUGE success! Highly complimented on both the taste and cuteness.
I need to work on my colors, my orange wasn’t as pretty as yours, more of a drab orange and my white didn’t look as white as yours, not sure why. At least I couldn’t screw up the yellow!
Thanks so much!!
I made these the Friday before halloween for my preschoolers harvest party. Everyone loved them they were so cute.
Pingback: Perfect Candy Corn Cookies | Delicious Recipes
You may be OCD, but you are also brilliant and there’s nothing wrong with paying attention to detail. Your solution really made them look like candy corn!
If you don’t want to dip the cookies in yellow chocolate you could make a layered log. I made one with a white inside, orange middle, and yellow outside, and sliced it into rings. Then I cut each ring into wedge shapes. It worked well for me…. Love your cookies and your creativity is inspiring!
Pingback: Top Ten Posts of 2011
Sweet Sugar Belle – You are simply hilarious, funny, bright, imaginative, creative, and any other adjective you could come up with. I saw someone else’s comment that said “I wish I could be you” ….. Well, I almost feel the same way … lol And you should slow down with your ideas b/c you are making my head spin! Haha Just kidding!
Pingback: Sliced cookies | Ittcts
I don’t do cookies with cteturs usually… because they always seem to expand on me, even after following the directions perfectly for no-rise cookies!BuT – I <3 me some other Christmas stuff – we always make Russian Tea Cakes, and Peanut Butter Cups and Chocolate dipped pretzels!