The Push-pin Trick {WFMW}
I know a lot of you got just as excited as I did about Wilton’s new line of licensed cutters. Many of you’ve already purchased them, and have them in hand. If you haven’t they’re more than likely on the way. The big question is, now that you’ve got them, how do you go from blank cutter to a perfect Hello Kitty?
This ol’ gal is not quite as simple as she looks. If you don’t get her eyes and nose just right she ends up looking more like cross-eyed kitty, or got-in-a-bar-fight kitty. If you don’t have a projector, or you aren’t quite comfy free-handing, I have the trick for you.
Remember this little cardboard thingy that your cutters came connected to?
Well, I am hoping you didn’t throw that away. Besides being a useful reference tool, it’s ALSO just what you will need for this nifty trick I’m about to show you. If you did toss it out for some reason *shame on you, BTW* then all’s not lost, you will just need to find an image of Kitty, re-size it to three inches and print it out. If you were a good decorator and saved it, do this.
Lay a regular piece of computer paper over the cardboard, and trace around it using a permanent marker. I recommend tracing the whole image so you’ll always have it handy if you need it for something else.
Cut it out, and then you’re ready to begin decorating.
To make these cookies you will need:
- Black and White piping icing
- Red and yellow 20-second icing
- white flood icing
AND
- a PUSH-PIN…Is the suspense killing you yet?
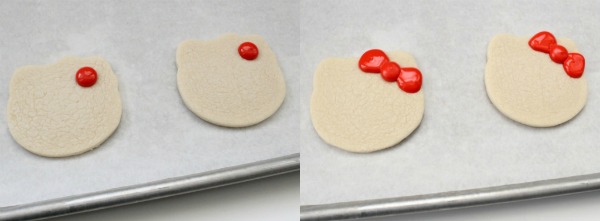
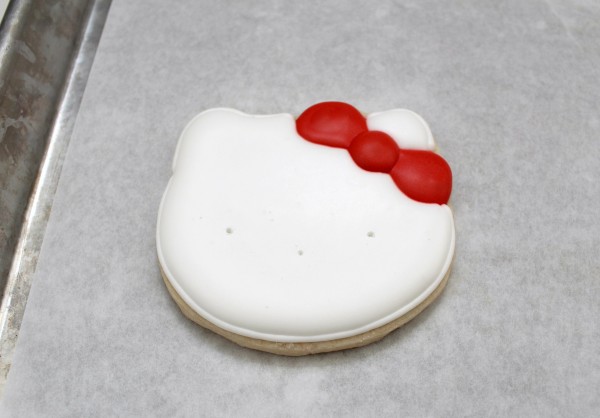
Now, we’re ready to go…pardon the pics, it was a semi-cloudy day, but with how hot things have been around here lately, I not going to complain. To begin, use red twenty-second icing to add the middle of the bow. Put it right smack dab between the two points on either side of Kitty’s right ear {well, technically her LEFT ear, but my right}. If you are having trouble visualizing where it should be, imagine or draw a diagonal line where with a food color marker to serve as a guide.
Let the middle section dry for about 20 minutes, then come back and add the loops.
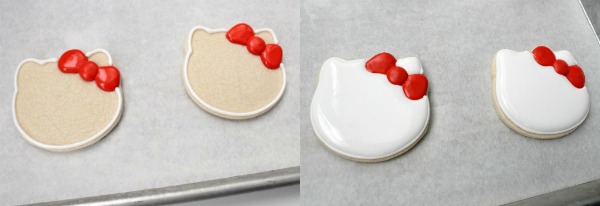
Let that dry for about an hour, longer if you have bleeding issues, then outline and fill Kitty’s face. Let this part dry completely, as in overnight.
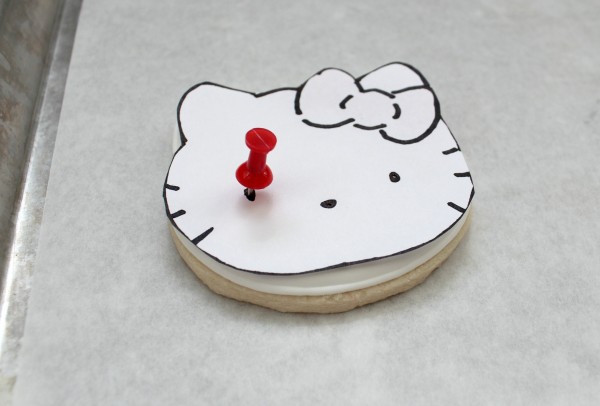
The next day you’ll need the kitty face you made, dry cookies, and the push-pin. Lay the image over the cookie, and use the pin to mark where the eyes and nose should be. I know it’s awful, but this always gives me the giggles. Seeing poor kitty stabbed in the eye, strikes me as funny. Maybe I need some sort of therapy or something but really, it gives me déjà vu. I’ve used this techniques before, in my Lego Man Post and the eye stabbing thing was just as funny.
After the violence is over, you’ll be left with the exact blueprint of HK’s face. Cool, right?!
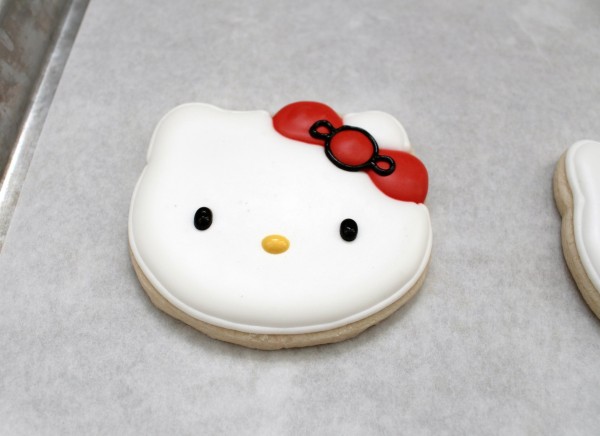
After that use the black piping icing to make the eyes and to outline the bow. Because of the way we did it, all you have to do is go around the circle and give it two little “ears”. Use the yellow TSI for her nose.
To finish up, outline the rest of the bow, and add whiskers. This is also easier than it might look. The middle whiskers are even with Kitty’s eyes. Add those first and the rest are a breeze .
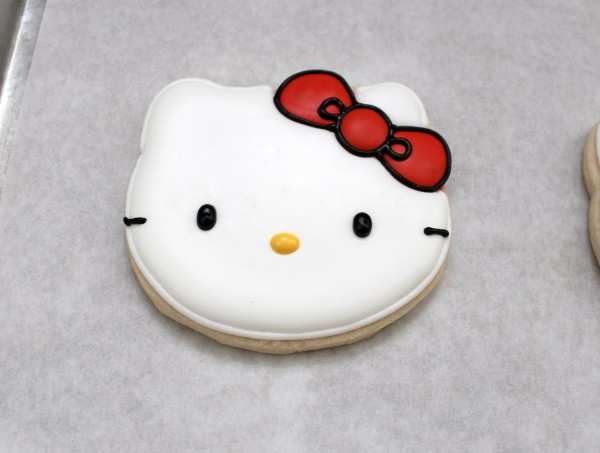
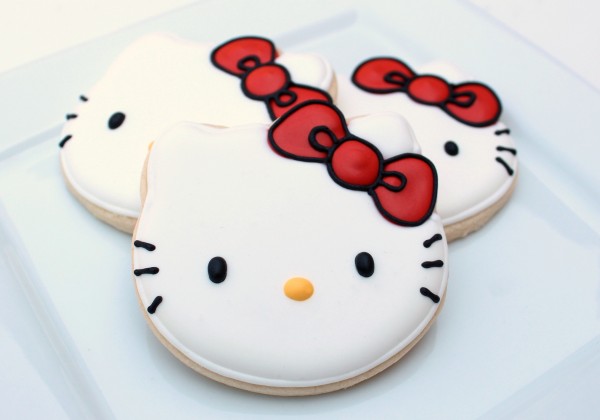
With the new Wilton cutters and the push-pin trick, making Hello Kitty cookies is easier than ever. No more “winging” it, simple, inexpensive, and works every time. Who needs a KopyKake? Push-pins work for me, and I hope they work for you too.
By the way, before I go, I have to ask, and I am asking on a whim, without Googling…does Hello Kitty have a name? As in a real one besides Hello Kitty? If you know, let me know.
Now you can decorate ol’ Kitty stress-free. ENJOY!




It’s so funny that you post it today, I just finished 45 hello kitty cookies using that method. Works perfectly. This time I did it with a pink bow and a pink dress. Did I mentioned I love your blog?
THANK YOU, Callye! I haven’t made the cookies yet, so this will help tremendously! I still have the packaging too:)
I love all your helpful tricks. I giggle every time you stab something in the eye too!
This is a great tip even if you do have a KopyKake. I don’t always feel like dragging that thing out for a few detail and this is the perfect solution to my small decorating needs. Thanks for sharing;)
Callye, love all your tricks and tips…they’re the best.
Great tip! I loved hello kitty when I was a kid, it’s funny how these things don’t seem to ever go out of style.
I feel so much better knowing that you use this trick too. Perfect tutorial! Love it!?
Seeing how you work your magic on your awesome cookies is so cool!! Thank you for always sharing your tricks and tips!!!
I made Hello Kitty cookies from hand-cuts about two months ago, and I’m still drooling over all the HK cutters being available now. I can’t wait to get my hands on a set, but I can’t get to our Hobby Lobby in town because of our flood situation.
I would have LOVED using this trick back when I made mine, and I will definitely keep it in mind for the next time. That, and I hope to one day have a KopyKake, too. 😉
nikki send me ur addy via email or in Twitter
Finally taking a moment to go through all your lastest posts — you really are inspiring!
I just love seeing how differently we all make our cookies but end up with the same result! Hope you’re having a wonderful Summer C. 🙂
I have never thought to keep the images from the packaging for this purpose! But I think I’ve only bought Mickey ones like this so far. HOWEVER, I am going to Hobby Lobby today (funny you should post this) to get the HK cutters. This push-pin (I use toothpicks) technique is how I MADDENLY do any character cookies. I always do it on the base of the cookie, but doing it on dried RI is probably much easier… Thanks for sharing your knowledge.
Great — now I can’t stop wondering if she DOES have another name. I was hoping someone had an answer. 🙂
PS — I love your perfect little bows!
The suspense was killing me, so I googled it! Her full name was/is Kitty White.
Love the kitty cookies… thank you!
Question: i am looking for a yummie and easy chocolate cookie recipe for decorating.
i dont see it in the recipe link… where can i find it?
-Sabrina
WOW thank you so much for the tutorial! so excited to try this!
great tip….you are one generous decorator! I did save that cardboard, I knew it would come in handy. But if I had forgotten, how lucky we have YOU!
This is a great idea to make Hello Kitty nose and eyes!
Great tip Callye and a sweet cookie! I just rec’d my new projector and while it is now unpacked I haven’t had a chance to plug it in and try it yet. I’ve used your push pin method before and it works great…been a lifesaving cookie decorating tip.
I’ve been making decorated cookies for years, and I’ve learned so many new tricks from reading through your posts – can’t wait to put them into practice! I only have one request: can you, pretty please, do a show & tell of ‘got in a bar fight’ kitty? It could be the beginning of the decorated cookie version of ‘cake wrecks’. Thanks for all of your tips!
I’m so excited about the new Wilton licensed character cutter line but can’t seem to find anywhere to purchase them. We don’t have Hobby Lobby here in CT and neither Michaels or AC Moore carry them. The only place I could find them online was at cookiecutter.com which is out of stock of all of them. Has anyone found anywhere else to purchase them? I have a Mickey Mouse and Hello Kitty order in two weeks so would love to get some so I don’t have to hand cut all of them. Thanks!!
Brenda, click on the website: offthebeatenpath.com They have lots of cookie cutters and they carry HK and many others. Hope this helps.
Try http://www.shopbakersnook.com
They have the Hello Kitty cookie cutters you’re looking for and they appear to be in stock!
Party City had all five sets today (in IL)…… Hello kitty, Spongebob, Mickey, Thomas, and Elmo/Cookie Monster……. You can order them at http://www.partycity.com too, they have them all in stock!!!
Love this. I need those cookie cutters in my life!
Love, love, love this post. You make it look o easy. Keep the tips coming!
perfection! I’ll post a link on edible crafts 🙂
Calley, thanks for the post. Can’t wait to make these for my cousin’s daughter next month!
It’s absolutely beautiful. I am sure this will be of help a great way!! Thank you
Hello Kitty is her only name. Other charcters that are in the Sanrio line up do have more normal names like HK’s sisters’ name is Mimi.
I love these! :D:D
Great tutorial! You make it so simple for all of us! If only I had a little girl to make them for, I just may have to make them for myself. Hello Kitty is so cute.
I really need to start practicing with my cookies..yours look amazing! And I love the idea with the push pin!! That will work when I decorate cakes too.. thanks so much for sharing 🙂
LOL, Evan is my son’t name, and I also had a Belle comment (my daughter’s name) All I need is a caleb and I have the whole family!
I love the push pin trick. I use it for all kinds of things. Used it a few weeks ago to make soccer balls. Although, I use a large safety pin, so the visual is different when you stab the eye. 🙂
This also struck me as hilarious, LOL! Yes, I need HELP!
Her name is Kitty White! I love your blog about the cookies!
I love your name. That’s my daughter’s name =)
What a GREAT idea!! My cutters are on their way from Off the Beaten Path and I can’t wait ’til they arrive. I will definitely follow your instructions – I wondered how I was going to get the eyes and nose on straight! Thanks again for all your helpful hints!
You could also use a black and yellow food marker pen to mark the eyes and nose instead of a pushpin. Then you wouldn’t have the little holes in your cookie. Just a thought 🙂
You are seriously BRILLIANT!
Just wonderful!!! You always take the guessing out of making perfection…TY!!
I love this short cut! Thanks!! Now if you can make the same shortvut for the wilton pan that I have!!
Also, i think her name is Kitty White, her twin sister is Mimi…
I loved her as a kid!
Pingback: Capital Confectioners | Blog | Quick Bites: Fun Things I Found Today
I wish I had this set of cookie cutters! I’m doing a hello kitty party soon and I can’t find them online or at the local bakery/craft stores 🙁 Oh well! This method will work wonders!! 🙂
I just ordered some from http://shopbakersnook.com See post 19.2 Mary who listed this site and that’s where I bought them from.
You are so funny and it really made me laugh; I bet it gets out a lot of aggression on those horrible mommy days we all have.
My niece has been wanting me to make Hello Kitty cookies for quite a while now. I think it’s time now that you provided a great tutorial! Thanks Callye!
Your tutorials are brilliant! Love this one!!! BTW, did I mention how much I love your new site design and logo? I think I have *wink, wink*
I was WAITING for the mail man today, R!
Just one little correction — The bow goes on Hello Kitty’s LEFT ear, not the right as stated in the instructions.
Sorry, I shoulda said her left, my right, sorry =) I’ll fix it!
Thank you so much for sharing this! I will be making the cookies next week for a special occassion and I am sure this will help my success in doing so. Nothing like a lopsided Hello Kitty face! I love this idea, hopefully I can get her face straight!
I have used this trick and it is genius! Thanks Callye
When doing “character’ representations in sugar, it’s so important to get the facial features right, and your trick makes it perfectly easy to make that happen! Thank you!
Jenn
Callye you are AWESOME! I love your blog. I will try this soon! And again thanks for all the help and ideas you provide. <3
Great tips on decorating hello Kitty! I LOVE your blog. You are so talented and inspiring!! thanks for sharing your wonderful creations with us 🙂
Fantastic tutorial….and an absolutely ingenious trick! Thank you!! These will have my soon-to-be-six-year-old daughter in seventh heaven.
Oh my goodness these are so cute!! I cant wait to try these. I’ve been “borrowing” ideas every week from other people that inspire me. I think this is going to be one of them. My little girl will be thrilled!!
Thanks for sharing
Great trick! Thanks for sharing.
Thanks so much for sharing this. I am just in awe. Had no idea how people do cookies such as these. Now I not only know, I can try for myself. Kim
Brilliant! (As always, of course!)
Needed to create you a little observation to finally thank you once again for your personal breathtaking secrets you have shared on this site. It was quite incredibly generous with people like you giving without restraint what exactly a lot of people would’ve marketed for an e-book to get some money for themselves, most importantly considering that you could possibly have tried it if you wanted. The smart ideas in addition worked to become great way to recognize that someone else have a similar dreams the same as my personal own to understand more around this issue. I am certain there are a lot more pleasant instances ahead for people who read through your website.
Love the tip for the push pin! (I use push pins to hang all my necklaces in my closet too! haha)
Your cookies are beautiful. You must be so patient!
Thanks for commenting on my blog. Hope you enjoy the watermelon lemonade! : )
oh they are so cute!!! Hello Kitty is so fun, great cookies and tips!
I made these Hello Kitty with chocolate cut out cookies, they turned out great! I still need to practice more to get my lines as nice as yours, but they are my best so far. Thanks for all the help, your blog has really helped me step up my cookie decorating!
When I lived in Japan, the birthplace of Hello Kitty, everyone called her “Kitty-chan.” Chan is a word you add to the end of a girl’s name in Japanese, sort of like an endearment. I don’t know if that is her official name or not, but in my house we have Kitty-chan everywhere.
Pingback: Stop what you’re doing and look at this! « kerrycooks
I noticed that Tish mentioned it already, but my twins are OBSESSED with Hello Kitty… and that’s totally spot on, her name is Kitty and her twin sister’s name is Mimi… 🙂
Oh, oh! And Mimi’s bow is on her right ear (and is generally yellow). 😉 Did I mention I have twins, haa haa haa!
Hello Kitty´s real name is Kitty White 😀
Thank you for sharing great tips, Callye!^^
Definately using this trick next time I have to make Hello Kitty Cookies!!!! Great idea!!!
Just traced Kitty! Can’t wait to break out the pushpin tomorrow!
I have a question about the drying part. Where do you put the cookies on and how do you let them dry? I mean without getting eaten by pets/husbands/ants. Hope you have an answer for that too!!
Love how you make all these cookies look so cute! Any idea for a wild animal party??
Pushpin idea. Smartest thing I’ve heard yet! Love it. I’m using the cardboard template, cutting it out, putting thumbtacks in both eyes and the nose, and just pressing it gently against each cookie, like a cookie press. Thanks again! Sheer genius!
Clever!
My little 5 year-old niece LOVES ‘Hello Kitty’. I ‘m going to have to make these at some point and i KNOW she’ll love them!
I know I’m late, but I didn’t even do the trace part, I copied your pic of the cookie cutter from here, cropped it & put it in a word doc, sized it to fit the cookies & used that.
Pingback: Vaniljpepparkakor « Dagens mat och bak
You’ve got a lot of talent.
How do yo get the frosting SO white?..is there such thing as white food coloring?…also does anyone have the icing, and 20 sec icing recipe???
There is bright white, but I dont use it. I just use clear extracts and the frosting is as white as the sugar…
awesome!!…thank you!…and I found all your recipes I am just a little blind sometimes and I had over looked them…thank you for the response!..=) Your work is just amazing!
perfect!
Do you let your outline dry overnight before you fill in? How do you outline out to the edge without the icing flowing over the side? Do you typically use a size 2 tip for this size cookie?
I do not know about the name for her but she used to have a mouth ages ago.
Pingback: Perfect Hello Kitty Birthday Cookies
I just got the same hello kitty set from party city and I need to make some halloween cookies. So I’m going to try to make a witch hello kitty. This will be my fist time making and working w/ royal icing. I think I can do it by just adding a triangle to the top of her head, but we’ll see. Thanks for all the information, inspiration, and tutorials you give on you blog.
I looked everywhere for these cookie cutters! I had no luck and had to use the ones from the Sanrio store. But…. last week I happened to be shopping for a birthday candle at Party City and BAM! Hello Kitty cookie cutters!
I love love love your blog! Thanks for all of the helpful advice and adding a smile and a laugh to my day! Keep up the GREAT work!
My 4 year old just decided she wants a Hello Kitty party for her 5th birthday. This is a great tutorial as I was going to make cookie favors. Thanks for sharing!
Hello!
I have been admiring your website for a few days now. My daughter is turning 3 and I am thinking about doing the hello kitty cookies. Do you think it’s easier to make them with Fondant or the Royal Icing? I have never worked with Royal Icing and I am scared. I guess if I start to play around with it now by the time Feb comes I should be a pro! I have the cookie cutters….just got them today 🙂 I guess I am afraid to do the ears… you didn’t put punch pins for the ears, did you? Did you just wing the ears?
Thanks so much!!!!
Hello,
A client I meet this morning told me about your web site. I have really enjoyed it. I will be a frequent visitor.
Delfia Cuellar
My neice is having a Hello Kitty birthday party for her daughter that’s turning 1. I’m going to make these – using your technique – for her party. Thanks!
Pingback: How to Pipe Lace on Cookies
You have probably long since discovered this but it appears that Hello Kitty’s name is Kitty White. I love your site BTW and you make me believe that I can really do some of these ideas myself! Thanks so much for the inspiration.
Pingback: May the Odds Be Ever in Your Favor
Pingback: Simple Lego Cookies
Thnx for your tips ! Love them.
Sabina from Mallorca Spain
thank you so much for sharing. I am excited to do this for my girl’s 1st birthday. 🙂
I love these, thanks for posting. Im baking these for my daughter 1st birthday and I have been a HK fan since I was a little girl.
PS. HK real name is Kitty White and she has a twin sister Mimmy.
http://www.sanrio.co.jp/english/characters/detail/hellokitty/index.html
These are to cute. Can you post cookie monster and elmo !
Thank you for this awesome push pin tip!:) My God daughter loves Hello Kitty & is requesting HK.cookies on her birthday. I have no experience what so ever when it comes to cookie decorating, but you made it look so easy!:) Awesome job and Thank you for sharing w/the world your helpful tips.
Thanks to you I was able to make super cute Hello Kitty cookies for my daughter’s birthday! Thank you!!
Pingback: Floral Monogram Cookies
Brilliant idea! I am looking forward to trying this out.
Pingback: Patriotic Candy Buttons!
Kitty White is her full name 🙂
Pingback: Using a Kopykake Projector to Decorate Cookies
Thanks so much for posting this. I already made the sugar cookies and was a little stumped how to make the face. My daughter is so excited to decorate these cookies
My 5 year old and I have been cooking your “perfect sugar cookie” recipe this morning. While we have lots of cookie cutters, we don’t have a Hello Kitty one 🙁 Like most little ladies, my daughter is pretty HK obsessed 🙂 So I’ve iced the above design onto a round cookies, they look amazing! Many thanks for such a cool blog!
Pingback: Hello Kitty Cupcake Toppers for Valentines Day – Rolled Fondant |
Pingback: Hello Kitty Cookies |
What # tip did you use for the bow?
I love your work and your witty sense of humor, you always bring a smile to my face as I read your blogs!!