Coloring and Preparing Royal Icing
I do lots of weird things. Some of them don’t make sense until I explain the logic behind them. The way I color and prepare my royal icing is one of these things.
Keep in mind, this is not the only way, just my way.
I begin with VERY stiff RI. YOu can find my recipe by clicking HERE. See how the spatula stands straight up in the icing? It should be so stiff that even if you were to thump it, the handle would barely move.
Also, I ALWAYS mix icing in a measuring cup. This helps me know EXACTLY how much I am mixing. I know to use the 2 cup size if I am filling an eight ounce bottle and a piping bag. I go with the one cup size for less. Try this. I really think it will prevent you from over or under mixing. Next, I choose my color. In this case, I want a teal shade, so I am using a combination of turquoise and royal blue.?
To begin, I add the amount of color I’ll need. This is where my printable color chart comes in handy!
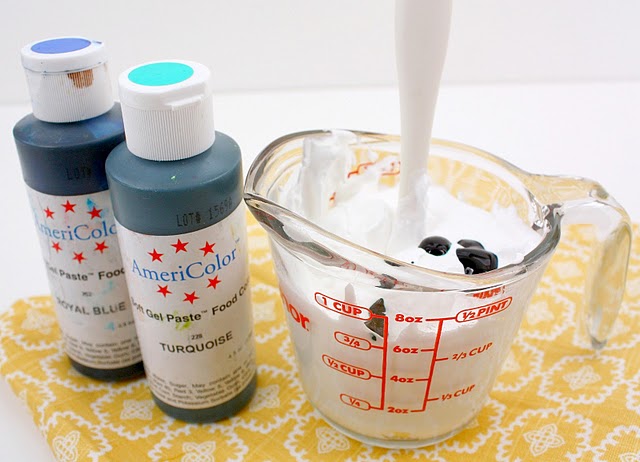
At this point, I mix it thoroughly. A few notes:
- when I am making icing ahead of time, this is the consistency at which I make and store it. This keeps it from becoming too thin as color is added and also prevents it from separating.
- If I know I will be using a lot of a particular color {like orange at Halloween, red at Christmas and Valentines, green right about now} I make a large bowl of it, and take out and thin as necessary. It allows the color to develop, and ensures that I have enough icing available to ensure all of my cookies are uniform in color.
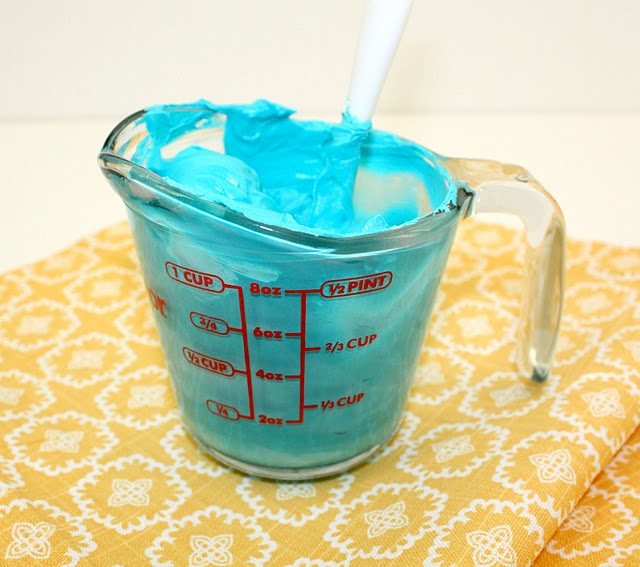
See how stiff it is? Is should sit just like this without falling off the spatula.
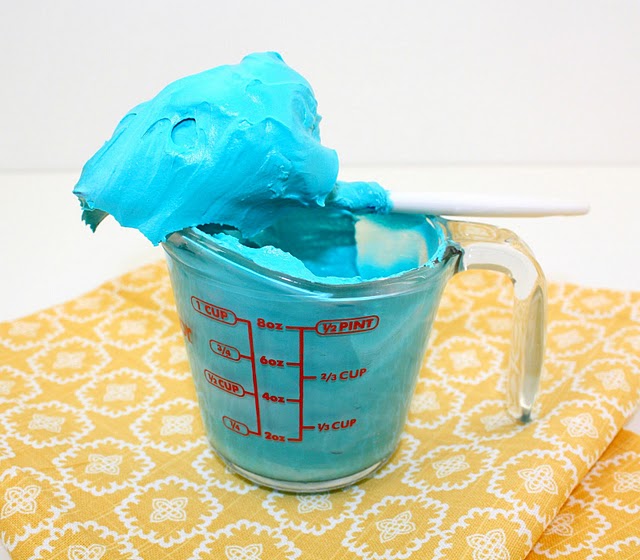
When I get ready to fill my bags, I thin the icing to piping consistency. I used to stand at the sink to do this until I learned an awesome trick from Gail, AKA, One Tough Cookie. Please check out her spray bottle tip {HERE}. TAKE my word on this. I can honestly say, it’s one of the best royal icing tips I have ever learned, and since then, I have never gone back!
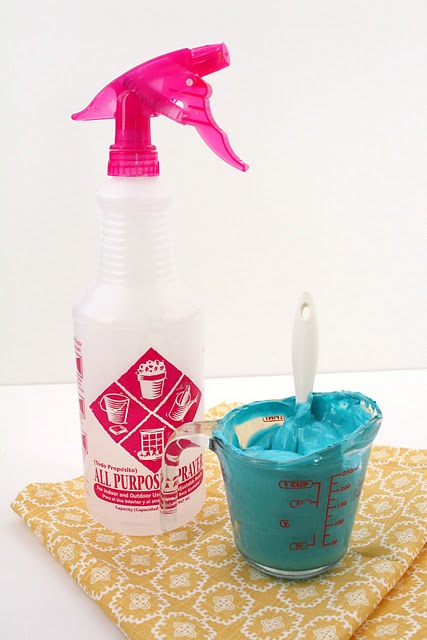
Using my spray bottle, I first thin my icing to piping consistency. This is about what it looks like. Think toothpaste, or Softscrub cleanser. It need to be soft enough to flow smoothly through the tube and curve without breakage, but stiff enough as not to lose it’s shape.
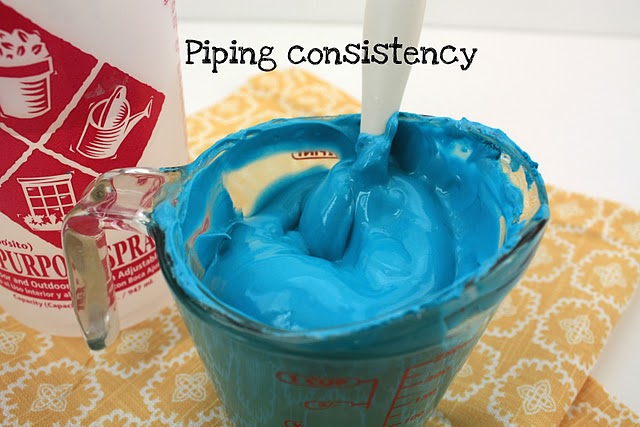
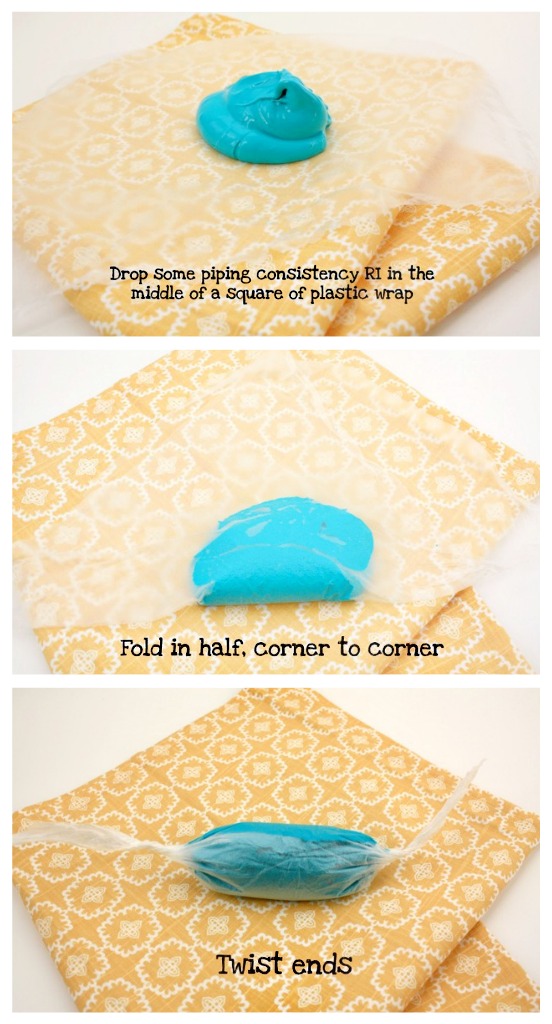
See how it’s thick enough to hold it’s shape but not so thick that it keeps a peak? This is what you want! Now you are ready to bag it, If you don’t like to wash icing bags, you are going to LOVE the next part. I have ALWAYS used disposable bags for many different reasons. I like that they are clear, so that I can easily see which color is which. Also, they are a little more budget friendly then pastry bags. To me disposable does not really mean disposable. A lifetime of being forced by my Nanny to wash Ziplock bags, made me physically unable to throw away perfectly good icing bags. However, anyone who has ever washed them knows, it’s awful, so, now I always use this nifty little trick I learned from Karen, of Karen’s Cookies. Just follow the steps below:
When you twist the ends, do it the same way you would if you were twisting up a towel to pop someone. Horrible mental image, but it was the only way I could think of to describe it. Slide the pouch you made into a bag fitted with a coupler, and you will be left with this…
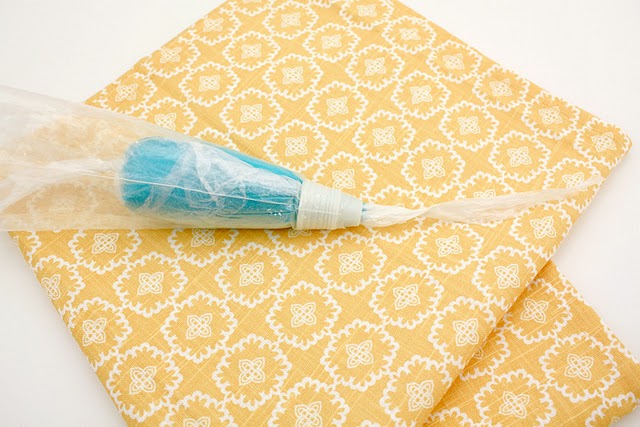
At this point, use scissors to snip off the end
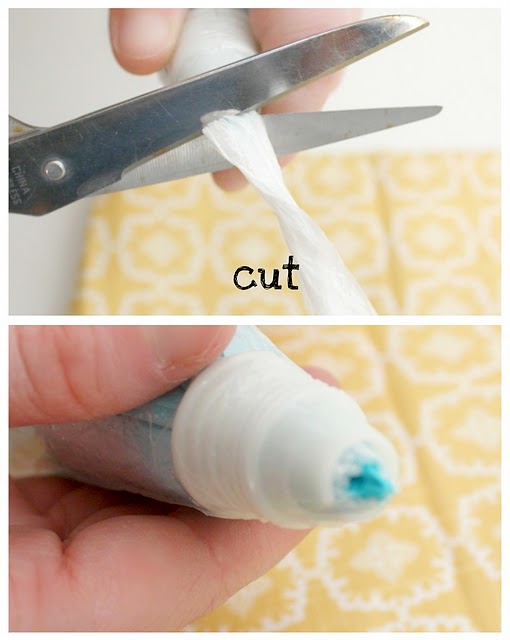
Add the desired tip and coupler, and you are ready to roll!
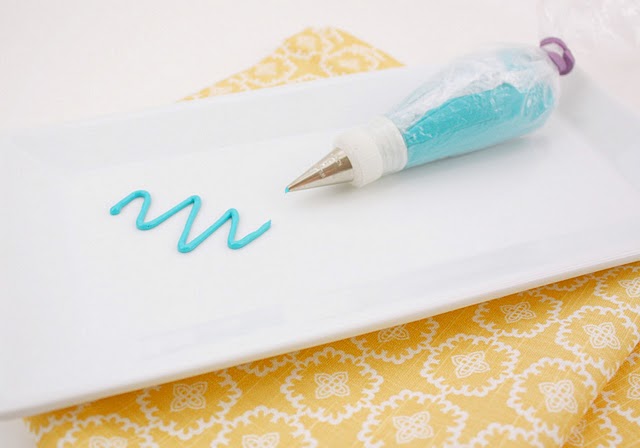
To keep the tip from crusting over and so that they are easy to identify and access, I place my prepared bags in a glass with a damp paper towel in the bottom.

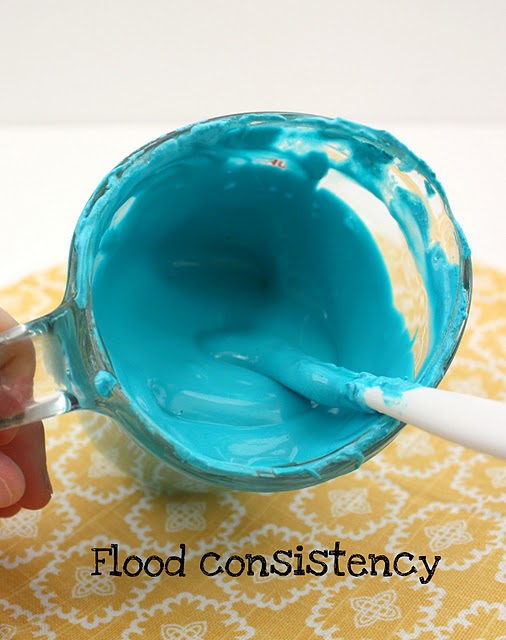
The last thing I do is thin my icing to flood consistency using the spray bottle as before {think shower gel}
A little tip…if you will let the thinned icing sit covered with a damp towel for several minutes, all of the air bubble will rise to the top, and you can easily stir them out.
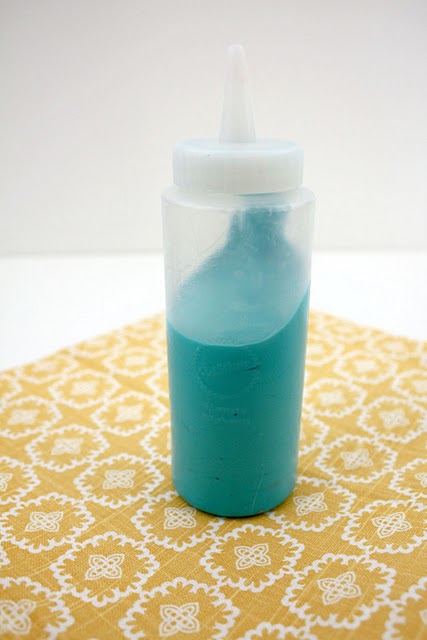
Put it in a bottle, and it’s ready to go. This is another time the mixing cups come in handy. The pour spout really makes is MUCH easier to transfer the icing from cup to bottle.
Repeat these steps for every color you plan on using for your cookie design. If you would like to see this live, Karen has made a very nice video demonstration which you can view {HERE}. As a matter of fact, she has lots and lots of helpful videos and tutorials, so bookmark her!
Keep in mind, this does take awhile. I spend on average one hour preparing icing before I even begin to decorate cookies. The good thing is, that once this is done, I can sit down and work on them uninterrupted, children cooperating, of course.
Like I said, there is more than one way to ice a cookie, but these simple tips should put you well on your way to coming up with your own method. I hope everyone tries it!
Good luck and happy decorating!


I thin it by spraying the water into the thicker icing and stiring.
how do you thin the icing?
Pingback: SweetSugarBelle's Royal Icing
Pingback: Outlining and Filling Cookies with Royal Icing
eu amei o seu trabalho, obrigado pelas dicas do icing
ele resseca sempre aqui no brasil qdo faz calor é triste de
trabalhar. adorei suas dicas bjs ate qualquer hora
Hi, after reading your instructions, about to set out on my first cooking making and icing experiment. I don’t have any equipment yet. Which size piping tips and bags, and squeeze bottles would you recommend? Going to try to make some rocket ship cookies! Great blog!
I recommend size #2 and # tips, and maybe a #1 for detail work. If you feel like investing a little more money in this hobby, I HIGHLY recommend PME #1.5 tips. They really help with fine details. They don’t clog as easily as #1 tips and their length provides exceptional control. As for bottles, I like Wilton squeeze bottles and the type with couplers. You can get all of the items you need at Karen’s cookies. I highly recommend her shop, especially for a beginner. They have excellent service and are very helpful! Cannot wait to hear how you progress!
What a great site you have. I am coming back to decorating after 15 years away and your site has so many great tips.
Thank You
Marg in Mo
Pingback: Amazing Ivory {Creating Color Palettes}
Great tips! (haha…punny)
SSB, I am so excited to find your site. Props to Pennies on a Platter for your guest blogging, which led me here! I have made several batches of SC/RI based off of another website and the RI has always been a source of contention but now, SO happy to try again. 🙂 Can you please tell me, based on your 2 measure cup and how you divided it in the pix, how many cookies can you line and flood based on 2 cups? If you posted that somewhere else on the site, please let me know and I will go hunting. Thanks so much!
Here’s a guesstimate. Each Wilton bottle has enough icing to fill about 1dozencookies and it holds a.little more than half a cup. About six ounces…
I bookmarked this to read later and I forgot! Just read all the way to the tip about using the plastic wrap trick so you don’t have to wash the icing bags. Brilliant!!! That is probably the one thing I hate most about decorating cookies…the cleanup. I hate having to dig the coupler out of the bag when I am done. This takes the mess out of it! Thanks for the tip! Love all your ideas, your tips, and most of all…your cookies! 🙂
And it saves TONS of $!!!
My first visit here … and not the last time … I just want to say that I am very surprise to see and read the explications… everything is easy to read (because I am french) and the pictures are perfect for understand … I am very happy to discover this beautiful site … Thank you …
Thanks! I saw Karen’s video on another cake decorating page and already used the technique a few days ago. Thanks for posting these photos! I was telling my SIL the other day how it’s going to make life so much easier for cake and cookie decorators that have to clean out so many bags! I teach part time cake decorating and so I already did this with my regular butter cream too and the bag cleanup was great. 🙂
Your tutorials are truly the best! I like to read them just for fun while I’m decorating. 🙂 Always gets me more excited!
Brilliz! Thanks for all your handy tips 😉
Pingback: SweetSugarBelle's Royal Icing
Love this tutorial. I am going to try the plastic wrap in the icing bag. Love love that tip.
Thank you, Thank you, Thank you!!! My biggest “problem” with decorating with royal icing has been getting the right consistency. You solved that problem for me with this post!! Did I say THANK YOU yet 🙂 Thanks for all your tips! You cookies are beautiful!!!!
so you prepare two of the icing? one thicker to outline and one thinner to fill in?
Most of the time, yes, Unless I use 20-second icing.
Pingback: Day of the Dead Sugar Skull Cookies
Thank You Sooooo Much for passing on the Icing in the Plastic wrap tip! I haven’t tried it yet but I know it’ll save me loads of time!
My goodness!! This tutorial is amazing!! And your Day of the Dead cookies are out of this world!!
Thank you so much for sharing!!
Wow!! I just found your blog and I adore you!!! I have been making cookies for 5 years now mostly for my kids’ birthdays and holidays and I have learned more in the last 10 minutes reading some of your tips than I have since starting!!! I will be referencing you regularly.
Thanks for all of your insight!!
Plastic wrap of cake pls problem is how plastic cake and thing use
I don’t understand…
Hi! I have a question about coloring royal icing! How can I avoid the fading of my purple, red, pink and blue royal icing? I haven’t expose them to direct sunlight, but they still fade. Once, someone told me that I could add a base of other color and then pour purple coloring for example– Is that true, if so, which base color, how to know which one to use?
Thanks!
I used royal icing to decorate my cookies the problem is when the icing dries it has a lot of holes in it. can you please give me some tips on how to avoid this?thanks. by the way, your cookies are so great!!!
thanks for the tips! i tried this but as the icing hardens, it changes to a much lighter shade. almost whitish. they also look grainy. not as silky shiny as yours. they looked normal when i was piping them though. hmm..what went wrong?
When colouring your RI – do you always use the americolour type colours? Could you use the wilton gel type instead?
Thanks for all your wonderful information on your site. I’m new to both cake and cookie decorating and since finding your site I can’t wait to try your techniques.
Do you still have the printable color chart?
The fact that you’ve taken the time to put all these instructions together – I can’t say THANK YOU enuf!
Pingback: How To Color Icing | cakedecoratingideaz.com
Thanks soooooo much! 🙂
Pingback: Beautiful cookies begin with Royal Icing | Five Little Ladies
Pingback: Sugar Cookie Troubleshooting | i am baker
BEST TIP EVER!!! I mean the one about putting the RI in the plastic wrap BEFORE you put it in the Piping Bag…GENIUS!!!!!
I agree. I saw that on this blog a couple of months ago and won’t ever go to any other way!!
Hi, I was wondering how can I color my RI that really dark red that you achieve for your Christmas cookies I have tulip red and super red from americolor and I also have christmas red from wilton. But I am not sure how much is just enough and how much is too much. help please!
thanks for sharing! great tips, especially the one about wrapping in plastic wrap first, wow takes a lot of the mess out of the equation Love it!
This is exactly what I was looking for, thanks for sharing !!!
I just made your sugar cookie recipe and also decorated some Christmas trees with piping and then “flooded” them! First of all – I love the sugar cookie recipe – it is the very best!! And for my first attempt at RI I did so-so……………no where near your works-of-art!! But, I am going to keep practicing!! Thanks so very much for your very through instructions!!
Pingback: Puffy Pumpkin Cookies
I’m making you pirate cookies for my son’s birthday party this weekend. Can you recommend an alternate to Ameicolor soft gel pastes? Looks like you can only order these online.
Wilton is probably your only option if you don’t live near Hobby Lobby.
wapping piping icing in plastic wrap…Genius! Best tip ever!
Thanks!
Wow. You…are….a….GENIUS!
Seriously. Genius! Thank you!
i really love the simple way u explain everything…i would be trying to bake and decorate this weekend for the first time…wish me luck
Wow! Thank you!!
Great tips, especially the clingwrap inside the piping bag! I always use disposable bags as I like them to be clear and they are a beggar to wash, so I will definitely be stealing this tip. Thanks! xx
Sooo helpful! Thank you so much! My husband just bought a box of 100 “disposable” icing bags because I used to always wash them after use. I won’t tell him he just wasted money. 😛
Pingback: How to make Ribbon Roses
Pingback: How to make Ribbon Roses « Sugar & Spice Baking Club
Awsome!! that is all I can say!
Pingback: My Favorite Icing Bowl
Tthank you so much for sharing. I am now officially addicted to your blogs. 🙂
Pingback: Learning about Icing Consistency
Pingback: Easter Cookie Tutorial
I have to thank you for the plastic wrap tip. I began using that right after I saw this article. I have tried to convince other in my decorating class to use it to. They don’t know what they are missing. Even if you have to wash a bag or coupler it is nothing compared to normal bag clean up. I used it for both royal icing and buttercream. No more greasy buttercream pastry bags…..thank you!!!! Once you master this technique I can’t see ever doing anything else.
Thks for the great info n tips on royal icing. Love the term 20 rule n plastic wrap bag
love your plastic wrap icing bags, can’t wait to try this next time I make cookies.
great bag tip! easier clean up!
Pingback: Royal Icing: Outline and Fill | The Green Apron
Thank you so much for posting this!! I tried the trick with the plastic wrap and I will never not use it again!!
I also shared the trick with a colleague at work. I greatly enjoyed responding to her “it’s such a hassle to wash out the piping bags” with “Don’t wash them out, you don’t have to!! Just do it this way” followed by sending her the link to this post.
Thanks again for all of your tips and tricks. I look forward to learning more with every new post!
Hi SweetSugarBelle!
You truly are my Hero when it comes to cookies, sugar and creativity in generall. I always love to see what you come up with and it is amazing how precise you decorate every single cookie. One must really taste the extra effort and love that goes into your cookies…
I have a question about my icing. It seems to always fall apart, there is usually one really runny part of icing and sometimes a really hard part too. When I make royal icing I try to get it to the right concistency by adding water a bit at a time, colour it with americolor, bag it and start decorating. It is fine for the first and sometimes second layer of icing and the time that passes in between that but It usually never holds until the third layer, eg over night or longer. Do you maybe knwo what I am doing wrong? I really need help fixing this problem and I would really really appreciate if you could maybe tell the secret of long lasting royal icing.
THANK YOU SO MUCH!!
Love from Germany
Anna
I love ur tips.
Thank u
Pingback: My Favorite Shade of Blue and Icing Color Tips
That is a great tip for the “disposable bags”!!
Thanks for the photo tutorial!
very nice tip! you’re very creative and does an impeccable job!!!
I just want to know, after you prepare all the icing (consistencies and coloring) how many days after this preparation can use the icing again? where do you store it? in the refrigerator? to reuse, is just take the icing from the refrigerator and wait until you reach the room temperature?
Great tips! As a tree hugger, I couldn’t bear to send all that plastic wrap into the earth, so I guess I’ll keep washing!! lol
HI,
I used the plastic bag idea, but the tip popped off in the middle of decorating! What did I do wrong? Is there a trick to make sure it stays on?
Shauna
She took the wax paper (with the frosting in it) and put THAT in the piping bag. She slid one end of the wax paper through the piping bag and snipped it. I missed it too, but you can see it being done in one of the pictures! Hopefully that helps!
Also, try putting the tip inside the bag before adding the frosting, so that the pipe stays in place. Heres a picture
http://www.google.com/imgres?um=1&hl=en&client=firefox-a&rls=org.mozilla:en-US:official&biw=1124&bih=870&tbm=isch&tbnid=aHUWDtLLwCptmM:&imgrefurl=http://thefrugalhomemaker.com/2012/03/30/strawberry-white-chocolate-cake-w-lemon-cream-cheese-icing-how-to-frost-and-decorate-a-cake-like-a-pro/&docid=uIEu_Bt_IJ-snM&imgurl=http://thefrugalhomemaker.com/wp-content/uploads/2012/03/DSC_0183.jpg&w=1024&h=712&ei=mSRmUPGID4isyAGZ0ID4Bg&zoom=1&iact=rc&dur=369&sig=104203263027857302675&page=1&tbnh=154&tbnw=197&start=0&ndsp=20&ved=1t:429,r:8,s:0,i:95&tx=90&ty=15
OOOHHH! Don’t know how I missed that in the pictures! Guess I didn’t look too closely. THANK YOU! You guys rock!
Pingback: The bus birthday cake adventure « Cooking In Japan
Hi, I went to Karen’s page to see the demo on coloring royalyou referred us to and it was no longer there. does she have it in another place? I just found you today and I cannot stop reading. It is all such valuable info, I have books and books on cookie decorating, but this is concice and informative all in one small space. wish I had more time. I have to get dressed and on with my day. I will be back for more later. I have seen a lot of things I do made simpler and less time consuming. Thanks, Cathy
I am generally super worried about food safety. Have you found meringue powder to be safe for everyone to eat? What is the life of a decorated cookie at room temperature? Thanks for the help!
I recently got the Squeezit bottles (both sizes) and I am having a difficult time. I don’t know if air is getting trapped after I release pressure but it will be incredibly hard to squeeze the bottle at about half full. Any advice would be appreciated!
Your cookies and instructions are fantastic! Would you please tell me what brand of meringue powder you use? Thank you.
Pingback: Sweet Explorations – Mummy BooBerry Pies
How about wrap like a piece of hard candy or bubble gum.
Idea: make cookies that look like an envelope and the facebook logo, ect. The take pictures and reduce them to the size needed for the links on your pages. I have software that can reduce the size if you need me to do it for you.
Hi<
I hope you can give me some advice. I have had the terrible experience of icing a hundred cookies only to check them at two in the morning and find the icing is just not setting right. I had one batch where the white icing set but the coloured was not quite hard and shiny, rather a bit spongy and powdery. I have read that i may have overstirred? is it the colouring that is affecting my icing, or overmixing or making it too runny..too much water….I thought i made the icing carefully. It has really made me scared!!! other times i might not have been so careful and the icing was perfectly fine! does this happen alot or have i just had bad luck a couple of times? is there anyway to tell that the icing is not going to set properly before you ice 100 cookies?
thanks for any help
Sarah
also, how long can the icing sit covered before you start to have problems?
Hiya, has anyone else come across this problem-when all my gingerbread men/cookies are iced they seem to dry pretty quick but the icing isn’t hard, so therefore it easily smudges when put into display bags. Any tips?? I use royal icing am I mixing it to the wrong consistency?
Thank u
Pingback: Experimenting with royal icing…and star wars cookies! | a dash and a pinch
Wow another wonderful idea, you are really so smart I have trouble not being on this page all day
Pingback: Personalized Valentine Cookies « Sweet Benanna&Sam
Gostaria de saber se alguém podia fazer a gentileza de me passar a receita e o modo de preparo em português, pois traduzir a pagina, mas as palavras não ficam perfeitamente traduzidas.
You still need the recipe translate? You can try to google it and select the desire language, it will do it. However; I can do it in Spanish with Sugarbelle’s approval. Don’t know if this help.
Hi! I’v enjoyed reading your blog for a few days now….I need to bake cookies for my brother-in-laws wedding, so toook your icing recipe down and got to the speciality baking shop to get ingredients…I was given Tylose Powder when I asked for meringue powder, and when I questioned this was assured it was the same thing ….needless to say, at 1am in the morning I threw away 3 lbs of icing gone horrible bad.. after 2 tries I gave up 🙁
I just finished reading your post where you advise to mix icing in a measuring jug…what measurements do you use for the 2 cup measuring jug? I’v decided to rather start small and move up in amounts ;-)’
Hi there,
I’ve been reading all of your tips and they’re amazing! Thank you so much for sharing.
I do have one question. I use your royal icing tips to the T. I’ve noticed that when I add the coloring to my flood icing the next day after it dries it seems to be crackly and a bit “dry” if you know what I mean. I can’t seem to get that perfect glossy look. Any tips? :O)
Pingback: Let them EAT Cupcakes…
Pingback: How to Make Icing Colors Match
My mind is blown from the plastic wrap trick! That is awesome! Thanks for sharing.
This is the only page I need to come back to. Great tips and very well explained.
THANK YOU!
There is a term known as a financial advisor to study his
financial condition. These types of loans can be joined together to make a consolidated one.
In just a few points is not your biggest worry.
I am just starting out on my cookie venture. I currently make cupcakes and fondant cakes for sale and wanted to offer accesorizing my cakes with decorated cookies to match. Your directions are so easy to understand and I love the humor.Can’t wait ti try all the knew things you have taught me. Thank you VERY much. Theresa Major, The Cupcake Composer!
THANK YOU Soooooooooo MUCH !
Pingback: Special Delivery
Thank you so much for this tip!!! It will save me a lot of time
Hi! I have loved your website since I found a link on pinterest! You’ve taught me how to make and decorate the cookies I’ve wanted to make all my life and didn’t know how…Thank you! But I have a question and I’m in a panic. I have baked lots of cookies for my churches Lord’s Acre sale on Saturday. They are iced with your recipe, have dried for a day…and look great by the way. But…tonight I wrapped each one individually in cellophane and put them in a plastic container. After spending 2 hours wrapping them I thought…”Oh no, it’s only Wednesday…will they be ok until Saturday…or will they create moisture by being wrapped up? I’d hate to have to unwrap them all, but I sure would if I knew it was going to ruin them! Thanks if you get time to answer!
I just started making cookies and you have been my biggest inspiration in this adventure. I am loving the cookies and the decorating so far and I have a request for you. You see, I am planning on buying some Americolor gels online and am a tad limited in my budget, so I was wondering if you might do a post about your most used and/or favourite colors so I, and other readers, can have an idea what colors are most important. Many, many thanks for all the things you have taught me 🙂
Where do you get your 8 oz piping bags from? I seem to be only able to find 12+
This post is so clear and easy to follow!!! I have been trying to make well decorated cookies for years! I’m going to try this method this week for our church Christmas fair!! I’ll check back soon! Thanks again!!!
Pingback: Tan Royal Icing
I went to look at the spray bottle technique and it said the site was down :0 !!!!! Please tell me what it is!
This is the greatest explanation. I’ve always found it so difficult to get the consistency right. Thank you for posting this information. (And that plastic wrap trick just changed my world!)
Pingback: Snowmen cookie pops - Roxana's Home Baking
I was just wondering what is the pray bottle method for thinning the icing? The blog you reference is currently being re-designed.