Funny Frankenstein Cookies
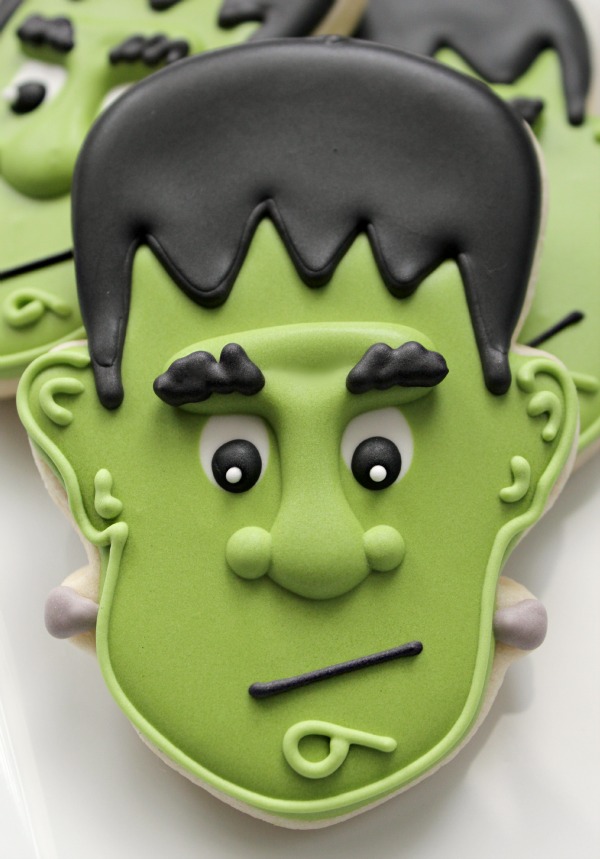
Not a Halloween goes by that I don’t make Frankenstein cookies. He’s my favorite. I’d guess it has something to do with all the hours I spent with Herman Munster as a kid.
Anywho, there are about a million and one ways to approach decorating a Frankenstein cookie. I do it a little differently each year. By following a few basic steps you will be able to make the most adorable Frankensteins on the block!
To make these cookies you will need:
- Black piping and flood icing
- Spooky green piping and 20-second icing
- White 20-second icing
- Tiny bit of gray piping icing
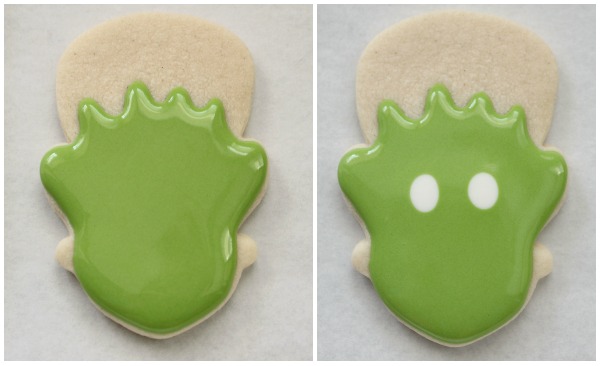
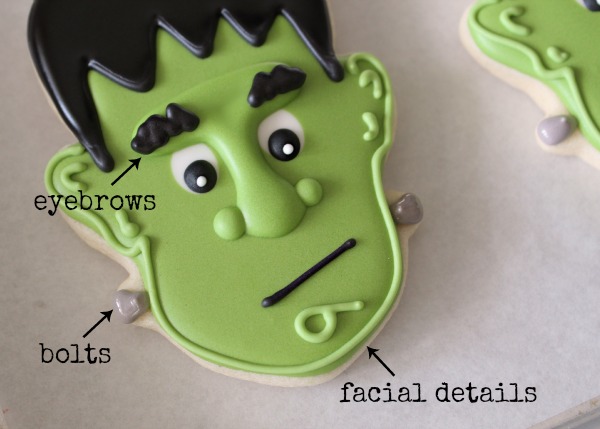
Begin buy using 20-second icing to cover the facial area. Sometimes I go straight across, sometimes Frankie has stylish bangs…do whatever floats your boat that day. Use white icing to add eyes immediately after flooding the face. This technique is often referred to as the wet-on-wet technique.
At this point let the icing dry. I wait at least four or five hours, sometimes it takes longer depending on the weather and your climate.
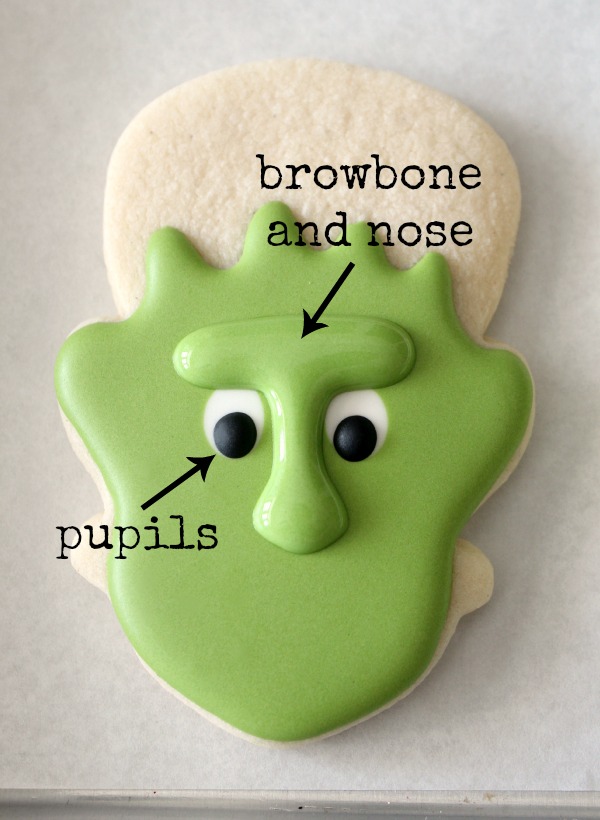
After the base is dry use green 20-second icing to add a brow bone, the bridge of his nose, and some pupils. Be sure to use thicker flood icing. I knew mine was a little thin when I started. I went ahead with what I had and it came dangerously close to cratering.
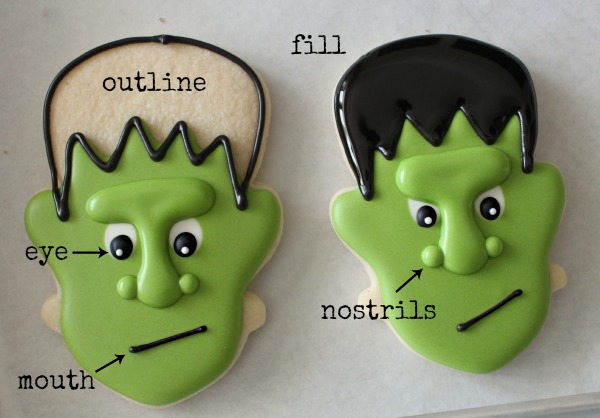
After a few more minutes outline and fill the hair, add nostrils, a mouth {I like using a variety of expressions}, and maybe give him a little twinkle in his eye.
Finish up by adding personality-adding details. I decided it was time to bring back Brook Shield brows and cleft chins.
PS-Don’t forget the bolts. That’s kind of a must when it comes to Frankenstein cookies.
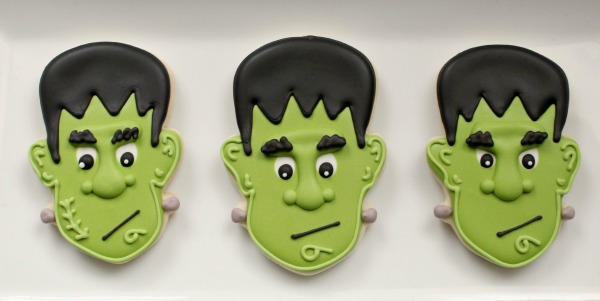
See? I do it different every year, although I admit, I might have a thing for spikey bangs.
 If you need Frankenstein cutters check out these places:
- Karen’s Cookies {this is the one I used in this post, PLUS, he also makes a great Mr. Potato Head}
- Country Kitchen Sweet Art {it’s part of a set, but I like this Frankie}
- Wilton has a cute Comfort Grip Frankenstein {I used it HERE} but you’ll have to scour Ebay, Ross, or TJ Maxx for that one. It’s getting a little tough to find…
Anywho, the moral of the story is this. Have fun with your Frankensteins. Add fun little touches that make them your own. I love seeing their expressions. As a matter of fact, the one on the right looks like this guy I know.


Love these! Just picked up a Frankenstein cutter today and can’t wait to try some!
These are so great – the brow/nose portion adds such awesome dimension. Fabulous, as always! 🙂
Those are AWESOME!!! WOOHOO!!!!
Love them all! You never fail to impress! Love the Halloween cookies clipart on your banner as well! xo
Perfect!
Too cool!! 🙂
Thank you for such a great tutoria! i’m totally in love with this cookies.
Kisses from Spain.
Just so cute! (is it ok for Frank to be cute?)
So cute! By the way, our local Michael’s store has the Wilton comfort grip one this year. Just in case that helps someone who is on the hunt for one. 🙂
I love Frankenstein anything, I have seing the movie many, many times and I have never made him in cookies. Your tutorial is very easy to follow, this might be the time that I will try to make him
So much incredibles details …
So cute! You have great timing too, I was just making Frankenstein cookies this morning and might borrow some of your pointers when I finish them up tomorrow. Thanks!
Holy moly, these are awesome. I mean, all your cookies are awesome but I’m loving the sorta 3D effect on these cookies. That and they’re incredibly cute too! 🙂
Also, you’re rocking the Halloween blog theme.
so darn cute!
you really should start teaching classes, you would be so popular!
Funky Yummy fun!
Love these cookies! I just found the Wilton comfort grip cutter at Michael’s on clearance for $1.99!
Thank you so much! I make cookies for my dad each month and was hoping to make Frankenstein Heads to match a Halloween mask I got for him. I needed some “design support” and this posting has motivated me to give it a try!
These literally had me chuckling as I read the post. So.Stinkin’.Cute. Every time I read your posts I find myself wanting to order more cookie cutters – arrrghhh!
if you see a cookie online and you think WOW now that is a cookie – It always leads to one place SUGARBELLE!!!!
Very cute ! I like it 🙂
I would love to live in your head for a day. I have no idea how you come up with such amazing ideas, how you layer icing to achieve effects. Your amazing!
Wilton Comfort-Grip Cutter “Frankenstein” on clearance at Michael’s for $1.99 (got me one today)!!!!
Pingback: 30 Fabulous Halloween Treats
I love every single one of your Frankenstein cookies, and your newest one here is no exception!
Does royal icing crater when the consistency is too thin? As always, your work is fabulous. When do you get a book deal?
I am made these today but for some reason I can never get my black, black enough. Even when I let it sit overnight. It stay the same charcoal color. I dont want to continue adding more black as it will end up with a bad taste. Any tips.
Pingback: Halloween Favs… | Crafted by Lindy
I was making Halloween cookies for a bake sale last week and was totally intimidated by the Frankenstein cutter I had- until I saw your post. I have had it open in my browser for WEEKS until I made my cookies. You are such an inspiration. Thank you so much for sharing your gift.
Here is a post about my bake sale cookies if you’d like to see how you inspired me. (Yes, I basically copied. No, it wasn’t for profit.) 😉
http://www.nickyhurt.com/2012/10/cookies-halloween-themed.html
how to make the royal icings look glossy and smooth?
Pingback: My new obsession… « Living the Sweet Life
Pingback: My new obsession… | Living the Sweet Life
Pingback: Silly Bat and Spider Cookies
Pingback: Attack Of Frankenstein! - B. Lovely Events
Pingback: Simple Frankenstein Cookies - The Bearfoot Baker
Pingback: Frankenstein Face Cookies - The Bearfoot Baker
Pingback: Snacks und Drinks – Gruselige Rezeptideen zu Halloween | KlonBlog
Pingback: Halloween Cookies