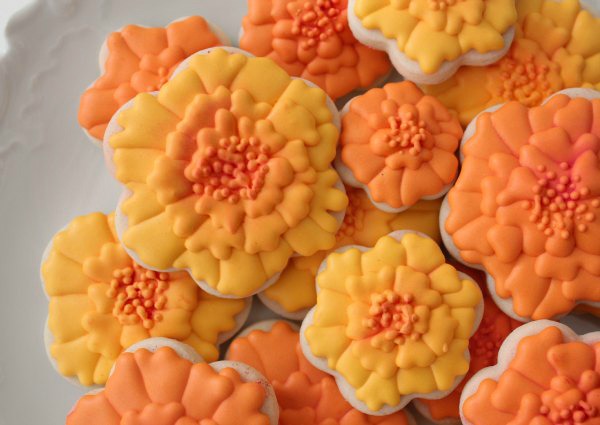
Pretty Marigold Cookies
This year instead of buying flowers from the nursery, the littles and I thought it would be fun to grow them from seed. It’s been really exciting for all of us to watch them grow. All of the flowers are doing well, but none so much as the marigolds. They aren’t quite ready to bloom, but while we are waiting I thought it might be fun to create a cookie version.
These are seriously the easiest cookies you will ever make. This may be the shortest supply list I’ve ever written.
To make these cookies you will need:
- orange or yellow 20-second icing
- pink petal dust
I started with a plain flower cookie. I used a cutter from this set, which is really really handy. The key to this cookie is patience. It’s all about the layering and drying. Begin by adding the first layer of petals to the cookie. I used a #2 tip.
Notice the empty spaces between them? This is an important step in getting a realistic look. Let the first layer dry for 30-45 minutes then come back and fill in the spaces. See the dimension you get from adding the icing at different times?
 Let the first layer dry then repeat.
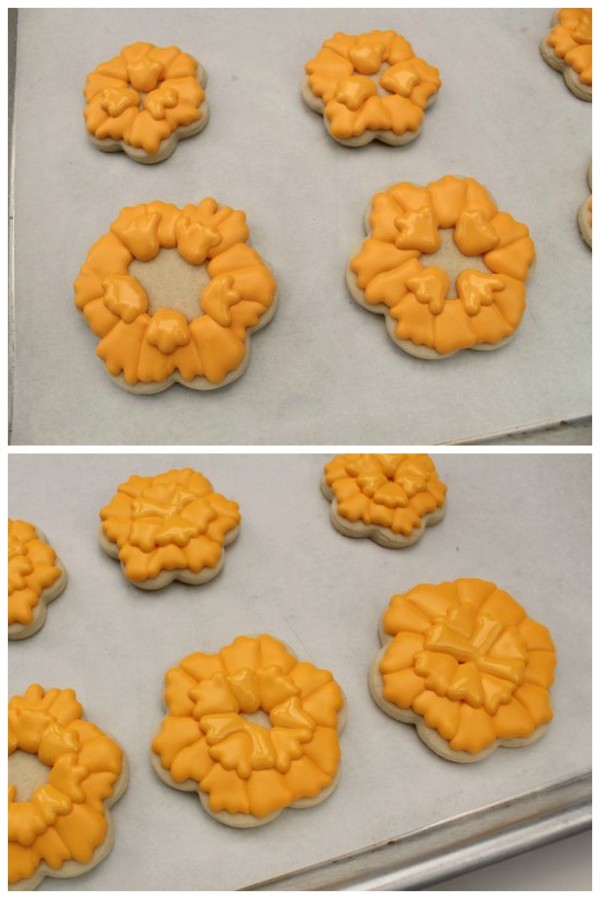 Let eah layer of icing set between applications and work toward the center until the petals eventually meet. For the sake of illustration I also wanted to show a side view of the cookie. All this layering might give the impression of a mile-high blob of icing on top of the cookie, but this is not the case.
 When the middle has dried, add a few dots using a small {about #1.5} tip. Give them a bit of drying time…are you noticing a pattern…and add a few more.
 This is when you REALLY let them dry! And by dry, I mean dry. Like overnight or something.
 The next day, use a paintbrush and apply a little petal dust to the middle of the marigolds. This is optional, but I think it really adds a lot.
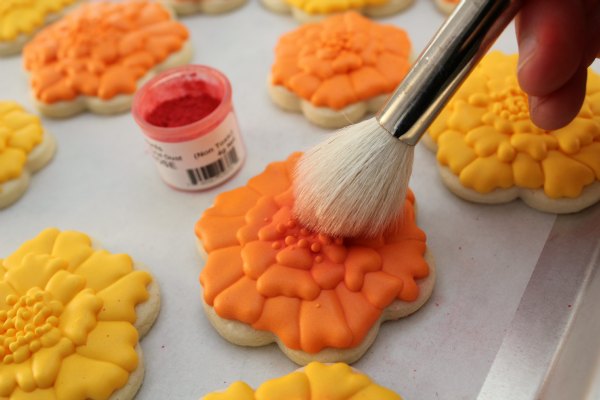 These are what I call laundry day cookies because you can do a lot of folding during drying time.
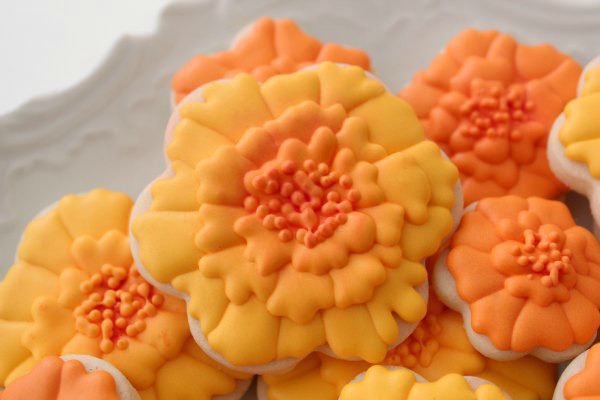 I’ve always liked marigolds, but after this summer they will always symbolize a very special memory for me.
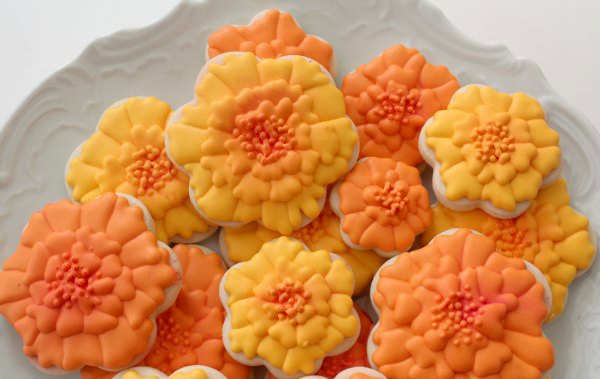 Marigold cookies are also the perfect accent for Day of the Dead sugar skulls. If you would like to see a sugar skull tutorial, click here.
Have a great week, everyone!


sooo very cool!
Well done 🙂 I love the creativity!
hugs
Betty Bake
I love the layered look! It looks like it would have been hard but you make it so easy. When I first saw the picture of these marigolds, I wonder how you did the center. I thought it was airbrushed but the petal dust is perfect! You are so smart!
These are adorable!!!!
Beautiful cookies. I don’t comment often, but I do love your work. I was a baker by trade for about a dozen years. I loved decorating cookies and cakes. If my quilting didn’t take up all my spare time, I would be inspired to decorate again by your beautiful work. Thanks for what you do.
So pretty! Super nice touch with the petal dust, really makes them stand out.
So lovely! Now, if I could only get the hang of 20 second icing… 🙂 Still working on getting those perfect consistencies!
These may be good for Day of the Dead!
Beautiful! My little ones and I planted from seeds this year as well…but basil and scallions make less pretty flowers 😉 hehe
Love the pretty petal dust and the centers are perfection. The layers make it just pop like a real marigold…beautiful,sweet Callye:)
So pretty! Thanks for another great tutorial!
These are gorgeous Callye. Love the petal dust, really makes the cookies pop!
These are beautiful! You did an amazing job!
Absolutely adorable, Callye! You are such an artist!
oh my these are just BEAUTIFUL!!
love them!!!
love these!! i am grounded from cookies right now. my house is a disaster!
i love the way the texture turned out.
i am grounded from cookies right now. my house is a disaster!
Love these! I didn’t know they were easy to grow… like that!
So pretty!
lovely as always!
These are so pretty, Callye! What beautiful spring cookies.
What tip did you use for the petals?
I used a #2
Oh, looks not so complicate to make, of course, a lot of patient, but nothing so complicate right? Just a quick question, what tip or technic did you use for the petals?
I love these! I might have to make some for my daughter’s birthday – she will get cake of course but now there must be cookies too 🙂 Thanks for the tutorial Callye!
So beautiful!! Plus I love you sense of humor :o)
Good to see you, Yamina =)
I’m always following your awesome posts! :o)
I tried your design and was thinking of using my new airbrush instead of luster dust… but didn’t quite succeed! Beside the tiny flower that litterally went flying off my hand and landed on an other that was drying, mine have a weird look! hehe
I’ll have to study your tutorial more carefully!
Hi Callye – thanks for the post. This is an interesting technique and I have a question. Looking at the second layer onward, it seems that the petals lay both on top of the previous layer and hang down towards the middle. Even with 20 second icing, wouldn’t the icing tend to flow to the lowest point (i.e., the middle) leaving a very thin top part of the petal and a bit more ‘blobby’ bottom of the petal? (Does that make sense?) Your petals seem to not have any flow issues, but it did make me wonder if it (1) could be an issue, and (2) what you would do to forestall that?
Thanks!!! 🙂 Laura
I know exactly what you mean. It’s all about consistency. When I say twenty-second icing, it can actually be a range of somewhere between 15 and 20 seconds based on what I want it to do. 15 lays flatter and would be more likely to flow, where as 17-20 will flow a little and meld when touching, but it tends to rise…like it has a little lift, if that makes sense, like it stacks? This is one of those cases where consistency can make or break you. It has to be absolutely between outline and flow so it will be as easy as possible. It just takes a bit of practice. I still goof on this from time to time. Thinning with a spray bottle or adding a little sugar can fix it. Does this make sense? Let me know if I answered your question…
Thanks Callye! So, it sounds like no problems, really, when you stick to a real 20 seconds for the icing. I appreciate your taking time to detail this a little more and sometime soon would like to give it a try. 🙂
Yet another great tutorial making it look so simple. I look forward to all of your step-by-steps and am grateful for your willingness to share your passion and talent for cookies. You rock!!!
Wonderful! I agree, the addition of the petal dust in the center of the flowers makes a difference; it’s magical even. Can you tell I’m cookie obsessed? (;
Wow! These are awesome! I’m working on flowers to post on my blog and I’m glad marigolds are not on my list because I would never make any thing as wonderful as yours.
So pretty! Thanks for sharing.
How perfect for May Day!
Beautiful!
these are beautiful. Just in time for Mother’s Day. Thanks for another wonderful tutorial!!
I .love these cookies but what tip did you use
I used a #2 =)
Wow!! Beautiful!
I LOVE the addition of the petal dust! You are right. It totally MAKES the cookie!!
Very pretty, Callye! You get so much dimension when you layer like this, and the brushed center is the perfect finishing touch. They are certainly posies filled with sunshine!
These are lovely!
Pingback: Mingle Monday Highlights {April 30th} | Add a Pinch
very pretty
gorgeous!
You ‘re a genius and these are so pretty!
I love those, marigolds remind me of growing up for some reason.
Me too! My Nanny ALWAYS had them in her flower beds.
I can’t take my eyes off these cookies! So happy, gorgeous and bright!
Gorgeous!! Definitely a cookie I can make 🙂
Pingback: Tropical Flowers for Paige's Summer Bridal Shower | Make Me Cake Me
Pingback: Day of the Dead Sugar Skull Cookies
these look awesome girl!
These are beautiful!
This might work for Carnations too…I will definitely try it in pink.
These are gorgeous–you are so talented!
These almost look too good to eat!!
These are just gorgeous. Your tutorials are so thorough. Thanks so much for sharing!
Pingback: Decorating cookies without a steady hand « Home Schooled Baking
Me encanta!!!
Soy mexicana y creo que logras captar la artesanía de nuestro país en el día en que celebramos a nuestros muertos con todos los elementos tradicionales que tenemos.
Muchas gracias por compartir!
Viva México!!!!
These are really lovely! I doubt I’d have the patience for them though. That petal dust really makes them stand out.
I love the yellow with the blushing pink center. Simple enough for even an icing klutz like me to accomplish. These will be great for Dia de los Muertos this year!
Pingback: Day of the Dead in Mexico — Projects & Links! | RambleCrunch | RambleCrunch
Pingback: Happy Birthday to My BFF Cookies - Eat, Think & Be Merry
Pingback: 25 Day of the Dead Party Recipes To Die For