Cute Little Scarecrow Cookies
Sometimes I feel a teensie bit guilty that I don’t have amusing stories to go along with my cookie posts.
I mean, I’m funny, I think…and I have interesting observations and tidbits. But what I don’t have is a talent for tying my kid’s weird habits into the cookies I made that day. Which now that I think about it, may be just as well for you guys.
To be perfectly frank, a lot of the things that I think are funny are just…NOT THAT FUNNY!
So, to make up for my lack of humorous witticisms I try to distract everyone with cute cookie ideas. I hope it’s working!
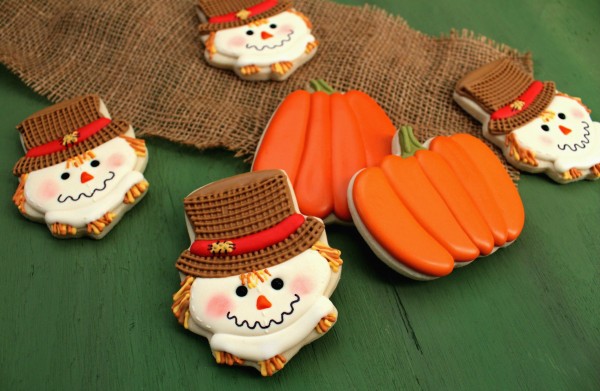
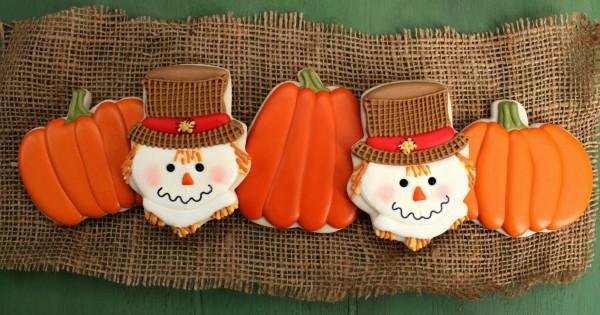
Today’s distraction is scarecrow cookies.
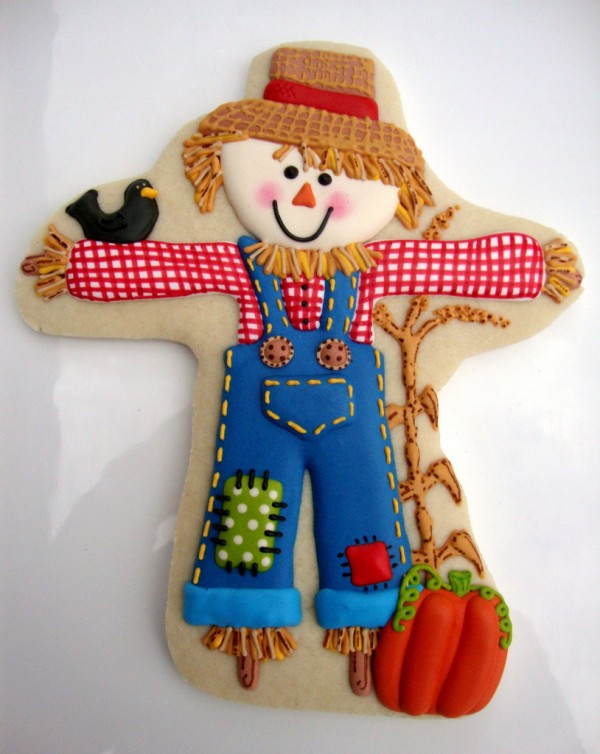
I made this scarecrow cookie last year as my entry in the county fair. Although I loved him, he was a lot of work. So, I wanted to re-create the same kind of cookie, minus all the hand cutting and color mixing.
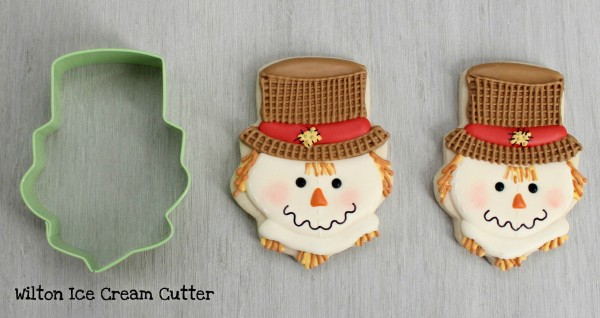
To make things easier, I used a cool little Wilton ice cream cutter from this set. This week has also taught me that it works GREAT for pilgrim cookies too. If you can’t get your hands on these, I have also used a cupcake cutter to make scarecrows as you can see HERE.
To Make These You Will Need:
- yellow piping icing {in between piping and 20-second consistency}
- tan piping and flood icing
- ivory 20-second icing
- black candy beads
- red 20-second icing
- a tiny bit of green and orange 20-second icing
- black food color marker
- pink shade of petal or lustre dust
If you aren’t sure what I mean by 20-second icing, click HERE for in in-depth explanation WITH videos!
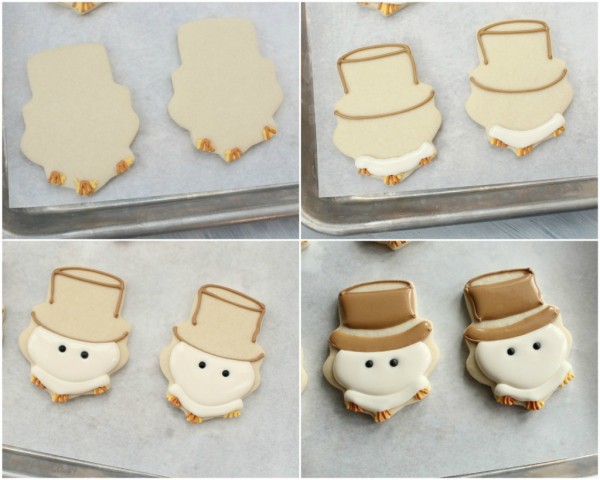
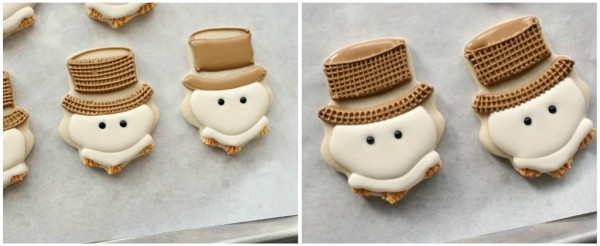
To begin, add little bits of straw around the neck area of the scarecrow. Next, outline the hat and add use ivory 20-second icing to add a “neck”.
Give the neck about twenty minutes to set and add the face. Immediately drop candy beads into the icing for eyes. Then fill in the sections of the hat as shown below.
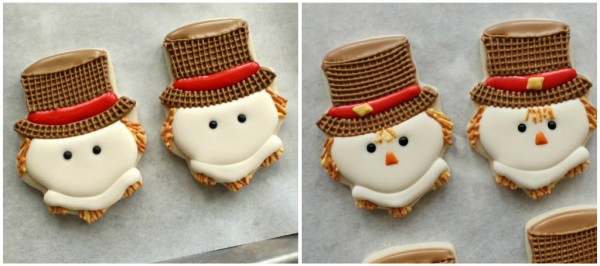
While the hat is still wet, use tan piping icing fitted with a small tip {#1.5} to pipe a straw pattern on the wet icing. Be sure to only work on a few cookies at a time. The piping icing will sink into the wet hat icing just a bit, and add texture and dimension to the cookie.
Next, use red 20-second icing to add a hatband, and when that has dried a bit, add a patch and nose. At this point the cookies will need to dry overnight.
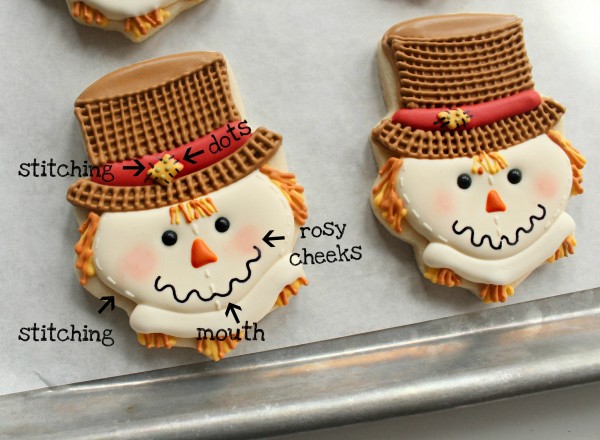
The next day, add the finishing details. You can do as few or as many as you like! If you aren’t sure how to create sweet rosy cheeks with petal dust, click HERE to learn how.
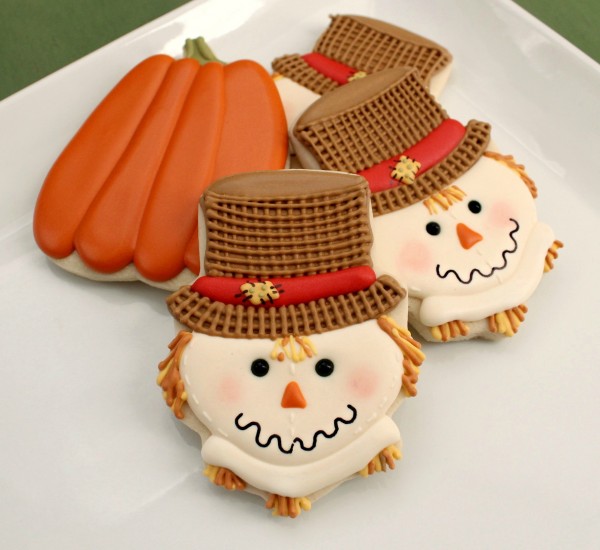
When you are finished, you’ll have a simplified version of my full-bodied scarecrow, minus hand cutting and custom cutters!
I love these guys!
Since I piddled around last week, this week is going to be a little fuller than normal. Besides a few more ideas from me, I’m also expecting a guest, that I know you will love, so check this SPOT!
Thanksgiving is ON THE WAY! Beside cookies, there are SEVERAL other wonderful treats to come. If you cannot tell my all of the exclamation points, I am very excited! I cannot wait to see what everyone comes up with.
Happy Baking, everyone!


You never cease to amaze me! Those scarecrows are darling!
wow!!!!!!!!!
Soooooo cute! The lattice on his hat is impeccable. I need to follow the link on how you do your cheeks, because mine always turn out terrible! 🙂 Perfectly adorable!
These are so cute!!
Have a nice day
I am in awe of your talent!
Callye, your talent just amazes me every time. Love the texture on the hats and all the detail. You are FABULOUS!!
Your talent never ceases to amaze me! Talk about a God given talent. I don’t know how you have the patience to do so much detail work. My hand cramps up and I am kind of over it after about a dozen or two! You are amazing.
I always want to give in and try royal icing when I see your cookies.
You are so talented! Love these!
They might be a simplified version of your gorgeous scarecrow cookie but even these are a lot of work!! Hats off to you for such a fabulous creation and thinking out of the box with that ice cream cutter (that I happen to have). Love, love, love!!
AMAZING! These scarecrows are absolutely adorable!! I love all the little details! And last year’s scarecrow?! WOW!
God, your good!
I’ve said it before… I’ll say it again… you are brilliant!! 🙂 xoxo
Precious! Love all the little details.
Fantastic as always. That full scarecrow is awesome. It would take me 6 days to make one, though!
You are so ridiculously creative! I always love checking out your website. Great ideas and inspiring posts – stories or not!
So creative. I have no idea how you think of these things!
He would make a cute snowman too!
Your entry cookie in the county fair is beyond amazing Callye. So much detail and so perfectly executed. These little scarecrow heads are no less so. I just love how you recreated the burlap material in their hats.
I was soooo hoping you’d teach us how to do the scarecrow!! I fell in love with yours from last year! So freaking cute!
These are so adorable. I love the little scarecrow, his face is the sweetest thing I ever did see. The pumpkins are awesome! I tried the ones you posted about Jack o’ Lanterns and liked them a lot, but I didn’t get a smooth finish as yours. In some areas the icing dipped in. Is there a reason for this? Do you think I needed to make the icing thicker? I think mine was about 10-12 seconds. I must admit when I do 20 seconds I get afraid that it won’t blend in and become smooth and end up second guessing myself. Thanks for any advise you can give
Hannah
Callye, you are so amazingly talented and awesome that you could not say one word and everyone would still love you! I do think you’re funny, though (and sweet and cute, too) 🙂 Love these adorable little scarecrows–like I’ve said before, I wish I had half your creativity!! I don’t have this cutter….do you think an upside-down cupcake would work??
OK, so you can post 20,000 steps of How-To-Do it but nobody would be able to get this detailed, creative and beautiful result as you did… as always!!! Way to go!
BTW, I have new batch of dough waiting for me to create some turkey cookies for my daughter’s day-care 🙂 I’m hoping for good….
Wow- that is amazing. Both this year’s and last year’s are very impressive!
These are seriously too cute for words and the one you made fir the fair S.T.U.N.N.I.N.G!!!
I live the hat….it looks just like burlap 🙂 Nothing short of amazing as usual!!
****love not live :0)
SO GLAD you posted this! 😀 I am now on my way to the craft store to search for a ice cream cutter, i may be using my Santa Claus head instead though. He might work just fine, but on the other hand I really want to make ice cream cones next summer.. So off I go. Thank you thank you!
Sammantha
You’re such an artist! I love your Blog, you have plenty of interesting and positive things to say and I really appreciate how you break everything down step by step!
Amazing as usual Callye. Only YOU could take something as simple as bunnies and ice cream cones and turn them into little Thanksgiving works of art.
These cookies are super cute….and I love that you post a complete how-to for these. But, seriously, who has time to make these? The average person would spend a good half hour on just one cookie. I appriciate the effort – could you post a cookie that is cute, but that I (being of average cookie-decorating talent) could finish in less then 5 minutes?
You are just behond talented, I love all your ideas and tutorials. You are so bless with your talent, do not read awful comments, they come from people that don’t have anything better to do in life.
You are absolutely fantastic. I wish we were about to give me some lessons. regards
Please write a book!!!!!
DEAR GOODNESS those scarecrows are amaaaay-zing! I’m totally wowed. YOU ROCK!
It seems almost superhuman to make such PERFECT cookies! So cute, Callye! I just love all the detail, and of course, that you used a cupcake cutter!?! Your 2010 scarecrow better have been awarded the blue ribbon!!! 🙂
I just adore your cookies and always look forward to your next post! Thanks ever so much for the fantastic tutorials, they are always a great inspiration to all of us ‘cookiers’. And yes, you do need to publilsh a book, it would be a definite best seller!!! Oh, and these scarecrow cookies are outstanding!!
too cute! You rock girl!
OMG! These are probably the cutest cookies I’ve ever seen you make. I’m just stunned. These are so perfect. I’m just not sure I have the patience to pull these off. And if I did them I would probably hate to watch people eat them. lol
Great job!
These are unbelieveable. So incredibly inspiring!
So awesome!! Callye you are amazingly talented! Such brilliant use of cookie cutters!
Oh Sugarbelle – these are spectacular! And BTW you know you’re the best don’t you??? Thanks!
Hi Charley!! ahhh yes sorry about not calling you Julia! but you have a great niankcme This whole idea of a new smk series is a bit shocking isn’t it!! I haven’t watched the video yet.. I’ll check it out.If you head over to the yuku forum, there are fans over there discussing this whole idea. I will believe it when it is officially announced.. or if KJ came out and confirmed it. but in the meantime, it is fun to dream! I have never read any of the virtual seasons so don’t really have any preconcieved ideas of what their future would have been like.. We’ll see I guess! Hey if there are more episodes coming.. I guess I better hurry up and get through the four seasons huh?!Byeee! so great to hear from you Charley!
OHHHHH — THE HATS!!!! i am absolutely, without a doubt IN LOVE with the hats!! And their little mouths! So creative and perfect!!! (And for the record….I only tell people stories to distract them from my cookies.)
LOL, I love you, you know that! Made me LOL! I needed that!
Dang, I envy your perfectness. Love the rosy cheeks! Gotta post on Edible Crafts 🙂
xoxoxo! Hope you’re feeling well! Thinking of you, Megs!
Those look amazing… you must be a patient person to do the detail work you do.
WOW!!! You are so amazingly talented…never cease to amaze me!!
These are amazing! I love them!!
Those are stunning. Your work is beautiful.
I don’t even know what to say anymore.
Inspiring.
The end.
Geez, Callye, the detail on these are just incredible!!! So cute!!
Stop distracting me with your cute cookies! Let’s get back to the subject at hand Ms. Callye! You are such a witty and hilarious person, it makes me laugh that you even wrote that you’re not. See? You’re funny! Okay… now back to being distracted: these are such incredibly cute cookies and your eye for cookie shapes blows my mind! I have so many cookie cutters and mostly I use my circles and squares. b o r i n g! Also you made me laugh when you said these were your “simplified version” 😀 I love that these are your idea of simple. ha ha ha
I loved!!! Great job. I love your cookies!!!
Greetings from Spain
This is not really the first of your reiwves I’ve find out, and you just never stop to impress myself. Thank anyone, and i also look forward to studying throughout future.
You really are a talented artist. I’ve started cookie decorating in the last few months, which makes me appreciate your talents even more! Thank you for sharing your creations and being an inspiration.
I don’t know what else to say but that you and your cookies are simply amazing!! Don’t you ever get tired of it? And who eats em all?? You’re awesomely talented 🙂
OMGoodness…those are “nearly” too cute to eat! 😉 They look amazing and delicious! I am in awe of the detail! Very nice! I have a party that I’d love you to share these at! http://theshadyporch.blogspot.com/2011/11/rock-n-share-wednesday-3.html
wow, love the details, so cute!
You are you, everyone loves your blog just the way it is. If all the blogs featured funny stories that tied into their snacks it would get really old really fast. So don’t think otherwise!
Love these cookies 🙂
Pingback: Celebrations Circle: Sweet Fall Harvest | Life of the Party
That is amazing!!! So did your entry win the fair? I would hope so! I love baking but when it comes to details, I go wild with my sewing. Check out my lastest project: http://eliana0204.blogspot.com/
I followed your tutorial for the scarecrows and thought you might want to see the results. Thanks for sharing the directions. Of course, they are not in your league but they were fun. I definitely know some things that I would change if I ever do them again.
http://www.flickr.com/photos/dianeop/6377357215/in/photostream
Awesome! thanks for sharing how you make your magic arlene Marie Pitts
You are an AMAZING artist!!! These are too gorgeous to eat – well, maybe just one little nibble!
Pingback: Sparkling Spiced Mulled Cider Cocktail - Bakingdom
Pingback: "Stuck" Santa Cookies!
that is beautiful. gosh…
Pingback: Celebrations Circle: The Best of 2011 | Life of the Party
Hi Callye, I hadn’t seen this I couldn’t get over the cutter, you’re so clever
Pingback: How to Make Leprechaun Cookies
Pingback: Make Cookies For a Tangled Party
May I ask where you got the pumpkin cookie cutters? (Both shapes) I’d love to create little gift bags this fall and give them out to friends and family (1 scarecrow/1 pumpkin), so I’m trying to plan ahead! 🙂 Thanks so much. I hope they turn out to be as beautiful as yours! I’ll be sure to post a photo of the finished product after following your tutorial.
I saw these while browsing one day and knew instantly I had to try. I made these for my co-workers on Black Friday (I work two jobs in retail and figured everyone could use a pick me up). EVERYONE loved them! You’re amazing! Thank you for the step-by-step for the people like me. I can make things taste good, but making them look good is a whole different story. 😉
(P.S– I send everyone who asks right back here to your blog.)
Pingback: Scarecrow Cookies | Ellie's Bites Decorated Cookies
I am really enjoying the theme/design of your site. Do you ever run into any browser compatibility issues? A small number of my blog visitors have complained about my website not working correctly in Explorer but looks great in Opera. Do you have any tips to help fix this issue?
Pingback: Scarecrow Cookies | The Sweet Adventures of Sugar Belle